
Document Editor
Just want to set up a sales tally receipt? There's a more focused tutorial
To set up a sales tally receipt specifically (with logo / bank account / WeChat payment QR code / Alipay payment QR code), see → Sales Tally Receipt Template Design and Payment Info Setup — done in 5 steps. This article is a detailed guide to the general Document Editor, applicable to multiple document categories such as purchase orders, stock-in orders, and quotations.
Overview
The Document Editor is a visual document template design tool built into Jenny Fabric Software. With it, you can customize the print format of all kinds of business documents—adjusting field layout, font styles, paper size, company logo, and more—so your printed documents match your company's brand image and business needs.
This article uses printing a sales order as the example to fully explain how to use the Document Editor. Once you've learned it, the workflow for common documents—purchase orders, stock-in orders, stock-out orders, etc.—is largely the same.
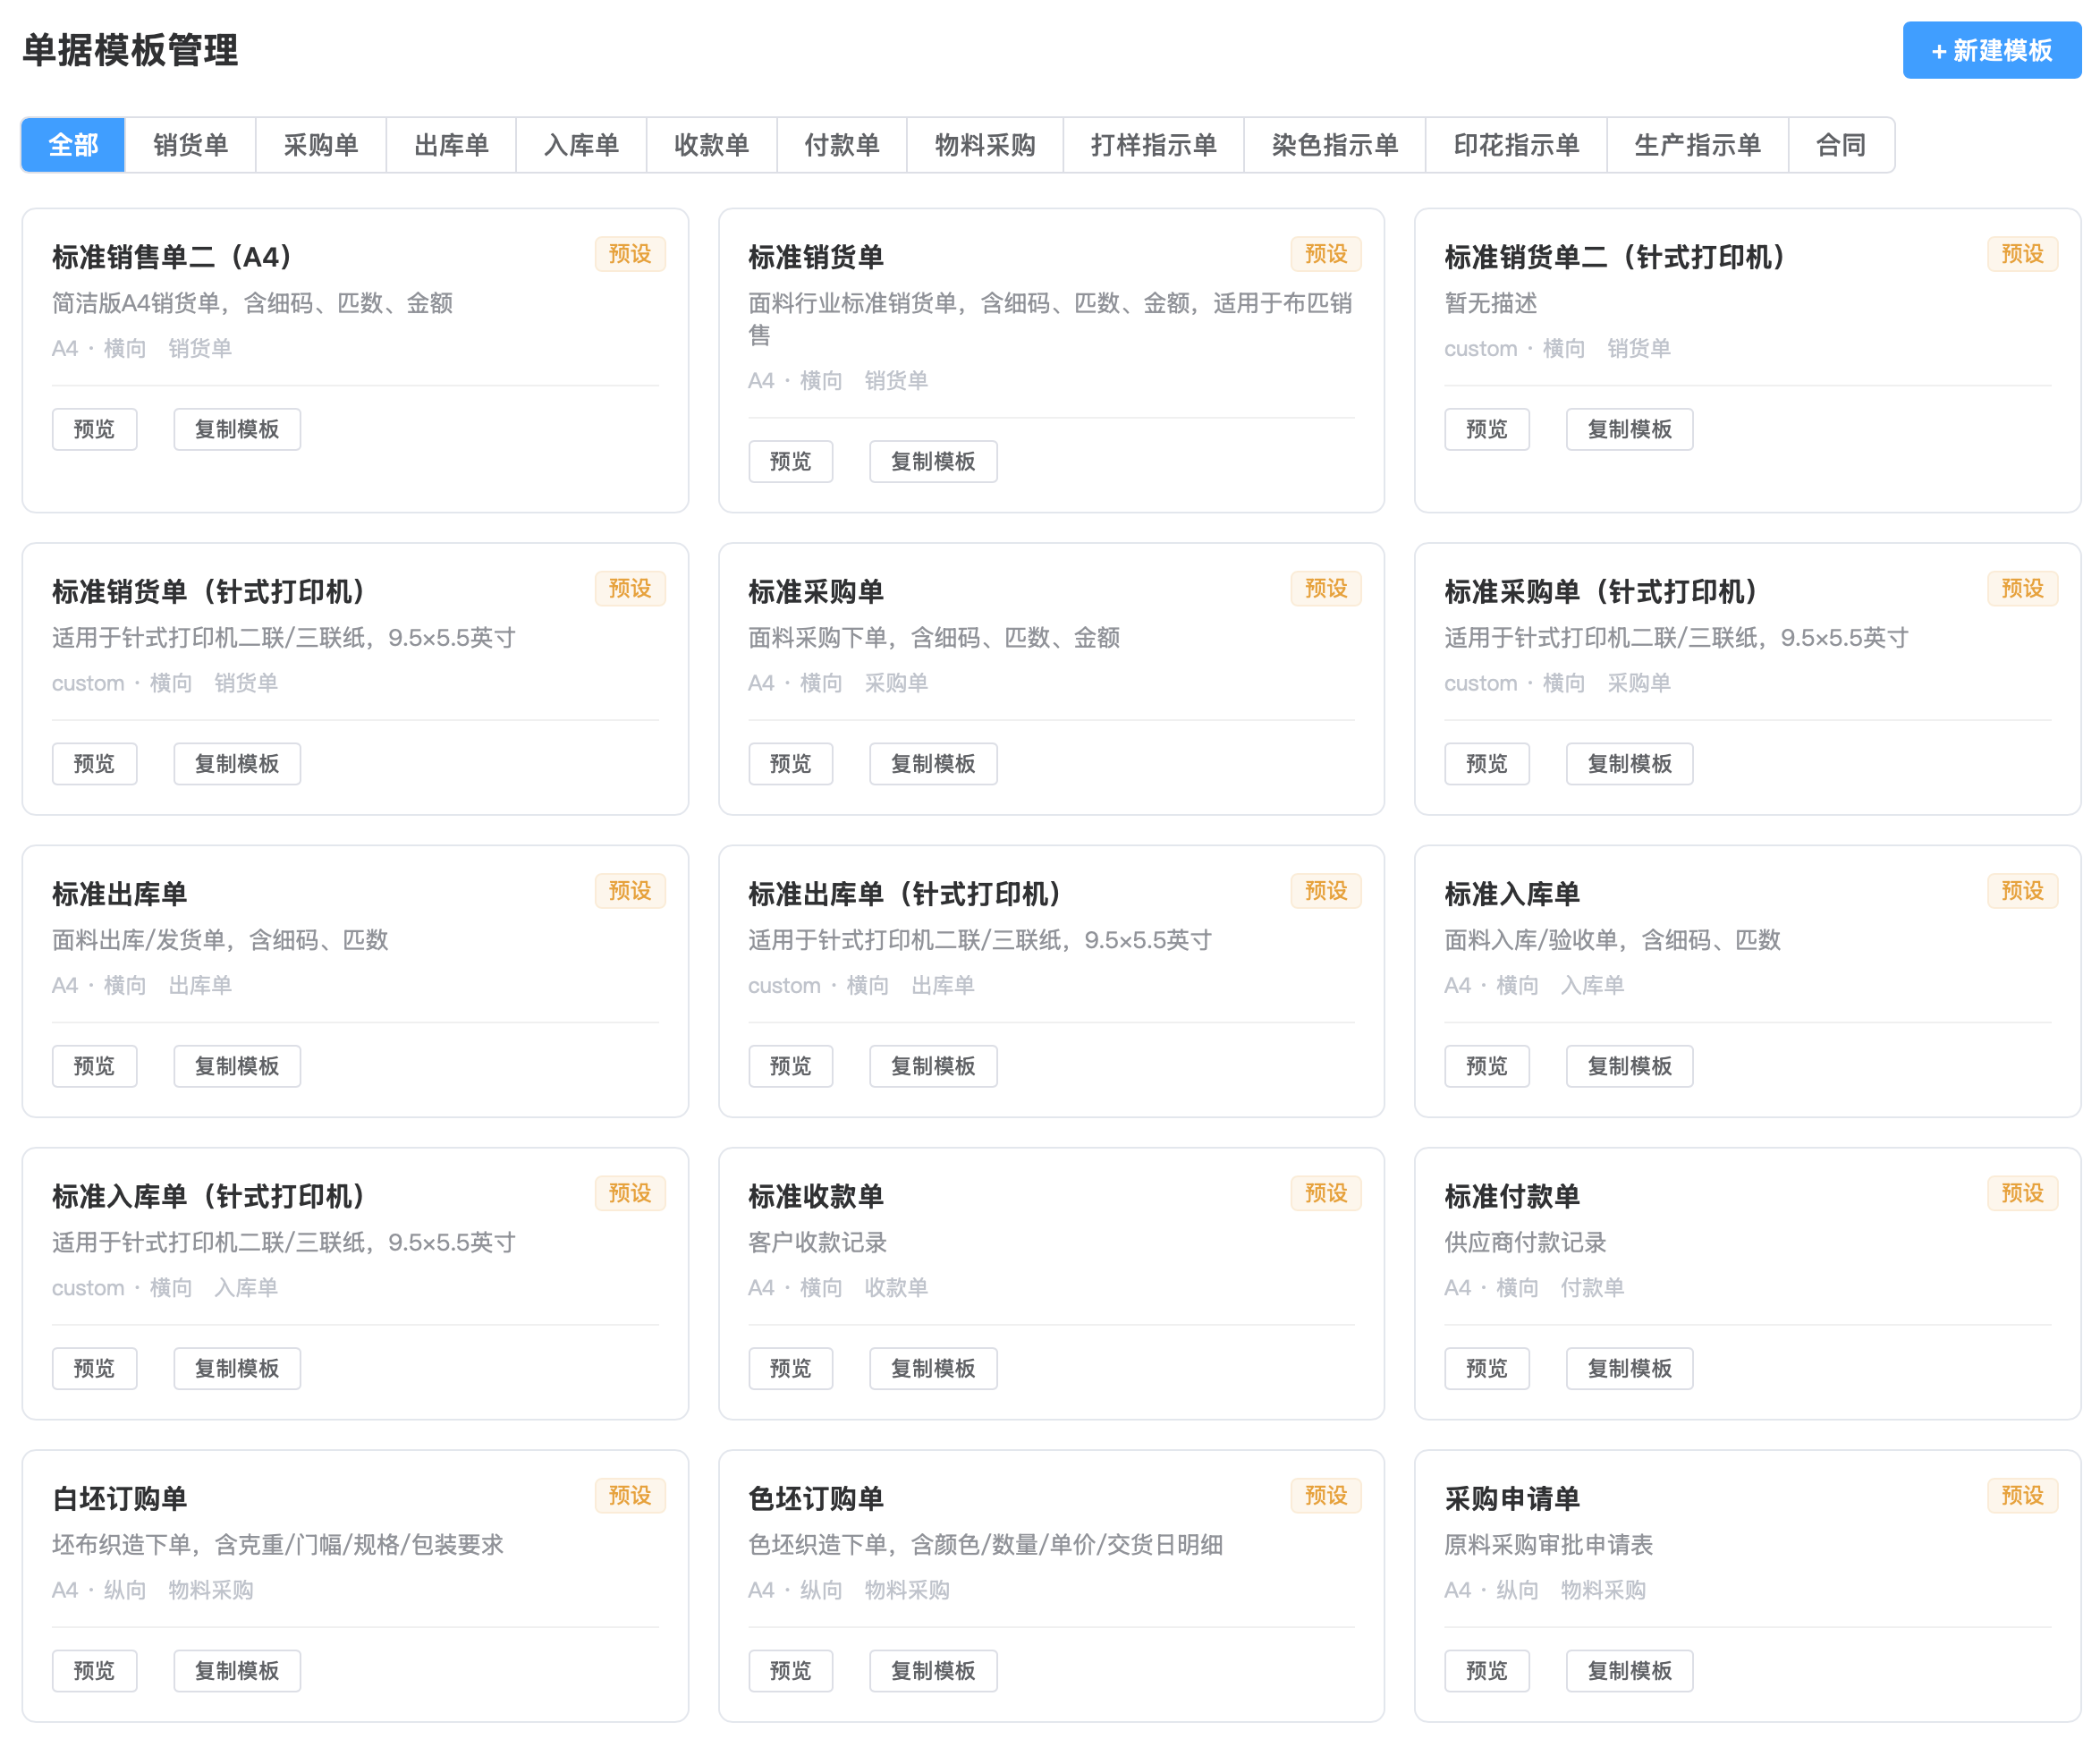
Supported document types
The unified entry displays templates by category. The categories visible to each company may vary by enabled modules and by the page entry used, so use the software's actual display as the source of truth. Common categories include:
Inventory-related
| Document type | Description | Related module |
|---|---|---|
| Sales order | Sales delivery voucher, the tally receipt given to the customer | Sales |
| Purchase order | Purchase stock-in voucher, for reconciliation with suppliers | Purchasing |
| Stock-in order | Stock-in record voucher | Warehouse → Stock-in |
| Stock-out order | Stock-out record voucher | Warehouse → Stock-out |
| Receipt order | Payment-received confirmation voucher | Funds Management |
| Payment order | Payment-made confirmation voucher | Funds Management |
Order-production-related
| Document type | Description | Preset template examples |
|---|---|---|
| Contract | Sales & purchase contract, sales order | Sales & purchase contract, textile sales order, PROFORMA INVOICE (export proforma invoice) |
| Material purchase | Purchase order for raw materials such as greige fabric, yarn, and accessories | Greige fabric purchase, accessory purchase |
| Material stock-in | Stock-in voucher after materials arrive | Material receiving record |
| Material issue / stock-out | Voucher for production material issue or dispatch | Material issue record |
| Material return / stock-in | Voucher for returned or leftover material stock-in | Material return record |
| Material stocktake sheet | Material inventory count record | Material stocktake |
| Sample-making instruction | Instructions related to sampling / color matching | Dyeing sample instruction, color-match notice, LD color-match sheet, color-point sheet |
| Dyeing instruction | Processing instructions sent to the dye house | Yarn dyeing process sheet, customer dyeing & finishing process sheet |
| Printing instruction | Processing instructions sent to the printing factory | Printed fabric instruction sheet |
| Production instruction | Instructions for each stage of the production process | Fabric production instruction, finished-product production instruction, outsourced processing instruction, finishing instruction |
| Packing instruction | Packing instructions before inspection, rolling, or shipment | Packing instruction, rolling/packing sheet |
Samples & marketing-related
| Document type | Description | Related module |
|---|---|---|
| Quotation | Template for quoting customers | Quotations |
| Sample dispatch order | Template for sample dispatch / sample sending | Quotations, Sample Dispatch Orders & Selection Orders |
| Selection order | Template for customer sample selections | Quotations, Sample Dispatch Orders & Selection Orders |
A rich set of preset templates
The system comes with a large set of industry-standard templates covering common scenarios in fabric trading and production. You can use a preset template directly, or copy one and customize it. For order-production pages that provide "Export Contract Excel" or "Export with My Template," follow the corresponding Excel-template workflow first.
Opening document template management
Where to find it: Left menu → Personalization Settings → Document Templates
After entering, you'll see this interface:
The interface has two areas:
- Category list on the left: document categories such as sales order, purchase order, stock-in order, stock-out order, receipt order, payment order—click to switch
- Template card area: all templates under the current category, each shown as a card with its name, description, and paper specification
- "Go to Online Editor" button in the top-right: opens the full editor at doc.jenny.cn, where you can create, copy, and edit templates
About template types
Each template card shows a type tag to help you distinguish them:
| Tag | Meaning | Editable? |
|---|---|---|
| Preset | A standard template built into the system | Can't be edited directly; can be "copied and edited" |
| Custom | A template you created or copied and modified | Freely editable |
| Default | The print template currently in use | Used automatically when printing on the business page |
Sales order example: the complete workflow
Step 1: Choose a template
- Open the document template management page (Left menu → Personalization Settings → Document Templates)
- Click the "Sales Order" category on the left
- View the template cards under that category
Each template card shows:
- Template name (such as "Standard Sales Order," dot-matrix printer version, etc.)
- Type tag (Default / Preset / Custom)
- Paper size and orientation (such as "A4 · Landscape," dot-matrix paper size · Landscape)
- Action buttons: Preview and Set as Default (the current default shows as Default Set)
To create, copy, or edit a template, click the "Go to Online Editor" button in the top-right to open the full editor interface at doc.jenny.cn, where you manage templates across all categories.
Step 2: Copy and edit a template
If a preset template doesn't fully meet your needs:
- Click "Go to Online Editor" in the top-right to enter the full editor
- Click "Copy Template" on a preset template, and the system copies it to your custom template list
- Open the visual editor to customize it
Step 3: Customize in the editor
The editor has three areas:
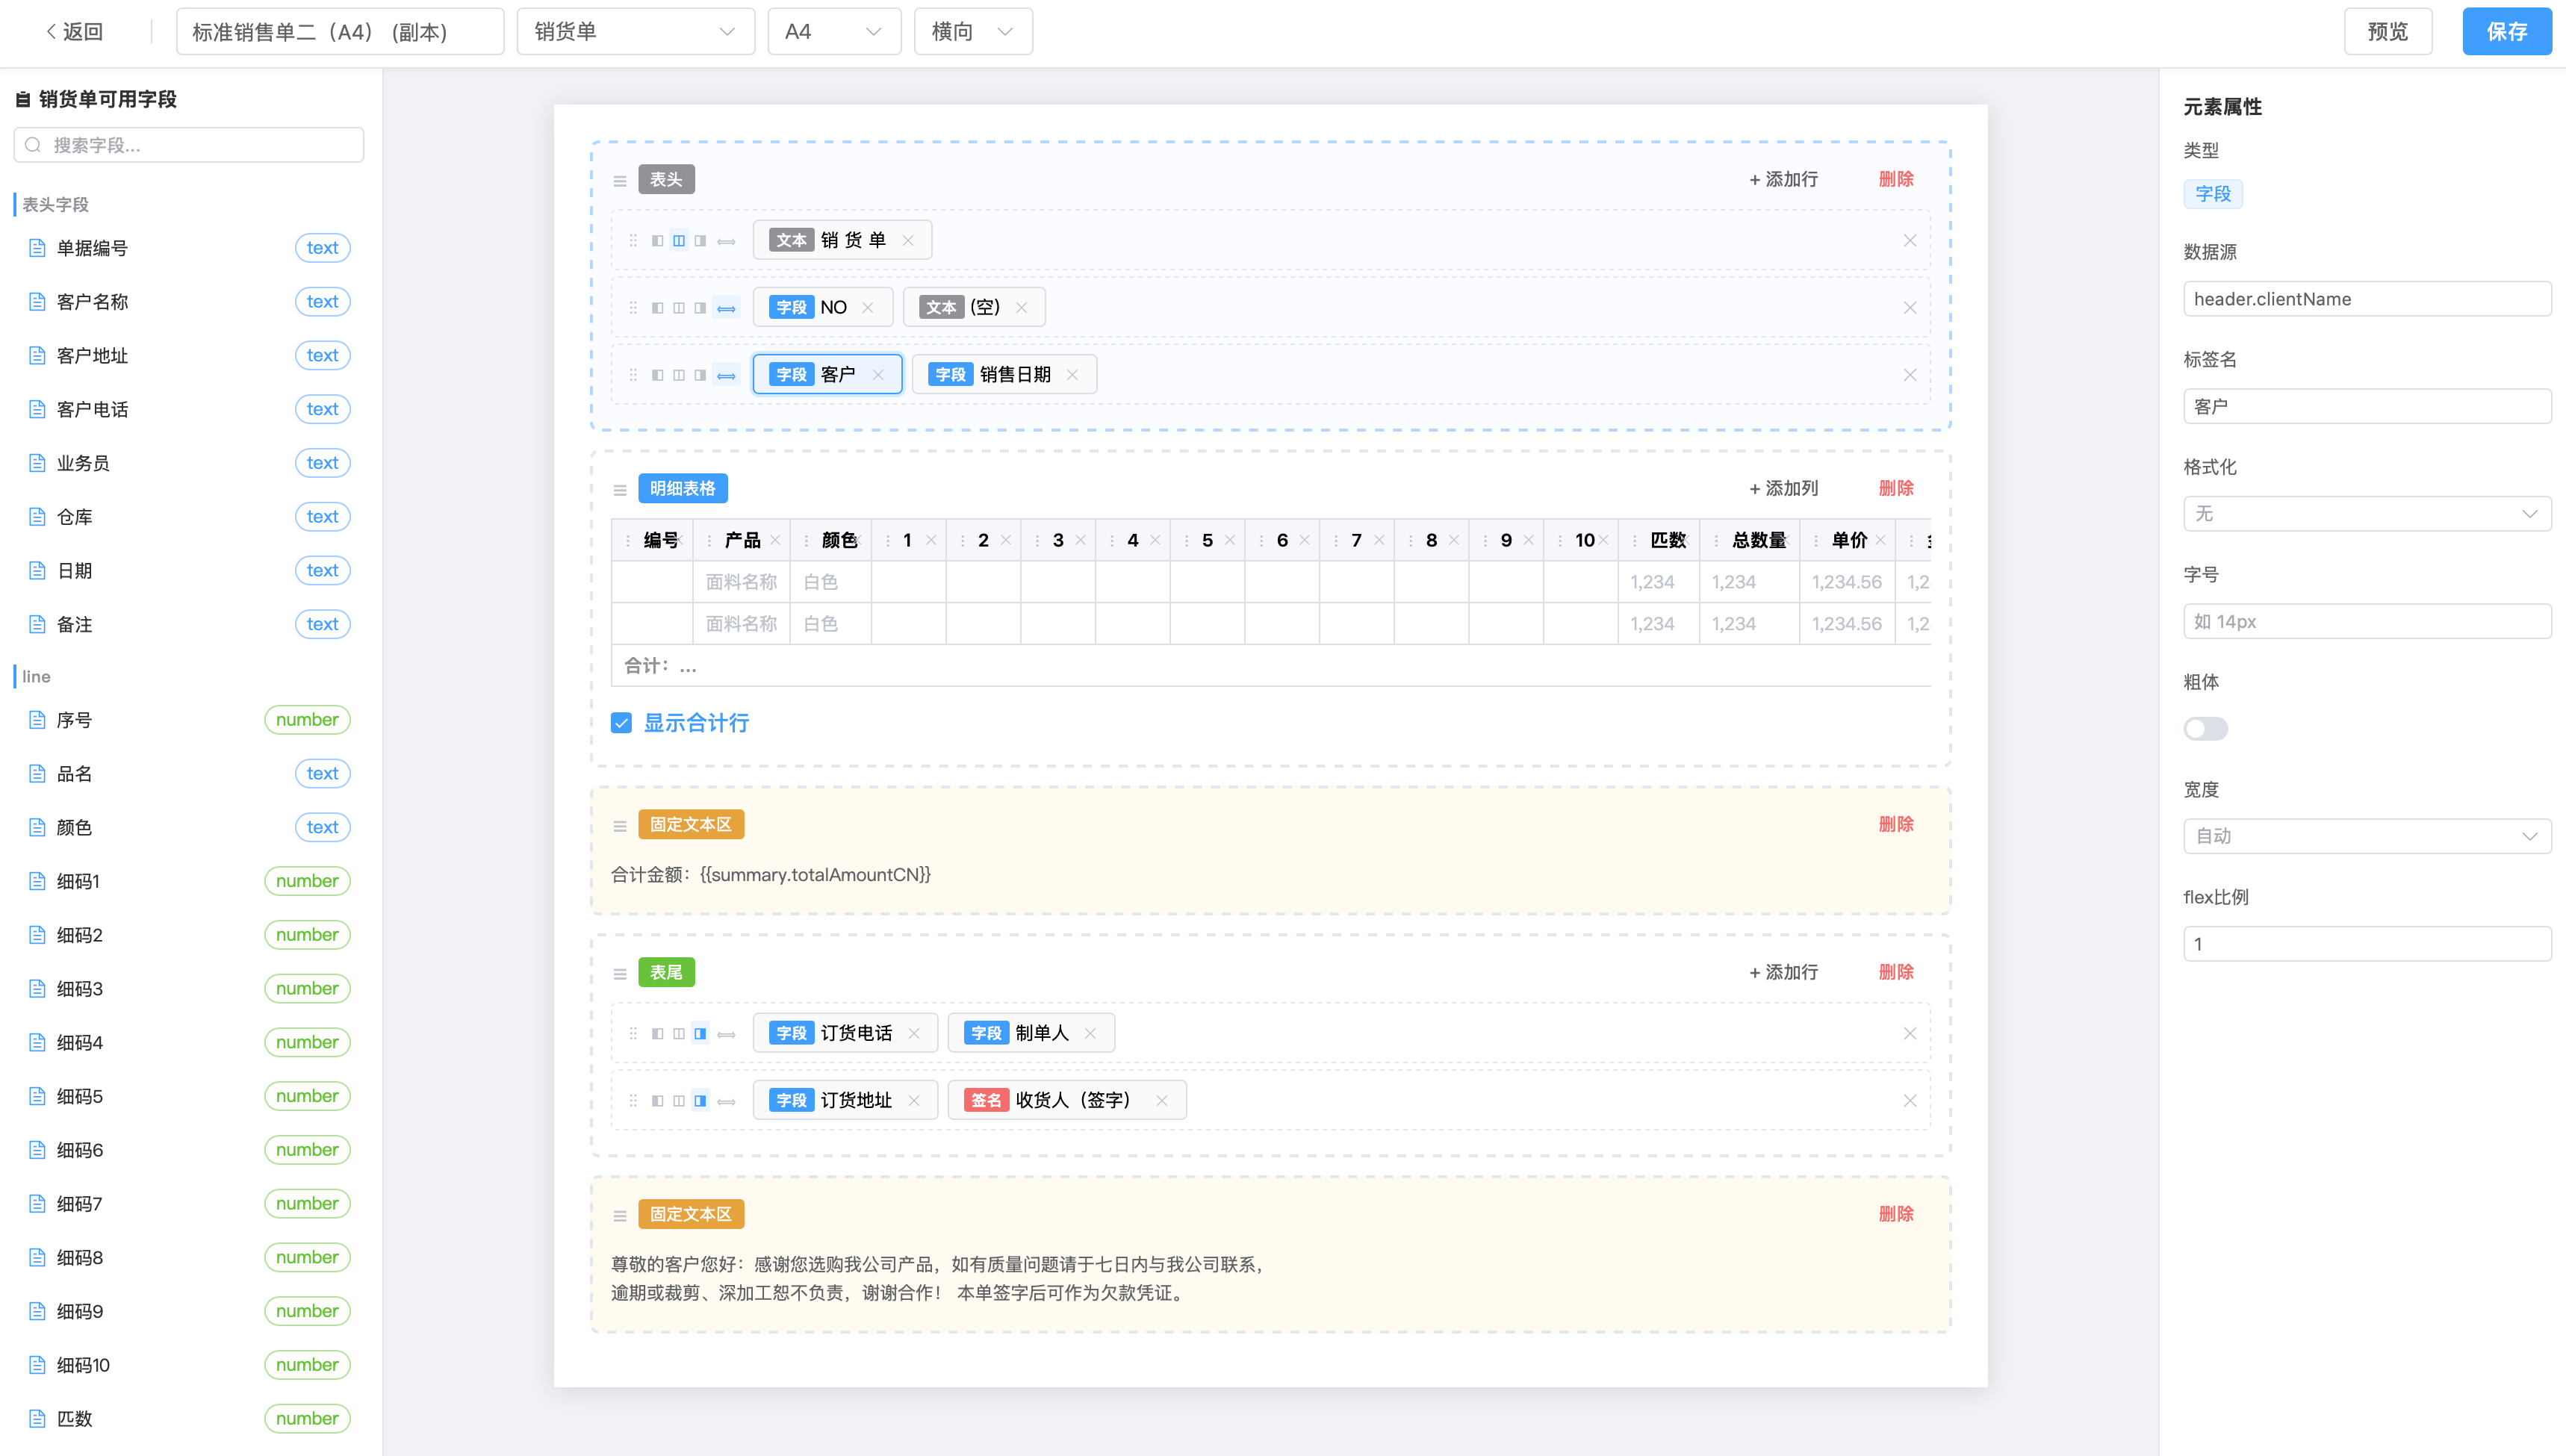
Left: Field panel
Lists all available fields, grouped by type:
- Header fields: company.name (company name), sales order number, customer, sales date, phone, address, etc.
- Detail fields: line number, product name, color, unit, detail code 1–10, roll count, total quantity, unit price, amount, etc.
- Summary info: total amount, total quantity
Each field is labeled with its data type (such as number); just drag it from the left into the template canvas in the middle.
Middle: Template canvas
A WYSIWYG template editing area, divided top to bottom into several editable sections:
| Section | Description | Elements you can place |
|---|---|---|
| Header | Document top information | Field labels (company name, document number, customer, date, etc.), text |
| Detail table | Product detail list | Columns can be added/removed (+ Add Column), supports detail code columns 1-10, automatic totals row |
| Footer | Signature area | Fields (order phone, prepared by, order address), signature slot |
| Static text area | Custom text | Total amount (with amount in words), notes, after-sales terms, etc. |
| Payment info | Payment method | Bank account info (company.paymentInfo), payment QR code images (QR code 1/2/3) |
Right: Element properties
After selecting an element on the canvas, the right side shows its property settings:
- Type: field / text / image / signature slot
- Data source: the bound data field (such as company.phone)
- Label name: the label text shown
- Formatting: number format, etc.
- Font size: e.g., 14px
- Bold: toggle
Bottom: Add elements & page settings
- Add elements: text, image, barcode, QR code, signature slot, static text area
- Page margins: top, bottom, left, and right margins (mm)
Step 4: Set as the default template
After editing, save, return to the template management page, and click the "Set as Default" button. From then on, when you click Print on the sales order detail page, the system automatically uses this template.
Step 5: Print in the sales order
- Open the sales order detail page
- Click the "Print" button
- The system renders the document using the default sales order template
- After confirming in the preview, print or export to PDF
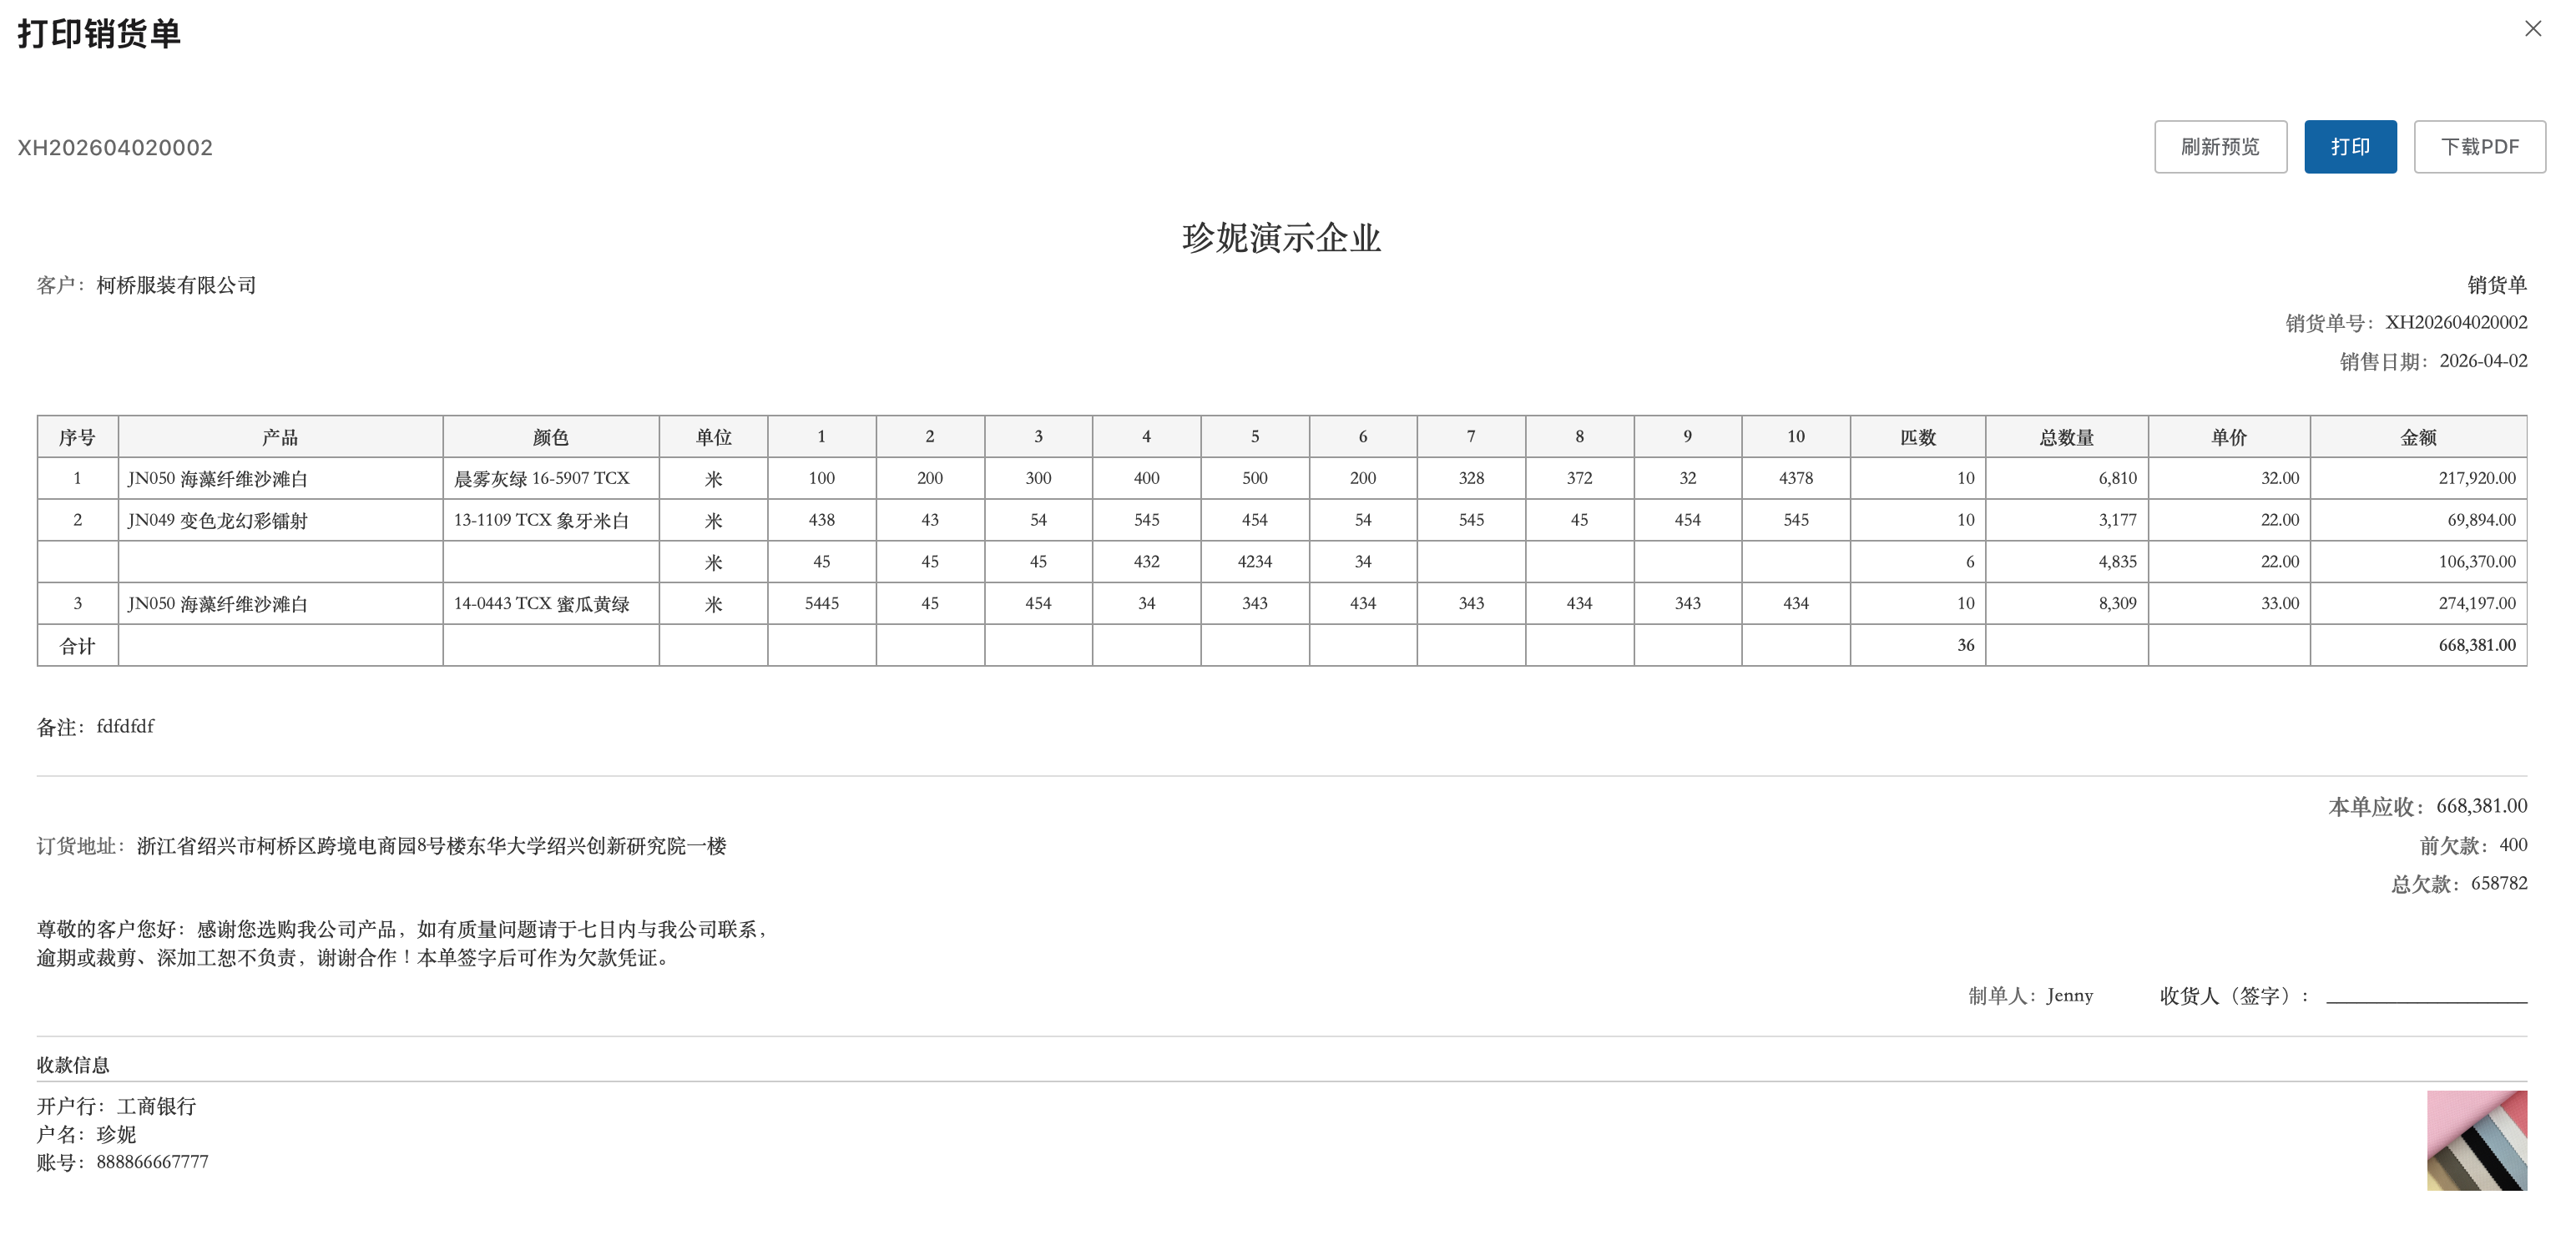
Adding payment QR codes and bank account information
Many fabric businesses want to show payment QR codes (WeChat/Alipay) and bank account information at the bottom of the sales order, so customers can scan and pay directly. Here's how to set it up:
Step 1: Enter your company's payment information
Where to find it: Left menu → Business Operations → Company Center → Basic Information
In the "Company Payment Information" area, you can configure:
Bank accounts (up to 5)
Each account requires:
| Field | Description |
|---|---|
| Bank | Bank name (such as "ICBC Hangzhou Branch") |
| Account name | Name of the account holder (company name or personal name) |
| Bank account number | The full bank card number |
Click the "Add" button to add a new account, up to 5.
Payment QR codes (up to 3)
You can upload up to 3 payment QR code images, typically used for:
- WeChat payment code
- Alipay payment code
- Corporate payment code
Click the QR code upload box to select and upload a QR code image.
Step 2: Enable it in the template
After entering your payment information, open the Document Editor:
- Find the "Payment Info" section at the bottom of the template canvas
- The payment info section automatically includes:
- The
company.paymentInfofield — shows the bank account text information - QR code 1 / QR code 2 / QR code 3 — shows the QR code images you uploaded
- The
- If the template has no payment info section, you can drag an image element in from "Add elements" on the left and set its data source to a payment QR code
Step 3: Preview and confirm
After saving the template, click print preview in the sales order to confirm the QR codes and payment information display correctly.
Tip
Once payment information is configured, every document printed with that template automatically includes it—no need to add it manually each time.
Available fields for sales orders
The following are the fields you can use in a sales order template (select them in the field panel on the left of the editor):
Header fields
| Field name | Data source | Description |
|---|---|---|
| Company name | company.name | Your company name |
| Sales order number | Automatic | Auto-generated document number (such as XH-20260402-0001) |
| Customer | header.clientName | The buyer's company/individual name |
| Sales date | header.date | The order date |
| Phone | company.phone | Your company phone |
| Address | company.address | Your company address |
Detail fields
| Field name | Description |
|---|---|
| Line number | Product row number (auto-numbered) |
| Product | Fabric product name |
| Color | Fabric color |
| Unit | Unit of measure (meters/kilograms, etc.) |
| Detail code 1–10 | Independent meterage/weight for each roll (10 columns total) |
| Roll count | Number of fabric rolls |
| Total quantity | Total meterage/weight for that line |
| Unit price | Sales unit price |
| Amount | Amount for that line |
About detail code columns
The detail table provides 10 columns, detail code 1–10; for most fabric businesses, 10 columns is plenty. You can delete the detail code columns you don't need in the editor to keep the table compact.
Footer fields
| Field name | Description |
|---|---|
| Order phone | The customer's contact phone |
| Prepared by | Name of the person who created the order |
| Order address | The customer's delivery address |
| Signature slot | The "Recipient (signature)" signature area |
Summary fields
| Field name | Description |
|---|---|
| Total quantity | The total quantity of all products |
| Total amount | The total amount of all products (also supports the amount in words) |
How to work with other documents
Purchase orders, stock-in orders, stock-out orders, receipt orders, and payment orders work exactly the same way as sales orders:
- Switch to the corresponding document type on the template management page
- Copy a preset template or edit a custom template
- Set it as the default
- Print on the corresponding business page (purchase order detail, stock-in order detail, etc.)
The available fields differ by document type—for example, a purchase order's header has "Supplier" instead of "Customer"—but the editor works exactly the same way.
FAQ
If I modify a template, will previously printed documents change?
No. Documents already printed or exported are unaffected; template changes only apply to subsequent printing.
Can I have multiple custom templates at once?
Yes. Each document type can have multiple custom templates, but only one can be set as the "default." The default template is used when printing.
Will preset templates be updated?
The system may add or improve preset templates during upgrades. Your custom templates won't be overwritten.
What if the editor won't open?
The Document Editor opens in a new window, so make sure your browser isn't blocking pop-ups. If it's blocked, click the pop-up prompt in the browser's address bar and choose "Allow."
Related features
- Inventory Management Explained — learn about the sales, purchasing, warehouse, and other business modules
- Quickly Issue a Sales Tally Receipt — order-issuing and printing tutorial for wholesalers
- Label Printing Setup — fabric roll label template design (different from the Document Editor)
- Thermal Label Printer Setup — printer connection and configuration