
Inventory & Sales in Detail
The Inventory & Sales module is the core business function of Jenny Fabric Software, covering the complete transaction loop from purchasing to selling.
Module Navigation
Inventory & Sales sits in the left-hand menu and contains the following submodules:
| Menu item | Submenu | Function |
|---|---|---|
| Products | — | The spot-stock product library for Inventory & Sales (fabrics set to "Product" from the sample library) |
| Sales → | Sales orders, Sales returns | Create sales orders, manage returns |
| Picking | — | Process picking for sales orders, enter piece-level measures, and ship |
| Purchasing → | Purchase orders, Purchase returns | Create purchase orders, manage returns |
| Warehouse → | Stock-in, Stock-out, Transfer, Stocktake, Live inventory, Inventory ledger, Warehouse management | Stock-in/out documents, inter-warehouse transfers, physical stocktakes, inventory queries |
| Reports | — | Business analysis, statements, summaries, performance, and more (see Reports in Detail) |
Menu navigation
Menu items with a → arrow reveal a submenu when you hover over them.
Funds and invoices are under the "Finance" menu
Fund ledger, receipts, payments, other income/expense, invoice management, account adjustments, and opening data sit under a separate top-level Finance menu (not under Inventory & Sales). For convenience, this article covers the funds parts together here; for invoices, see Invoice Management. Document print templates have been unified under Personalization Settings → Document Templates (see the Document Editor).
1 Sales
What it does: Manages the full lifecycle of sales orders—from creating the order, entering piece-level measures, and picking and shipping, to collecting payment and settling.
1.1 Sales Order List
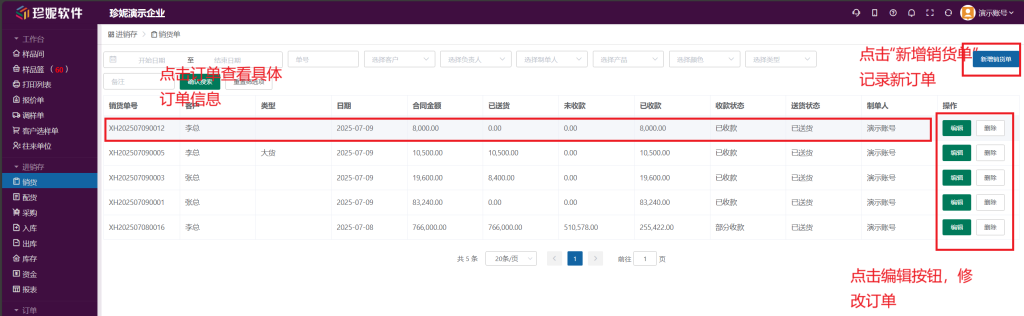
Click "Sales" in the left-hand menu to enter the sales order list page.
Filters:
- Date range (start date – end date)
- Sales order number
- Customer
- Owner
- Creator
- Product
- Color
- Type (Bulk / Meter sample)
- Notes
List fields: sales order number, customer, type, date, contract amount, delivered, outstanding, received, payment status, delivery status, creator.
- Payment status: unpaid (red), partially paid, paid
- Delivery status: not delivered (red), pending picking, picking, picked, partially delivered, delivered
1.2 Creating and Editing a Sales Order
Click the "New Sales Order" button in the top-right to enter the editing page.
Header info:
- Sales order number (auto-generated, format XS + date + sequence)
- Customer (required)
- Owner
- Type (Bulk / Meter sample)
- Sale date (required)
- Planned receipt date
- Delivery date
- Delivery address
- Default warehouse
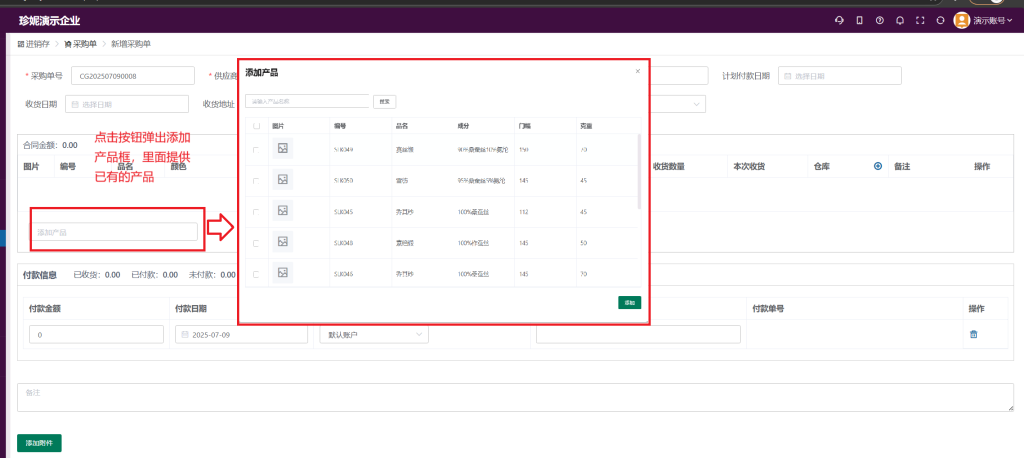
Product line items: Click "Add Product" to select products. The product selection dialog supports search by number, product name, and composition, and can be filtered by color:
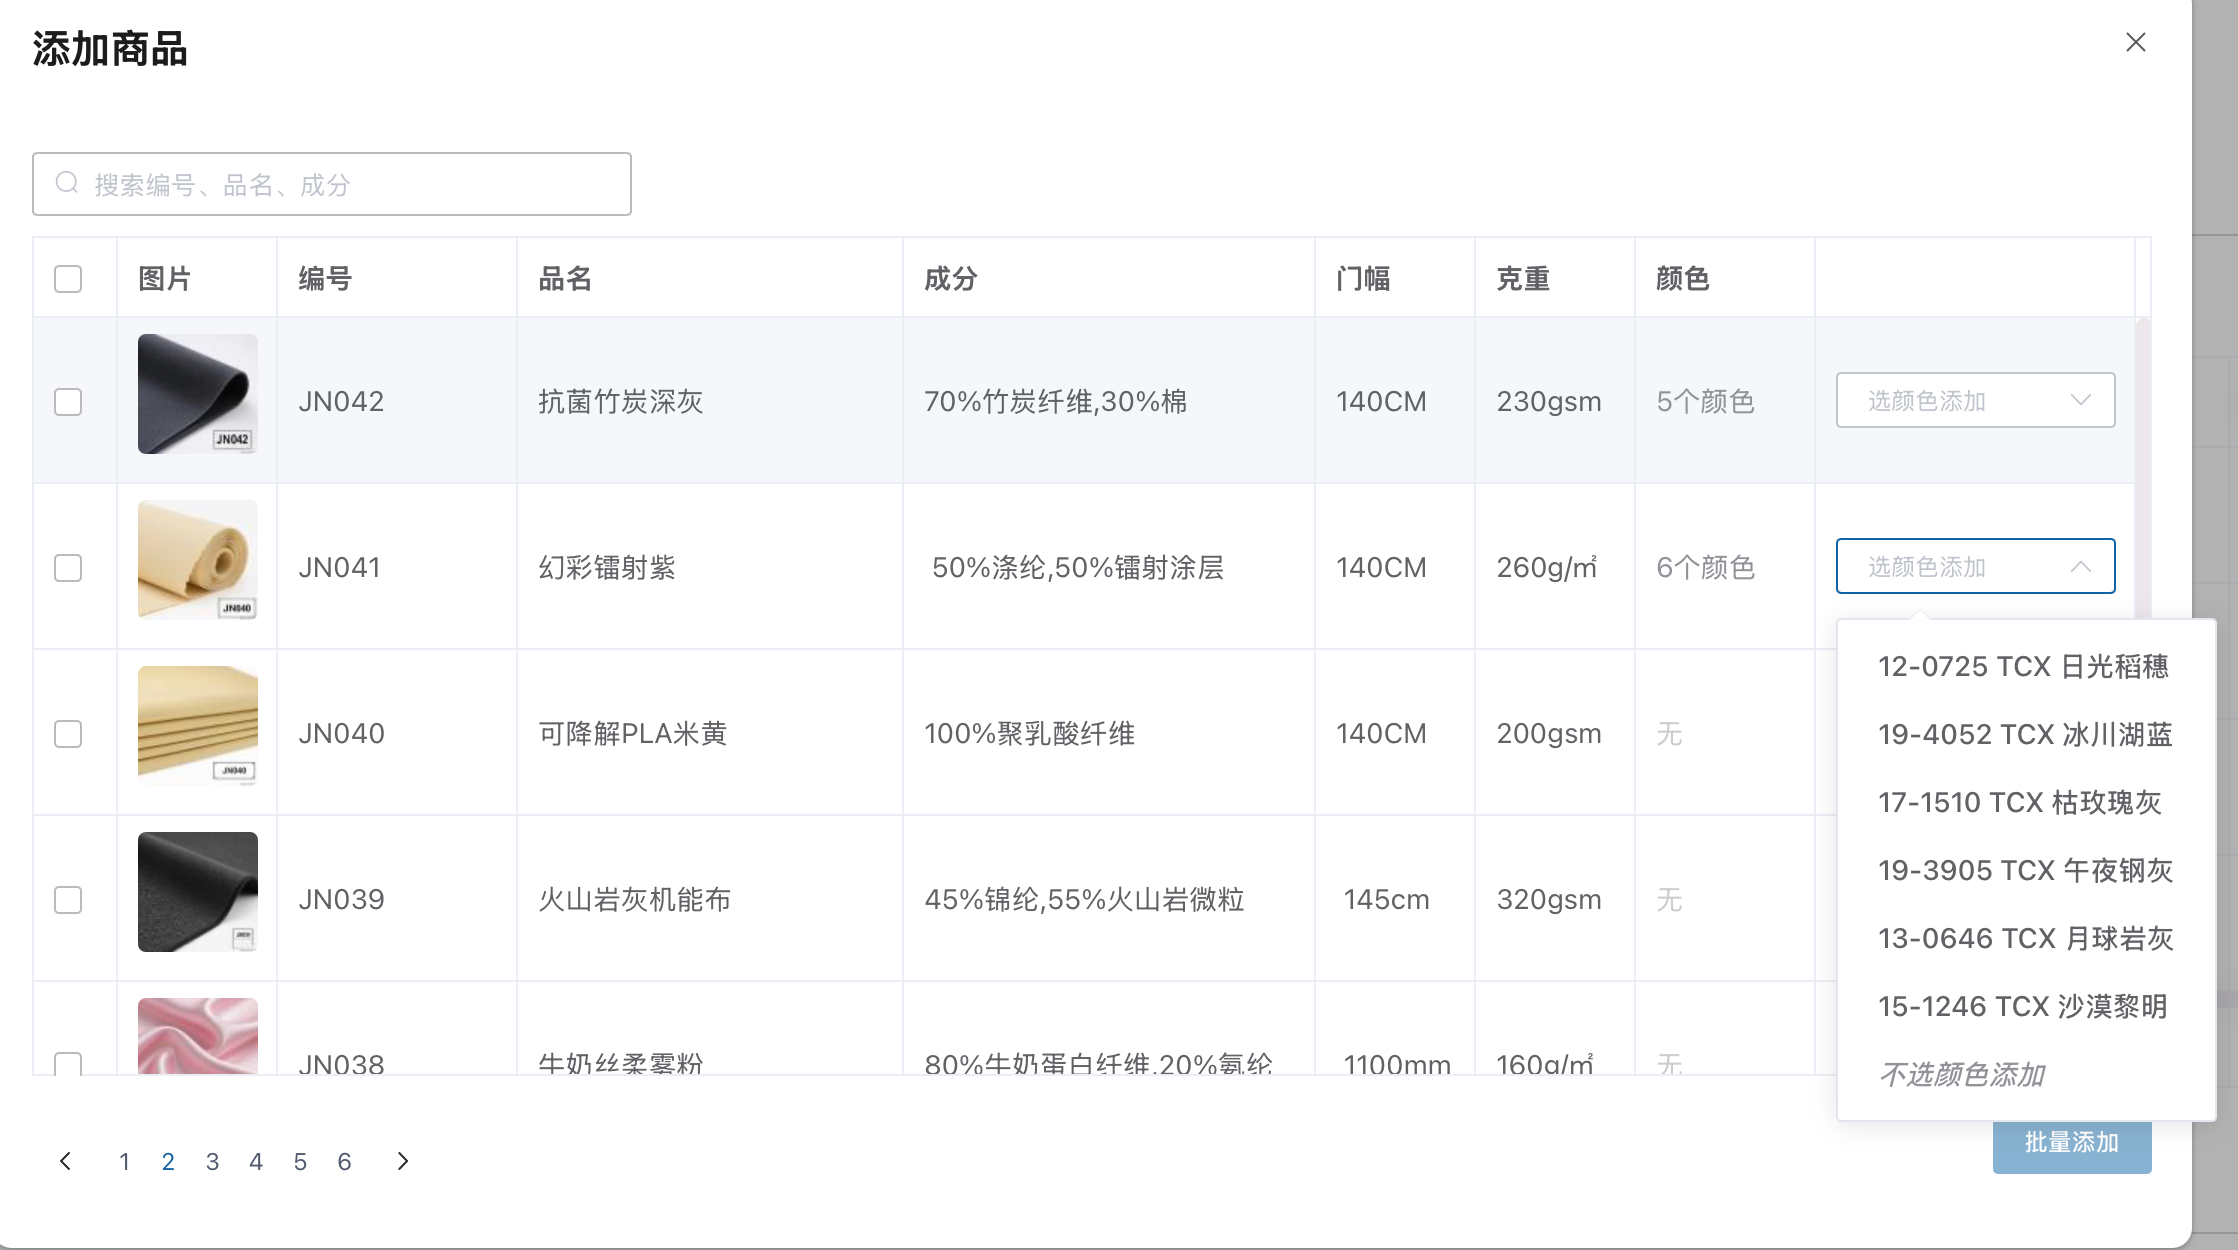
The system shows the following fields:
| Field | Description |
|---|---|
| Photo | Product photo thumbnail |
| Number | Product number |
| Product name | Product name |
| Color | Fabric color |
| Piece-level measures | Per-piece meter details for each bolt |
| Pieces | Number of bolts |
| Total quantity | Total meters/total weight |
| Unit price | Can be entered manually; when there's a transaction history, the system auto-recommends the last unit price |
| Amount | Calculated automatically (total quantity × unit price) |
| Delivered quantity | Quantity already shipped |
| This delivery | Quantity being shipped this time |
| Warehouse | Stock-out warehouse |
| Notes | Product notes |
Payment info: Below the product line items is the payment area, showing the delivered amount, amount received, and outstanding amount. Multiple receipts are supported:
- Enter the amount received and the receipt date
- Select the receipt account
- The system auto-generates a receipt number (format SK + date + sequence)
- Click a receipt number to view its details
At the bottom are "Save" and "Save and Print" buttons. Printing uses the default sales order template set in the Document Editor.
1.3 Negative Stock Support & Sell-Driven Purchasing
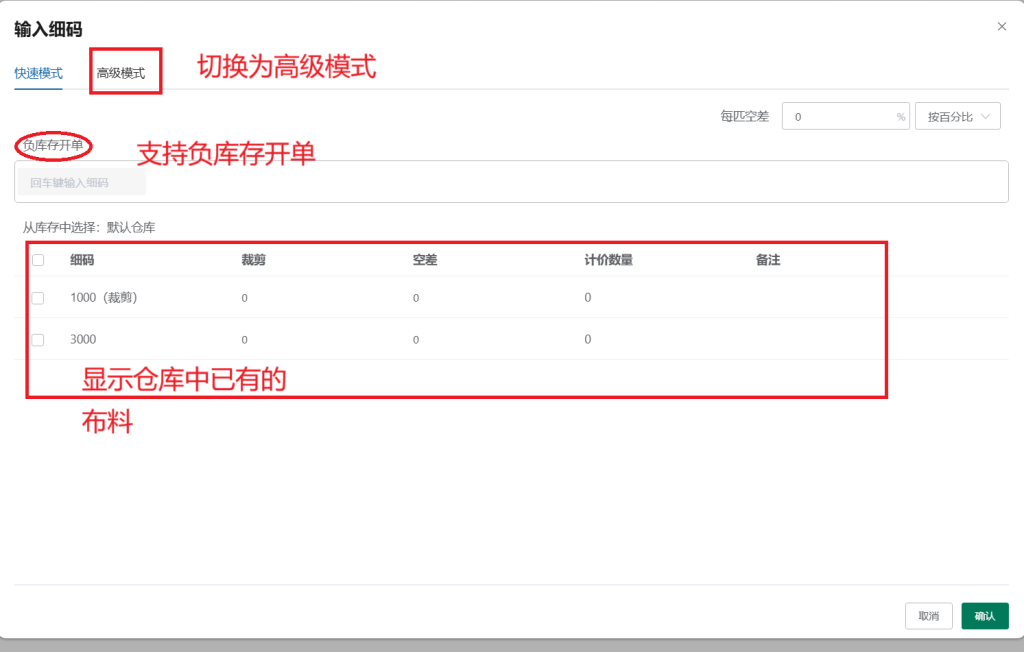
When stock is insufficient, the system allows issuing an order against negative stock—you sell the goods and issue the sales order first, and stock temporarily goes negative. This is common for sell-first, buy-later secondary wholesalers / traders: take the order and sell first, then place a purchase order with the supplier to replenish.
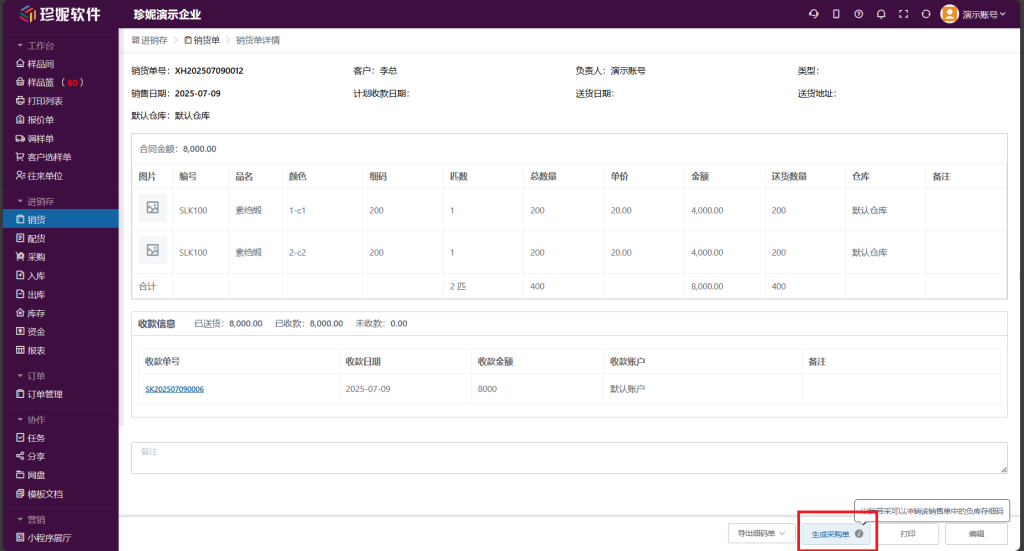
Sell-driven purchasing (generate a purchase order from a sales order): on the sales order detail page, click Generate purchase order. The system jumps to the new purchase order page and auto-fills the products, colors, quantities, unit prices and per-roll piece details from that sales order. You just add the supplier (the sales order has no supplier, so pick one manually), the purchase date, the salesperson, etc., then save.
Saving the purchase order offsets the negative stock automatically
Negative stock is cleared by purchase stock-in. Piece details carried over by sell-driven purchasing are automatically marked as "received"—the moment the purchase order saves successfully, the system replenishes stock by piece detail and the earlier negative stock returns to zero. There is no separate "confirm receipt" step to run. (Ordinary purchase orders created by hand are unaffected—they still stock in only after you confirm receipt.)
A few rules:
- Can't generate while picking: if the sales order is in "Pending picking / Picking" status, it is blocked—finish picking first.
- No duplicate purchasing: only piece details not yet claimed by another purchase order are carried over, so the same goods aren't purchased twice.
- Piece details can be merged: details from a negative-stock order and a standard-stock order can be merged into the same purchase order.
- Repeated saves don't stock in twice: the carried-over piece details share the same records as the sales order, so saving / editing the purchase order again and again won't add stock a second time.
- Deleting the purchase order lets you start over: delete a purchase order generated this way and its piece details automatically revert to "not purchased," so you can generate a new purchase order.
- The generated purchase order behaves like any other—you can keep adding / removing products and editing quantities / unit prices.
Suggestion
The first time you run this flow, after saving the purchase order go to Warehouse → Live Inventory and double-check the quantities, confirming that the negative stock has returned to zero.
1.4 Rounding
Sales orders support rounding—adjusting the trailing digits of the contract amount. For example, rounding 10,309.20 CNY down to 10,300 CNY makes it easier for customers to pay and reconcile.
1.5 Piece-Level Measures Hover Tooltip
On the sales order detail page, hovering over the piece-level measures column pops up a detail box that displays each bolt's details in a table, so you can review them quickly without entering the editing page.
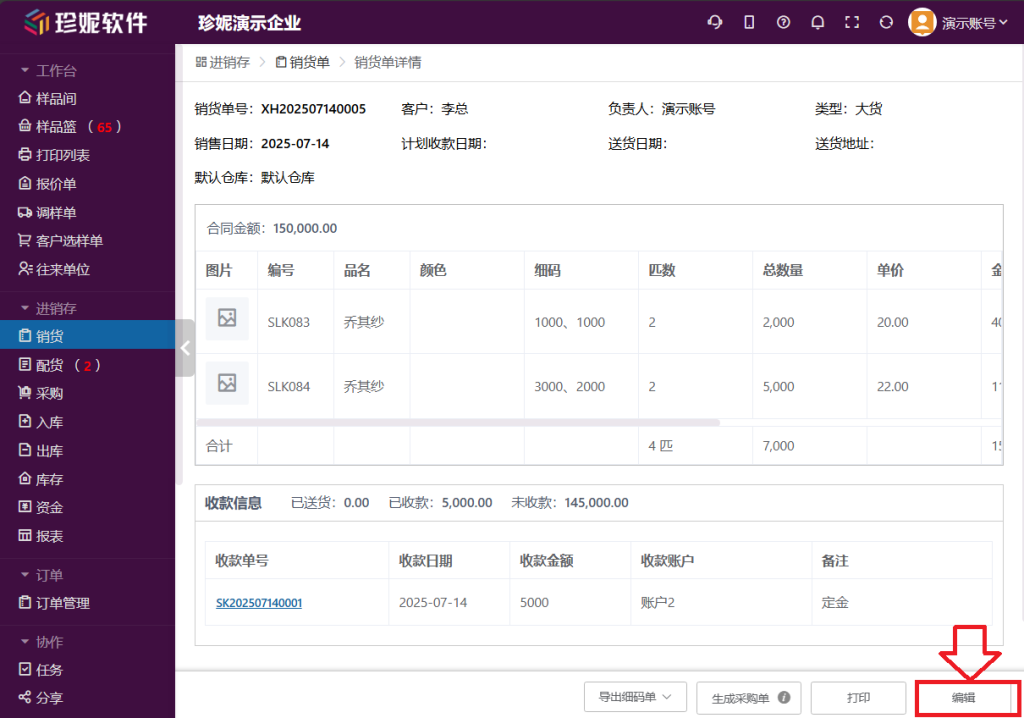
1.6 Sales Order Detail Page Actions
At the bottom of the sales order detail page are the following action buttons:
- Export tally receipt — export the piece-level measure details to a file
- Generate purchase order — sell-driven purchasing: quickly generate a purchase order from the sales order to replenish and offset negative stock (see 1.3 Negative Stock Support & Sell-Driven Purchasing)
- Print — print using the default template in the Document Editor
- Edit — modify the sales order content
1.7 Reporting for Picking
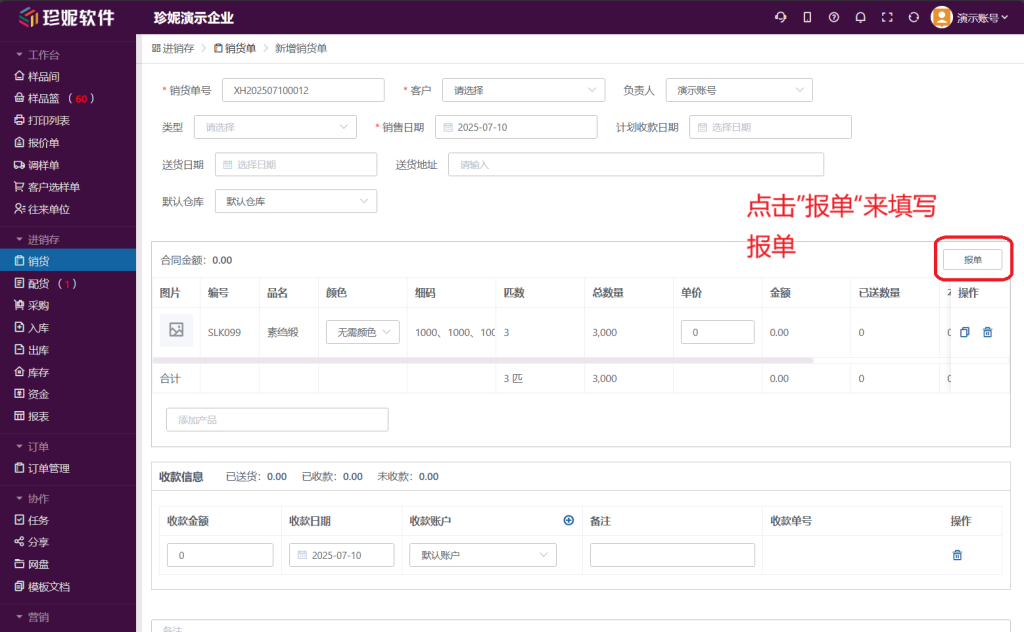
On the sales order editing page, click the "Report" button to submit the sales order to the picking staff. After reporting, the sales order enters the "pending picking" status.
1.8 Sales Returns
Click "Sales" → "Sales Returns" in the left-hand menu to manage customer return documents.
2 Picking
What it does: Warehouse staff physically pick goods against a sales order, enter piece-level measures, and confirm shipment.
2.1 Picking List
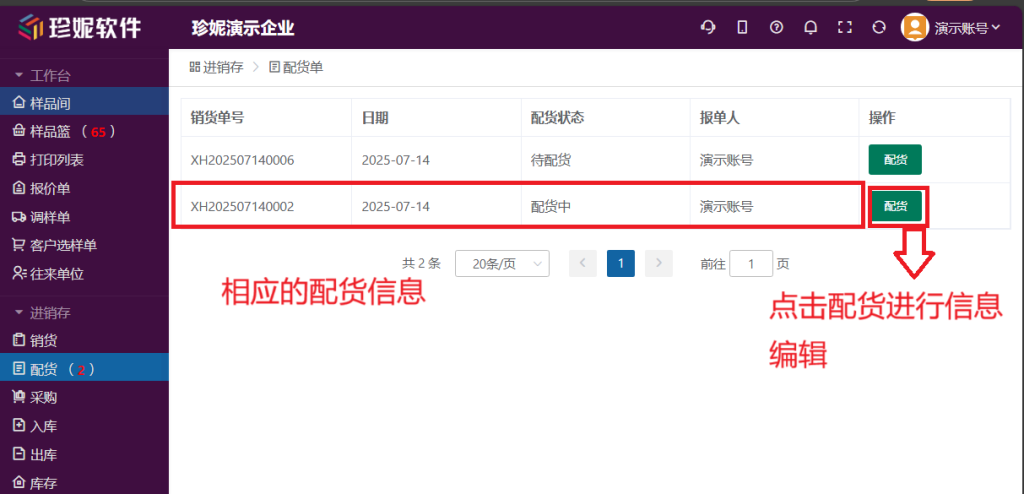
Click "Picking" in the left-hand menu to enter the picking list. The list shows:
| Field | Description |
|---|---|
| Sales order number | The linked sales order number |
| Date | Sales order date |
| Picking status | Pending picking / Picking |
| Reporter | The salesperson who submitted the report |
| Action | Pick button |
The number badge to the right of the menu item (e.g., "Picking (6)") indicates the number of picking documents currently pending.
2.2 Picking Workflow
- Click the "Pick" button in the picking list.
- Enter the actual piece-level measures for each product (the per-piece meter details for each bolt).
- Set the picking document date.
- Confirm to complete picking.
Permission control:
- Once a salesperson has submitted the report, they can no longer manually modify the piece-level measures.
- Only staff with picking permission can perform picking.
2.3 Scan-to-Pick on Mobile
Using the Jenny app to scan the QR code on the fabric label can auto-fill the piece-level measures, reducing manual entry errors and improving warehouse efficiency.
3 Purchasing
What it does: Records the stock-in flow of fabric purchased from suppliers, automatically syncing inventory and fund data.
3.1 Purchase Order List
Click "Purchasing" in the left-hand menu to enter the purchase order list page.
Filters: date range, order number, supplier, owner, creator, product, color, notes.
List fields: purchase order number, supplier, date, contract amount, received, unpaid, paid, payment status, receipt status, creator.
- Payment status: unpaid (red), partially paid, paid
- Receipt status: not received, received
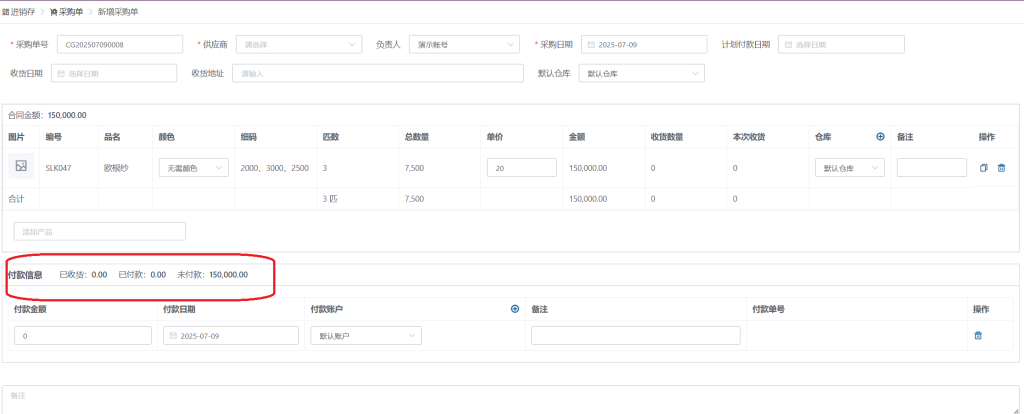
3.2 Creating and Editing a Purchase Order
Click the "New Purchase Order" button in the top-right.
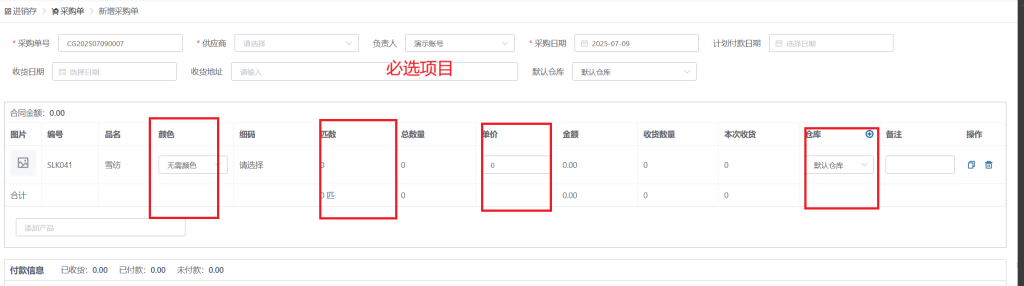
Header info: purchase order number (auto-generated, format CG + date + sequence), supplier (required), purchase date, owner, etc.
Product line items: after adding a product, fill in the product name, color, quantity, and unit price; the system calculates the amount automatically.
3.3 Payment Management
In the purchase order detail you can edit payment info:
- Multiple payment records are supported
- The system automatically tracks cumulative payments and the remaining unpaid balance
- Each payment generates a payment number (format FK + date + sequence)
3.4 Purchase Returns
Click "Purchasing" → "Purchase Returns" in the left-hand menu to manage return documents to suppliers.
3.5 Printing Purchase Orders
On the purchase order detail page, click the "Print" button; the system renders and prints using the default purchase order template set in the Document Editor.
3.6 Purchase Order Tally Receipt (Roll List) Download & Share
Purchase orders support downloading / sharing a tally receipt (roll list)—it lists each bolt's lot number / roll number / meters and other details. The desktop and mobile versions are consistent, making it easy to send directly to the supplier to verify the goods received.
3.7 Confirming Receipt
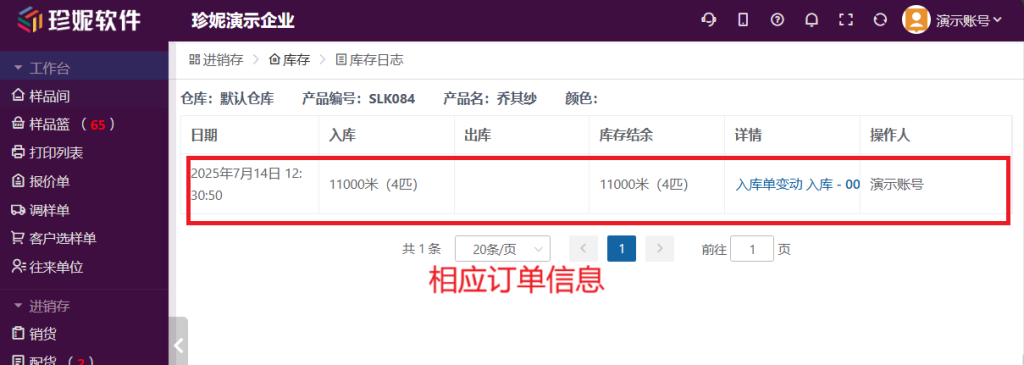
After confirming receipt, the system automatically increases the stock quantity and updates the inventory record.
4 Warehouse Management
The Warehouse module centralizes stock-in/stock-out documents and inventory queries. Click "Warehouse" in the left-hand menu to reveal a flyout submenu, split into two groups:
Documents: Stock-in, Stock-out, Transfer, Stocktake
Queries: Live inventory, Inventory ledger, Warehouse management
4.1 Stock-In
What it does: Handles non-purchase stock-in operations, such as production material returns.
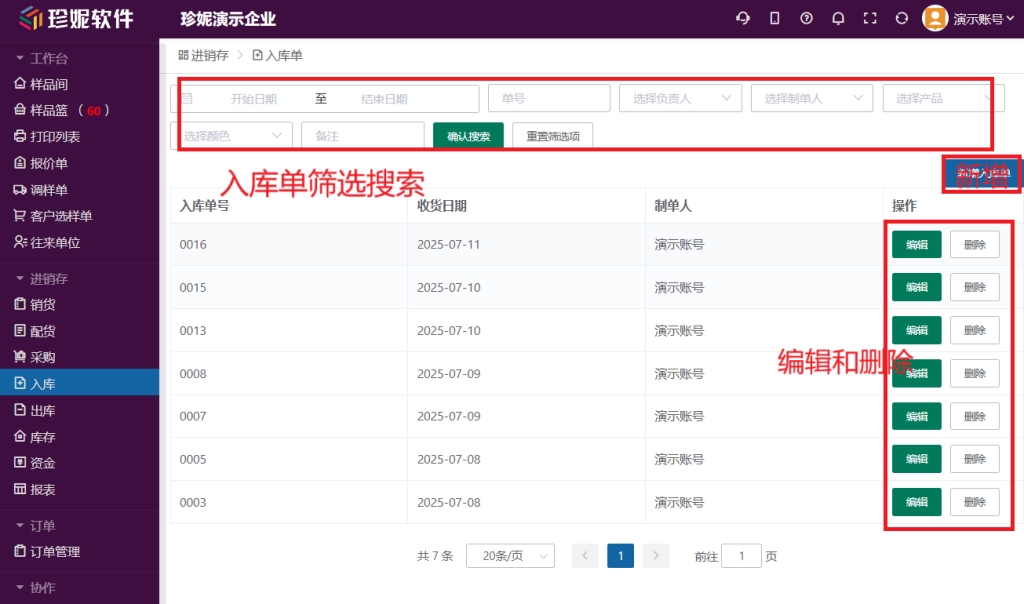
Stock-in document list:
Filters: date range, order number, creator, product, color, notes.
List fields: stock-in number, receipt date, creator, action.
New stock-in document:
- Click the "New Stock-In" button.
- Fill in the basic info: receipt date, receipt address, default warehouse.
- Add products and enter piece-level measures (the independent meter/spec details for each bolt).
- After saving, the system automatically updates the inventory.
For how to enter piece-level measures, see Entering Tally Receipts.
Add products with the unified product picker
The stock-in document's "Add Product" has been unified with sales, purchasing, and stock-out into the same product picker: it supports search by number / product name / composition, lets you select by color (SKU), and you can quickly add a product that doesn't yet exist right in the dialog—no need to go back to the Sample Library to create it first.
Advanced mode (roll-by-roll entry): Stock-in documents have Advanced mode enabled by default, letting you enter, roll-by-roll (roll-level), the lot number, roll number, net length / gross length / weight, tolerance, and other details for each bolt. The form fields are grouped into basic info / piece-level details with an independent action bar, making multi-roll entry smoother. In Advanced mode you don't need to fill in a width for every roll—each roll's width is taken uniformly from the sample's nominal width, cutting down repetitive entry.
- When there's only a single unit, the secondary unit is hidden automatically for a cleaner interface.
- After entering each bolt, you can directly print a 70×90 fabric roll label and stick it on the bolt; later, scanning it during stock-in/stock-out or picking identifies it instantly.
Atomic batch-number allocation — no collisions when multiple people stock in
Stock-in documents use atomic batch number allocation—when multiple people stock in at the same time, the system guarantees that each document gets a unique batch number, eliminating the occasional "collision" problem of the past.
Stock-in document details: When viewing a stock-in document's details, it shows the photo, number, product name, color, width (taken from the sample's nominal width), piece-level measures, pieces, total quantity, warehouse, and notes. For stock-in documents entered in Advanced mode, the piece detail view also shows gross length / weight (kg) / batch number / production date / grade columns (the purchase order's piece detail view does too). Printing (using a Document Editor template) and editing are supported.
Bin location (a per-roll find-the-goods marker):
When entering rolls in Advanced mode, each roll can be given a bin location (e.g. Area A - Rack 3 - Level 2), recording where that bolt sits in the warehouse. The bin location is purely a marker for finding goods—it plays no part in stock quantity calculations or deductions. The stock-in document's piece detail view has a "Bin location" column, and you can also fill it in / change it later when editing the stock-in document.
One-click barcode printing for every roll:
On the stock-in document detail page, click the piece-level measures column to open the piece detail dialog:
- The top of the dialog has a button to print barcodes for all rolls—one QR-coded label per roll; stick them on the bolts and they can be scanned later for picking / stock-out
- Each roll's row also has a small print button, for reprinting a single roll on its own
- Labels use the fabric label template set as "in use" under Label Management, and the QR code scans straight to that specific roll
Print in batches when there are a great many rolls
When printing a very large number of rolls at once (roughly 50+), the QR codes on the odd label may not finish generating in time. Print in batches and spot-check by scanning.
4.2 Stock-Out
What it does: Handles non-sales stock-out operations, such as writing off damaged goods.
Filters: date range, order number, creator, product, color, notes.
New stock-out document:
- Click the "New Stock-Out" button.
- Fill in the delivery date, delivery address, and default warehouse.
- Add products and enter piece-level measures.
- After saving, the system automatically deducts the inventory.
Stock-out tally receipt (detailed / summary): Stock-out documents support generating a tally receipt, making it easy to send along with the goods for the customer or warehouse to verify:
- Detailed tally receipt: lists each bolt's details, such as lot number / roll number / meters.
- Summary tally receipt: totals the pieces and quantity by product / color.
Both tally receipts can be printed / exported to Excel / saved as an image.
4.3 Transfer
What it does: Moves stock between different warehouses. For example, transferring 100 meters of fabric from the "Main Warehouse" to the "Showroom Warehouse."
Transfer document fields:
- Transfer number (auto-generated, prefix DB)
- Date
- Source warehouse (required)
- Destination warehouse (required)
- Transferred products (number, product name, color, quantity, pieces)
Workflow:
- Click "Warehouse" → "Transfer."
- Create a transfer document and select the source and destination warehouses.
- Add products (only products with stock are shown) and check off each bolt to transfer (piece level).
- After saving, the system automatically:
- Source warehouse: stock decreases (stock-out)
- Destination warehouse: stock increases (stock-in)
Tip
A transfer doesn't change the total stock quantity—it just moves stock between warehouses. Transfers support piece-level operations: you can precisely choose exactly which bolts to transfer, rather than just entering a quantity.
4.4 Stocktake
What it does: Performs a physical stocktake of a warehouse, reconciling the difference between system stock and actual stock, and adjusting automatically.
Stocktake document fields:
- Stocktake number (auto-generated, prefix PD)
- Date
- Stocktake warehouse (required)
- Status: Draft / Confirmed
Workflow:
- Click "Warehouse" → "Stocktake."
- Create a stocktake document and select a warehouse.
- The system automatically loads all inventory records for that warehouse (system quantities), precise to each bolt (piece level).
- Check each bolt and enter the actual quantity (the physical stocktake result).
- The system automatically calculates the difference:
- Overage (actual > system): shown in green; automatically stocked in upon confirmation.
- Shortage (actual < system): shown in red; automatically stocked out upon confirmation.
- After verifying everything, click "Confirm Stocktake" and the inventory adjusts automatically.
Note
A stocktake cannot be undone after confirmation, and the inventory adjusts immediately. We recommend carefully verifying every difference before confirming.
4.5 Live Inventory
What it does: View current inventory data in real time, with multi-dimensional filtering.
Filters: warehouse, product, color, sample search.
List fields:
| Field | Description |
|---|---|
| Thumbnail | Product SKU photo (hover to see a larger image) |
| Warehouse | The name of the warehouse it's in |
| Number | Product number |
| Name | Product name |
| Color | Fabric color |
| Pieces | Pieces in stock |
| Stock quantity | Total stock (meters/kilograms, etc.) |
| Update date | The time of the most recent inventory change |
Notable features:
- Merge & summarize / Expand details: a pair of toggle buttons in the top-right—"Merge & summarize" aggregates stock by warehouse + color; "Expand details" lists every bolt roll by roll (lot number / roll number / stock quantity, with rolls that have been cut carrying a "(cut)" marker).
- Only show in-stock: in the merged summary view, an "only show in-stock" filter is checked by default, hiding rows whose quantity nets out to zero after stock-ins and stock-outs cancel; untick it to see everything.
- Summary data: the total pieces and total quantity are displayed at the top of the page by default; click the eye icon to hide them.
- SKU thumbnails: the list shows product photo thumbnails; hover to view a larger image.
Inventory ledger
Click a row in the inventory list to view that product's inventory ledger—a complete record of stock-in/stock-out activity. Every change (purchase stock-in, sales stock-out, transfer, stocktake, etc.) is traceable, and you can jump to the original document. The Inventory ledger entry in the "Queries" group of the Warehouse flyout menu shows the stock movements of all products together.
4.6 Warehouse Management
In the "Queries" group of the "Warehouse" flyout menu, click "Warehouse Management" to:
- Add a warehouse
- Edit a warehouse name
- Set the default warehouse
5 Funds Management
What it does: Centrally manages the fund flow of purchase payments and sales receipts, with support for multi-account management and reconciliation.
The entry is under the "Finance" menu
The funds-related features sit under a separate top-level Finance menu, which contains these direct menu items: Fund ledger, Receipts, Payments, Other income/expense, Invoice management, Account adjustments, and Opening data.
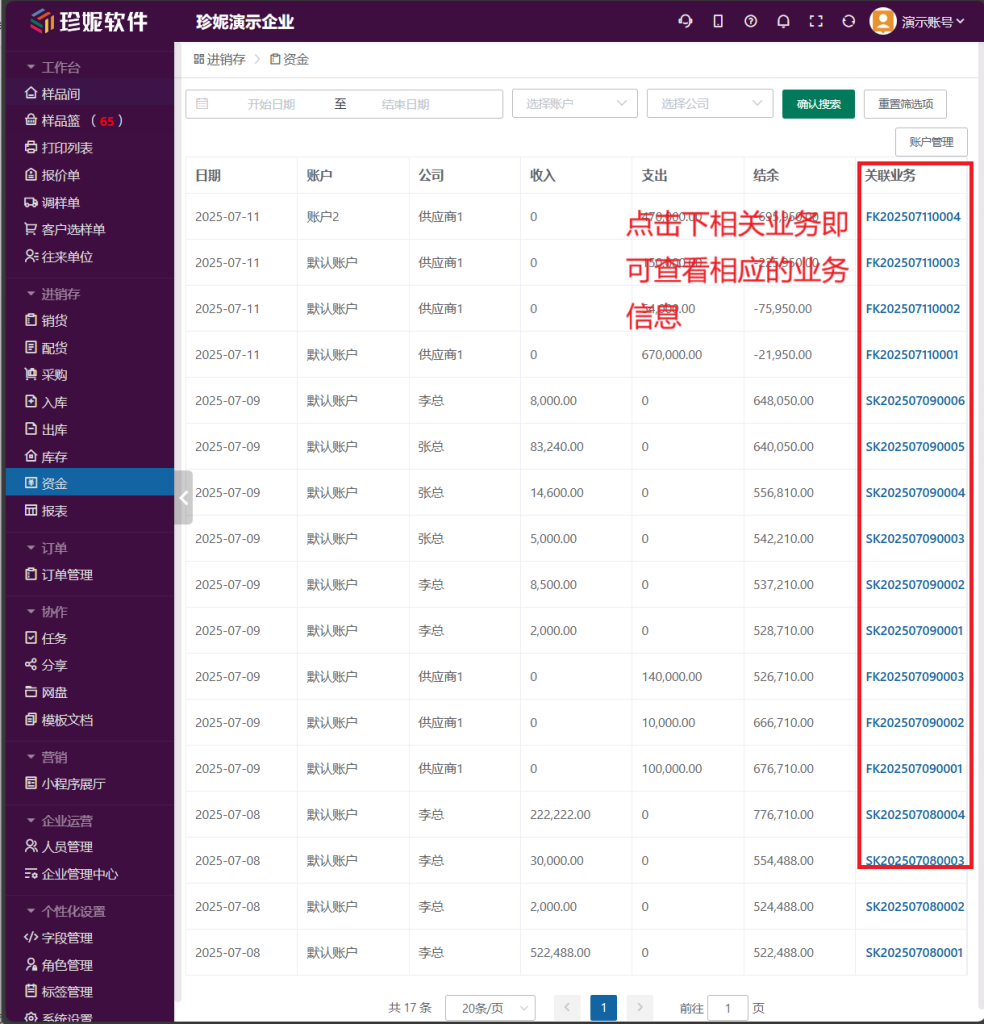
5.1 Fund Ledger List
Click "Finance" → "Fund Ledger" in the left-hand menu to view all income and expense activity.
Filters: date range, account, company.
List fields:
| Field | Description |
|---|---|
| Date | Transaction date |
| Account | Receipt/payment account |
| Type | Income/expense type |
| Company/summary | The counterparty (customer or supplier) or summary |
| Income | Sales receipt amount |
| Expense | Purchase payment amount |
| Balance | Current account balance |
| Linked business | The corresponding receipt or payment number (clickable to jump) |
5.2 Receipts and Payments
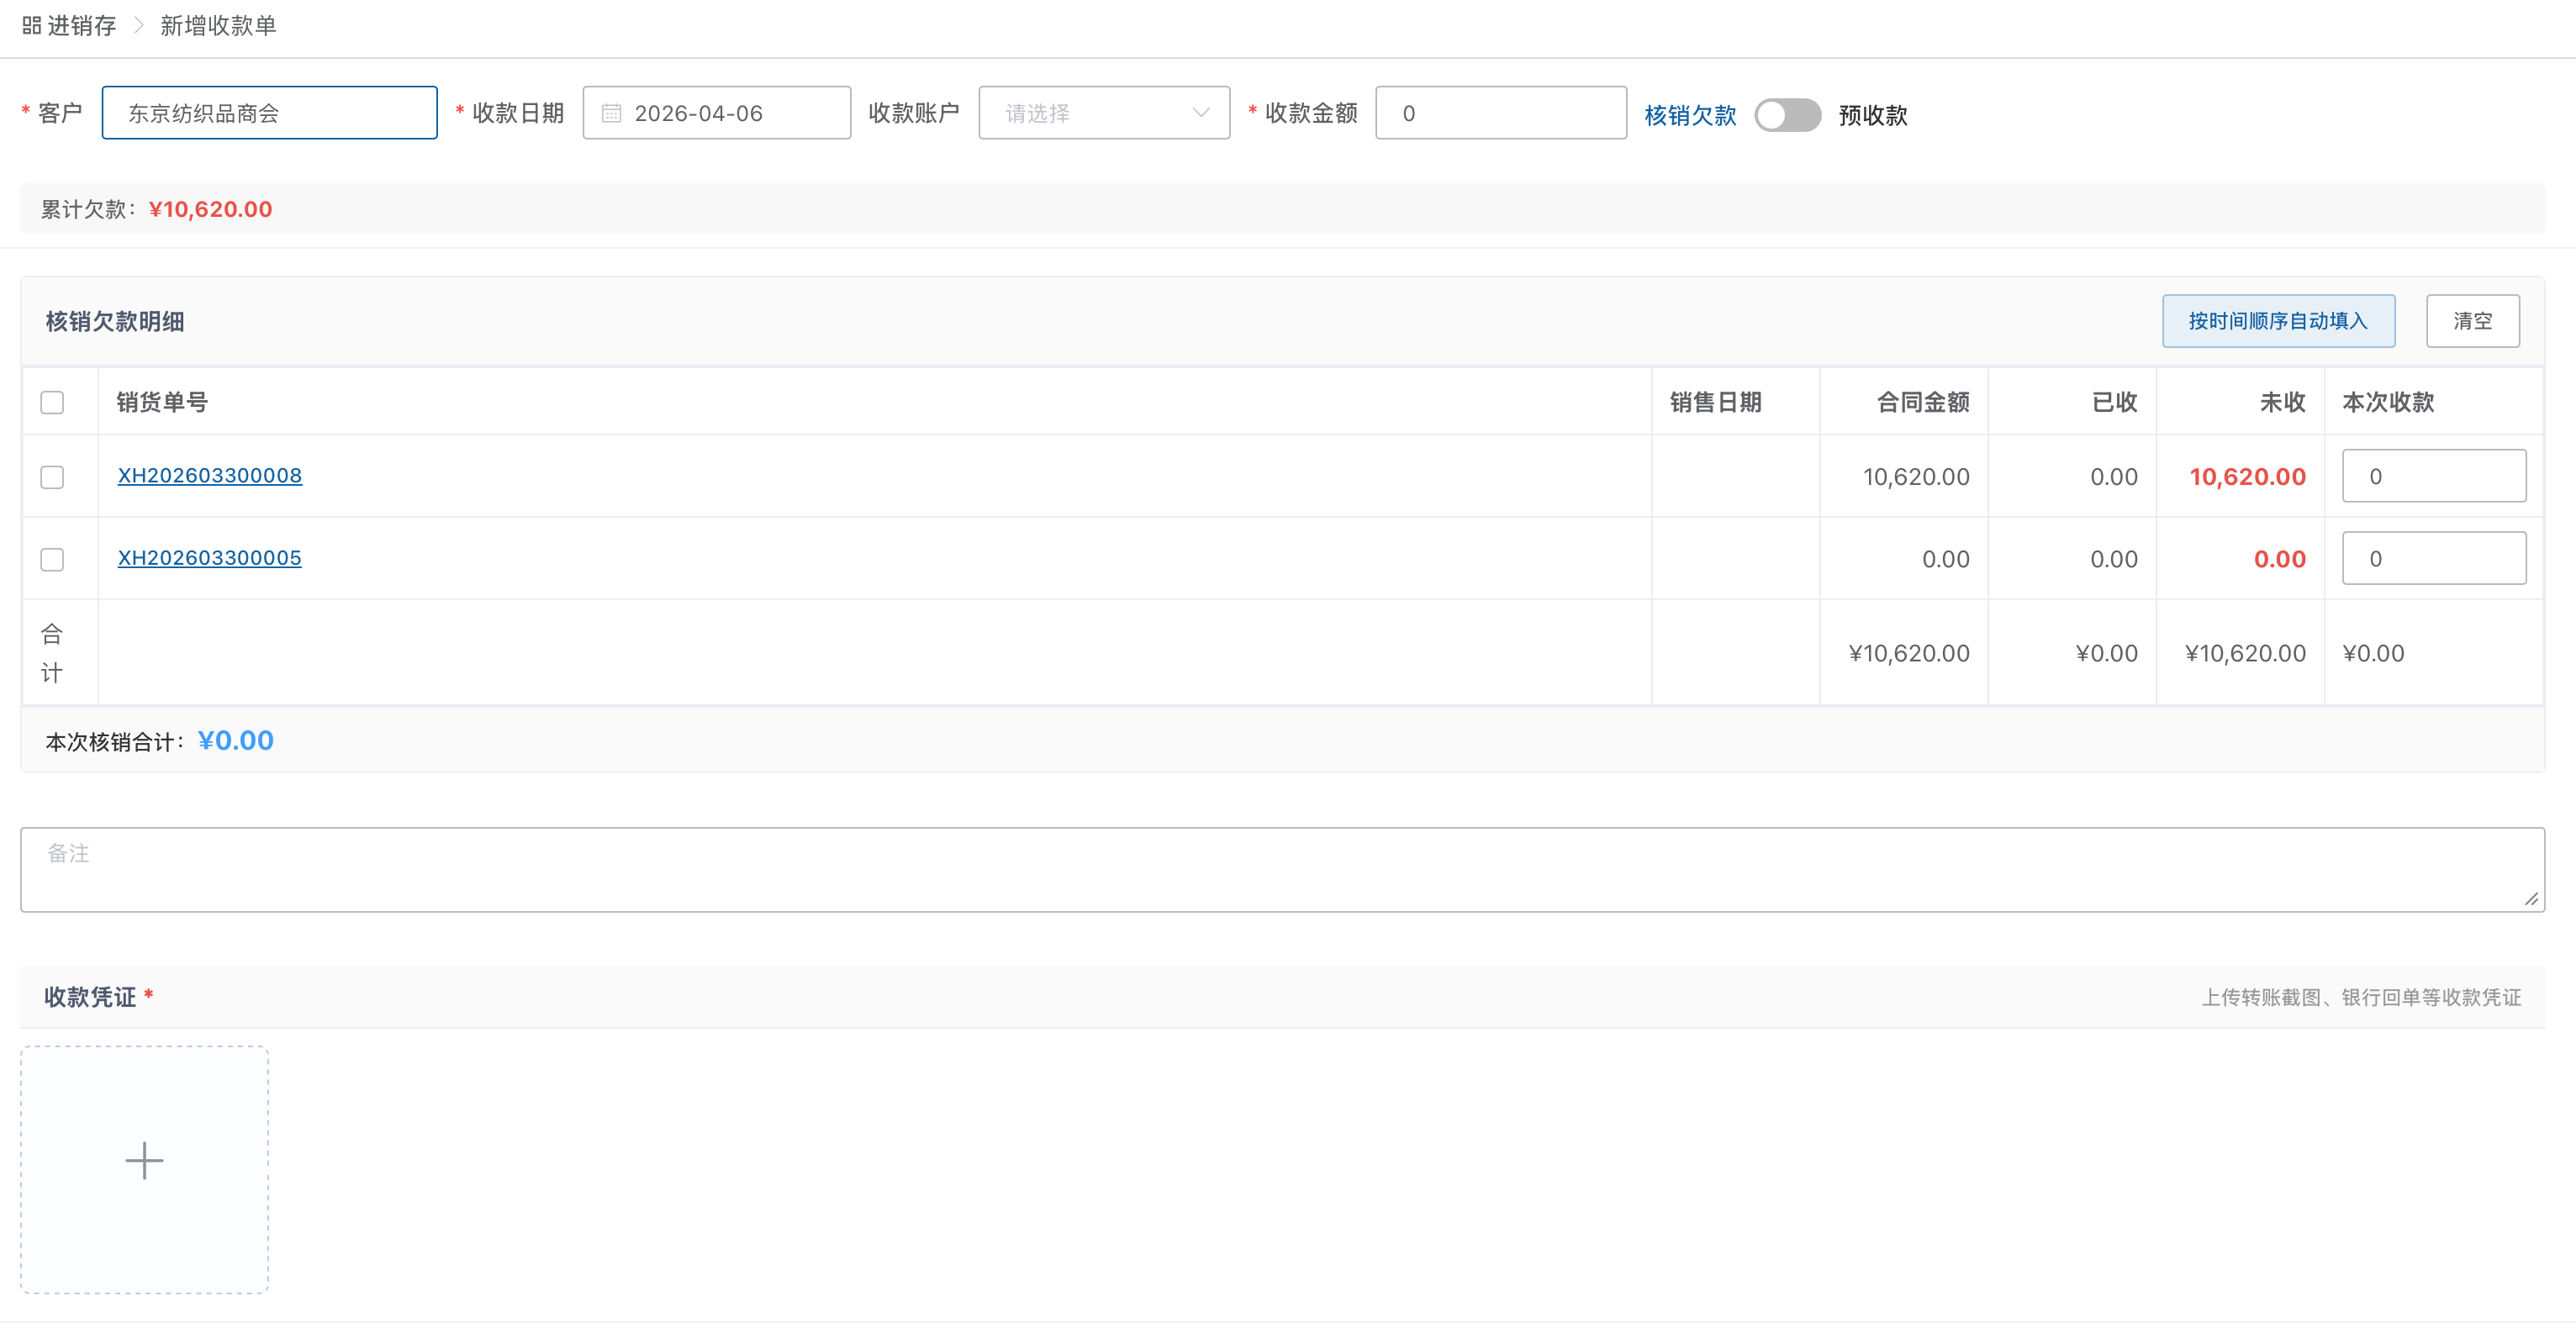
In the new version, receipts and payments have their own dedicated list pages:
- Click "Finance" → "Receipts": view all receipt records, managed independently of sales orders.
- Click "Finance" → "Payments": view all payment records, managed independently of purchase orders.
Receipts and payments support custom print templates through the Document Editor.
Viewing voided documents: at the top of the receipt / payment lists you can switch between Normal and Voided. Switch to "Voided" for a read-only view of every document that has been voided—the list shows the void time / voided by / void reason, and each document number carries a "voided" badge. Voided documents are for audit-trail viewing only and can be neither edited nor restored—the books stay traceable, and the bad-entry risk of accidentally editing a voided document is ruled out.
5.3 Other Income/Expense
Click "Finance" → "Other Income/Expense": record non-business income and expenses (such as utilities, rent, and miscellaneous fees).
5.4 Account Management
Click the "Account Management" button in the top-right to manage receipt/payment accounts:
- Add an account
- Edit an account name
- Set the default account
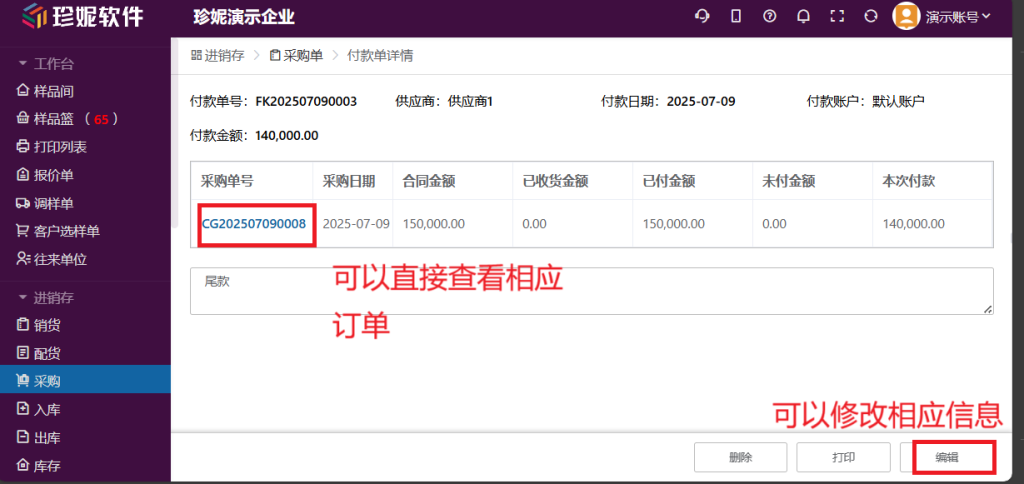
5.5 Modifying Fund Records
- Find the transaction row you want to modify in the fund ledger table.
- Click the business document number in the "Linked business" column.
- Jump to the corresponding sales order or purchase order detail.
- Modify the receipt/payment amount on the detail page.
- The system automatically updates the fund ledger and balance.
6 Entering Tally Receipts
Piece-level measures are a core concept in the fabric industry, referring to the independent meter/weight details of each bolt. They need to be entered in scenarios such as purchase stock-in, direct stock-in, and sales picking.
6.1 Entry Modes
- Quick mode: enter the quantity directly (e.g., "1000" for 1000 meters) and press Enter to confirm—suitable for quickly issuing orders.
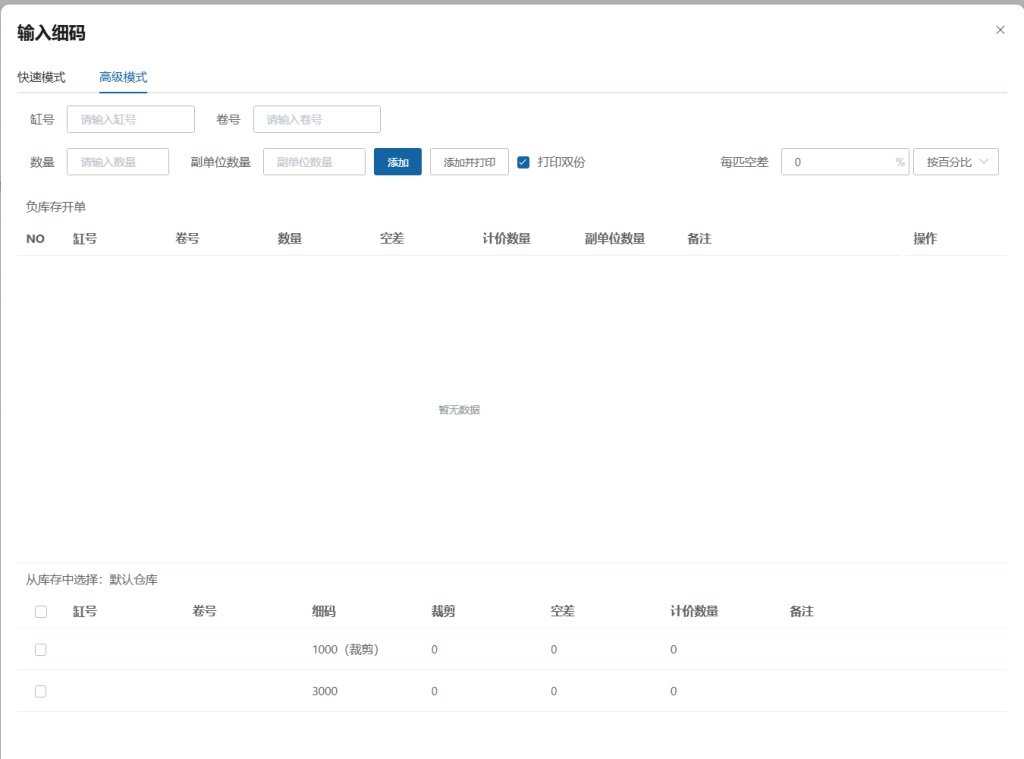
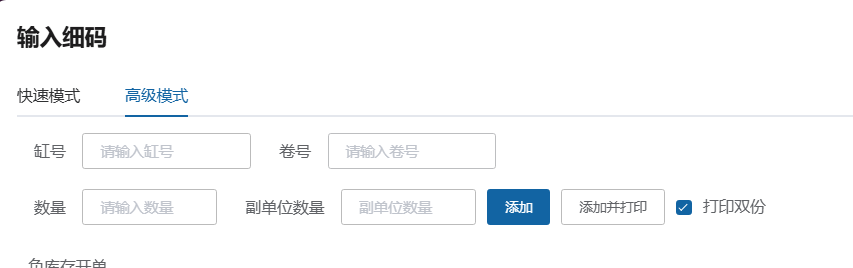
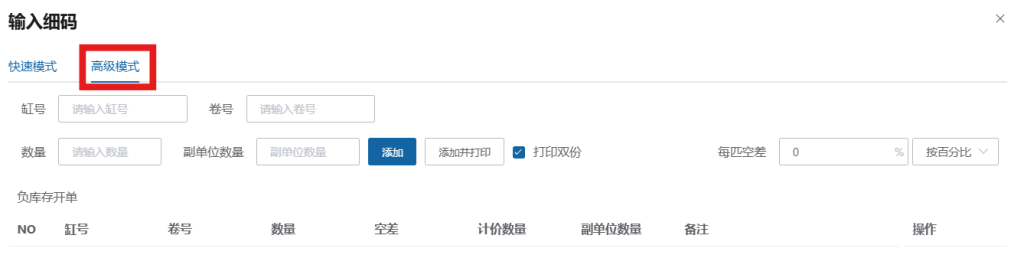
- Advanced mode: enter, roll-by-roll (roll-level), detailed info such as lot number, roll number, net length / gross length / weight, and tolerance, and set the default warehouse and priced quantity—suitable for fine-grained management (each roll's width is taken uniformly from the sample's nominal width, so there's no per-roll width entry). Stock-in documents have Advanced mode enabled by default, and after entering each bolt you can directly print a 70×90 fabric roll label.
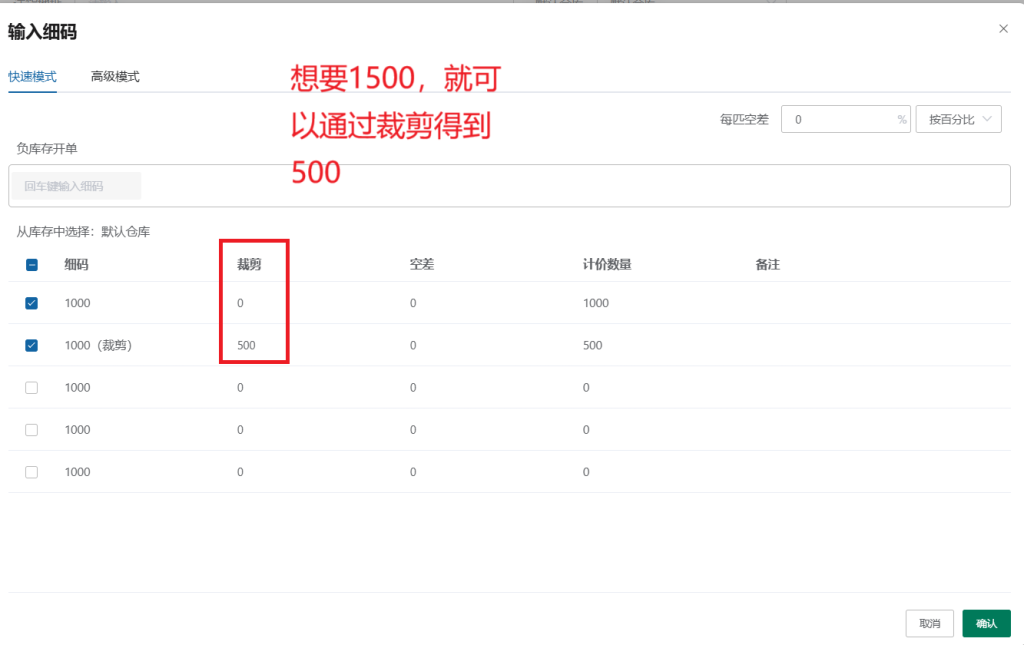
6.2 Piece Cutting
When the length needed isn't a whole bolt, you can use the cutting feature. After entering the required length, the system automatically calculates the remaining length and updates the inventory.
6.3 Primary/Secondary Unit Conversion
Supports automatic conversion between various fabric units of measure, such as kilograms to meters. For example, when the primary unit is meters, you can set kilograms as the secondary unit, and the system calculates automatically using the conversion ratio you set.
6.4 Per-Piece Tolerance
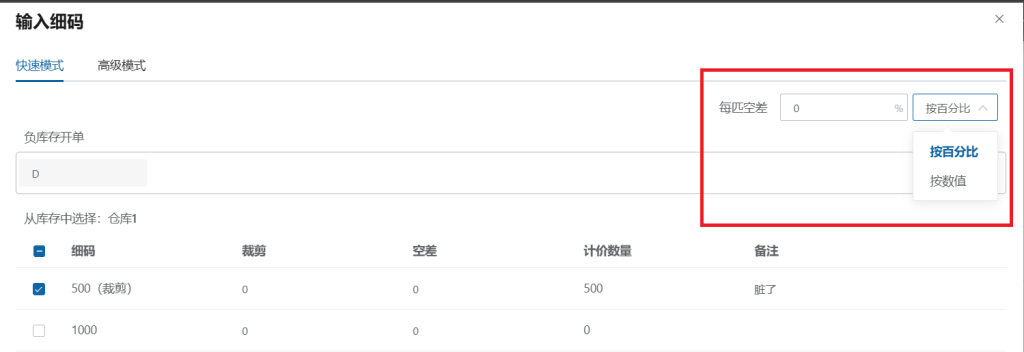
Tolerance is an important concept in fabric trading, referring to the difference/allowance between the actual quantity and the priced quantity.
- By percentage: enter the tolerance percentage (e.g., 98 means priced at 98% of actual, i.e., a 2% allowance).
- By value: enter the specific tolerance value directly.
7 Printing Fabric Labels
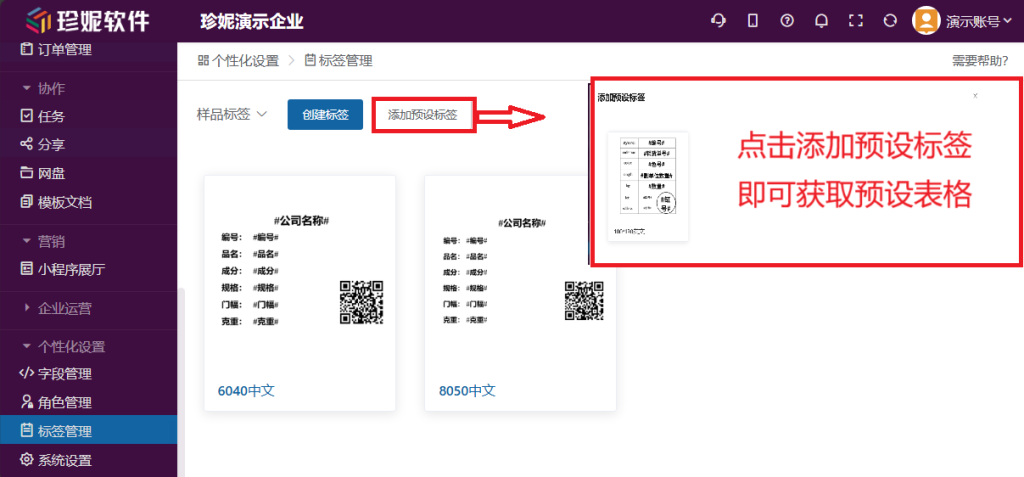
7.1 Creating a Fabric Label
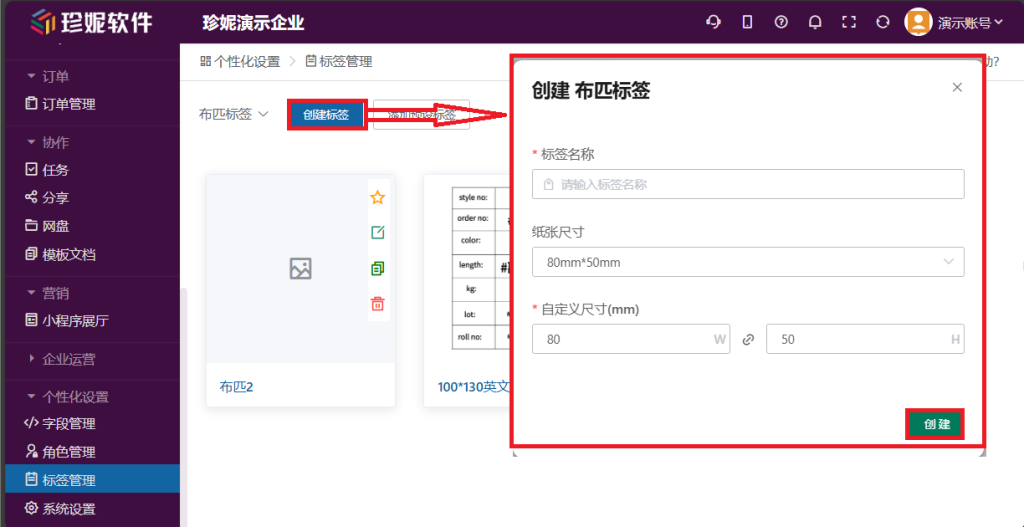
- Click "Label Management" at the bottom of the left-hand menu (in the Enterprise Operations group).
- Select the "Fabric Label" option.
- Use a system template to quickly create a label.
- Click the "star" icon to set it as the template in use.
7.2 Printing Bolt Info on a Sales Order
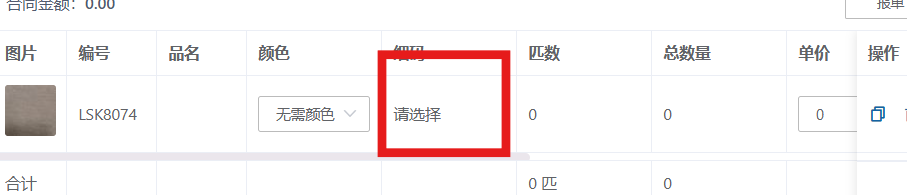
- After adding bolt info to a sales order, open the piece-level measure editor.
- Fill in the label info under advanced settings.
- Click the print button.
8 Reports
What it does: Multi-dimensional data analysis to monitor sales performance and outstanding accounts.
Click "Reports" in the left-hand menu to enter the report home page, where the various reports are grouped and displayed as cards. A few commonly used reports are introduced below; for the complete list, see Reports in Detail:
8.1 Sales Performance Report
Tracks each owner's sales performance, including:
- Contract amount
- Outstanding receivables
- Amount received
Click the "Sales Performance Report" title to enter the detail page and view more dimensions of data and time-range filtering.
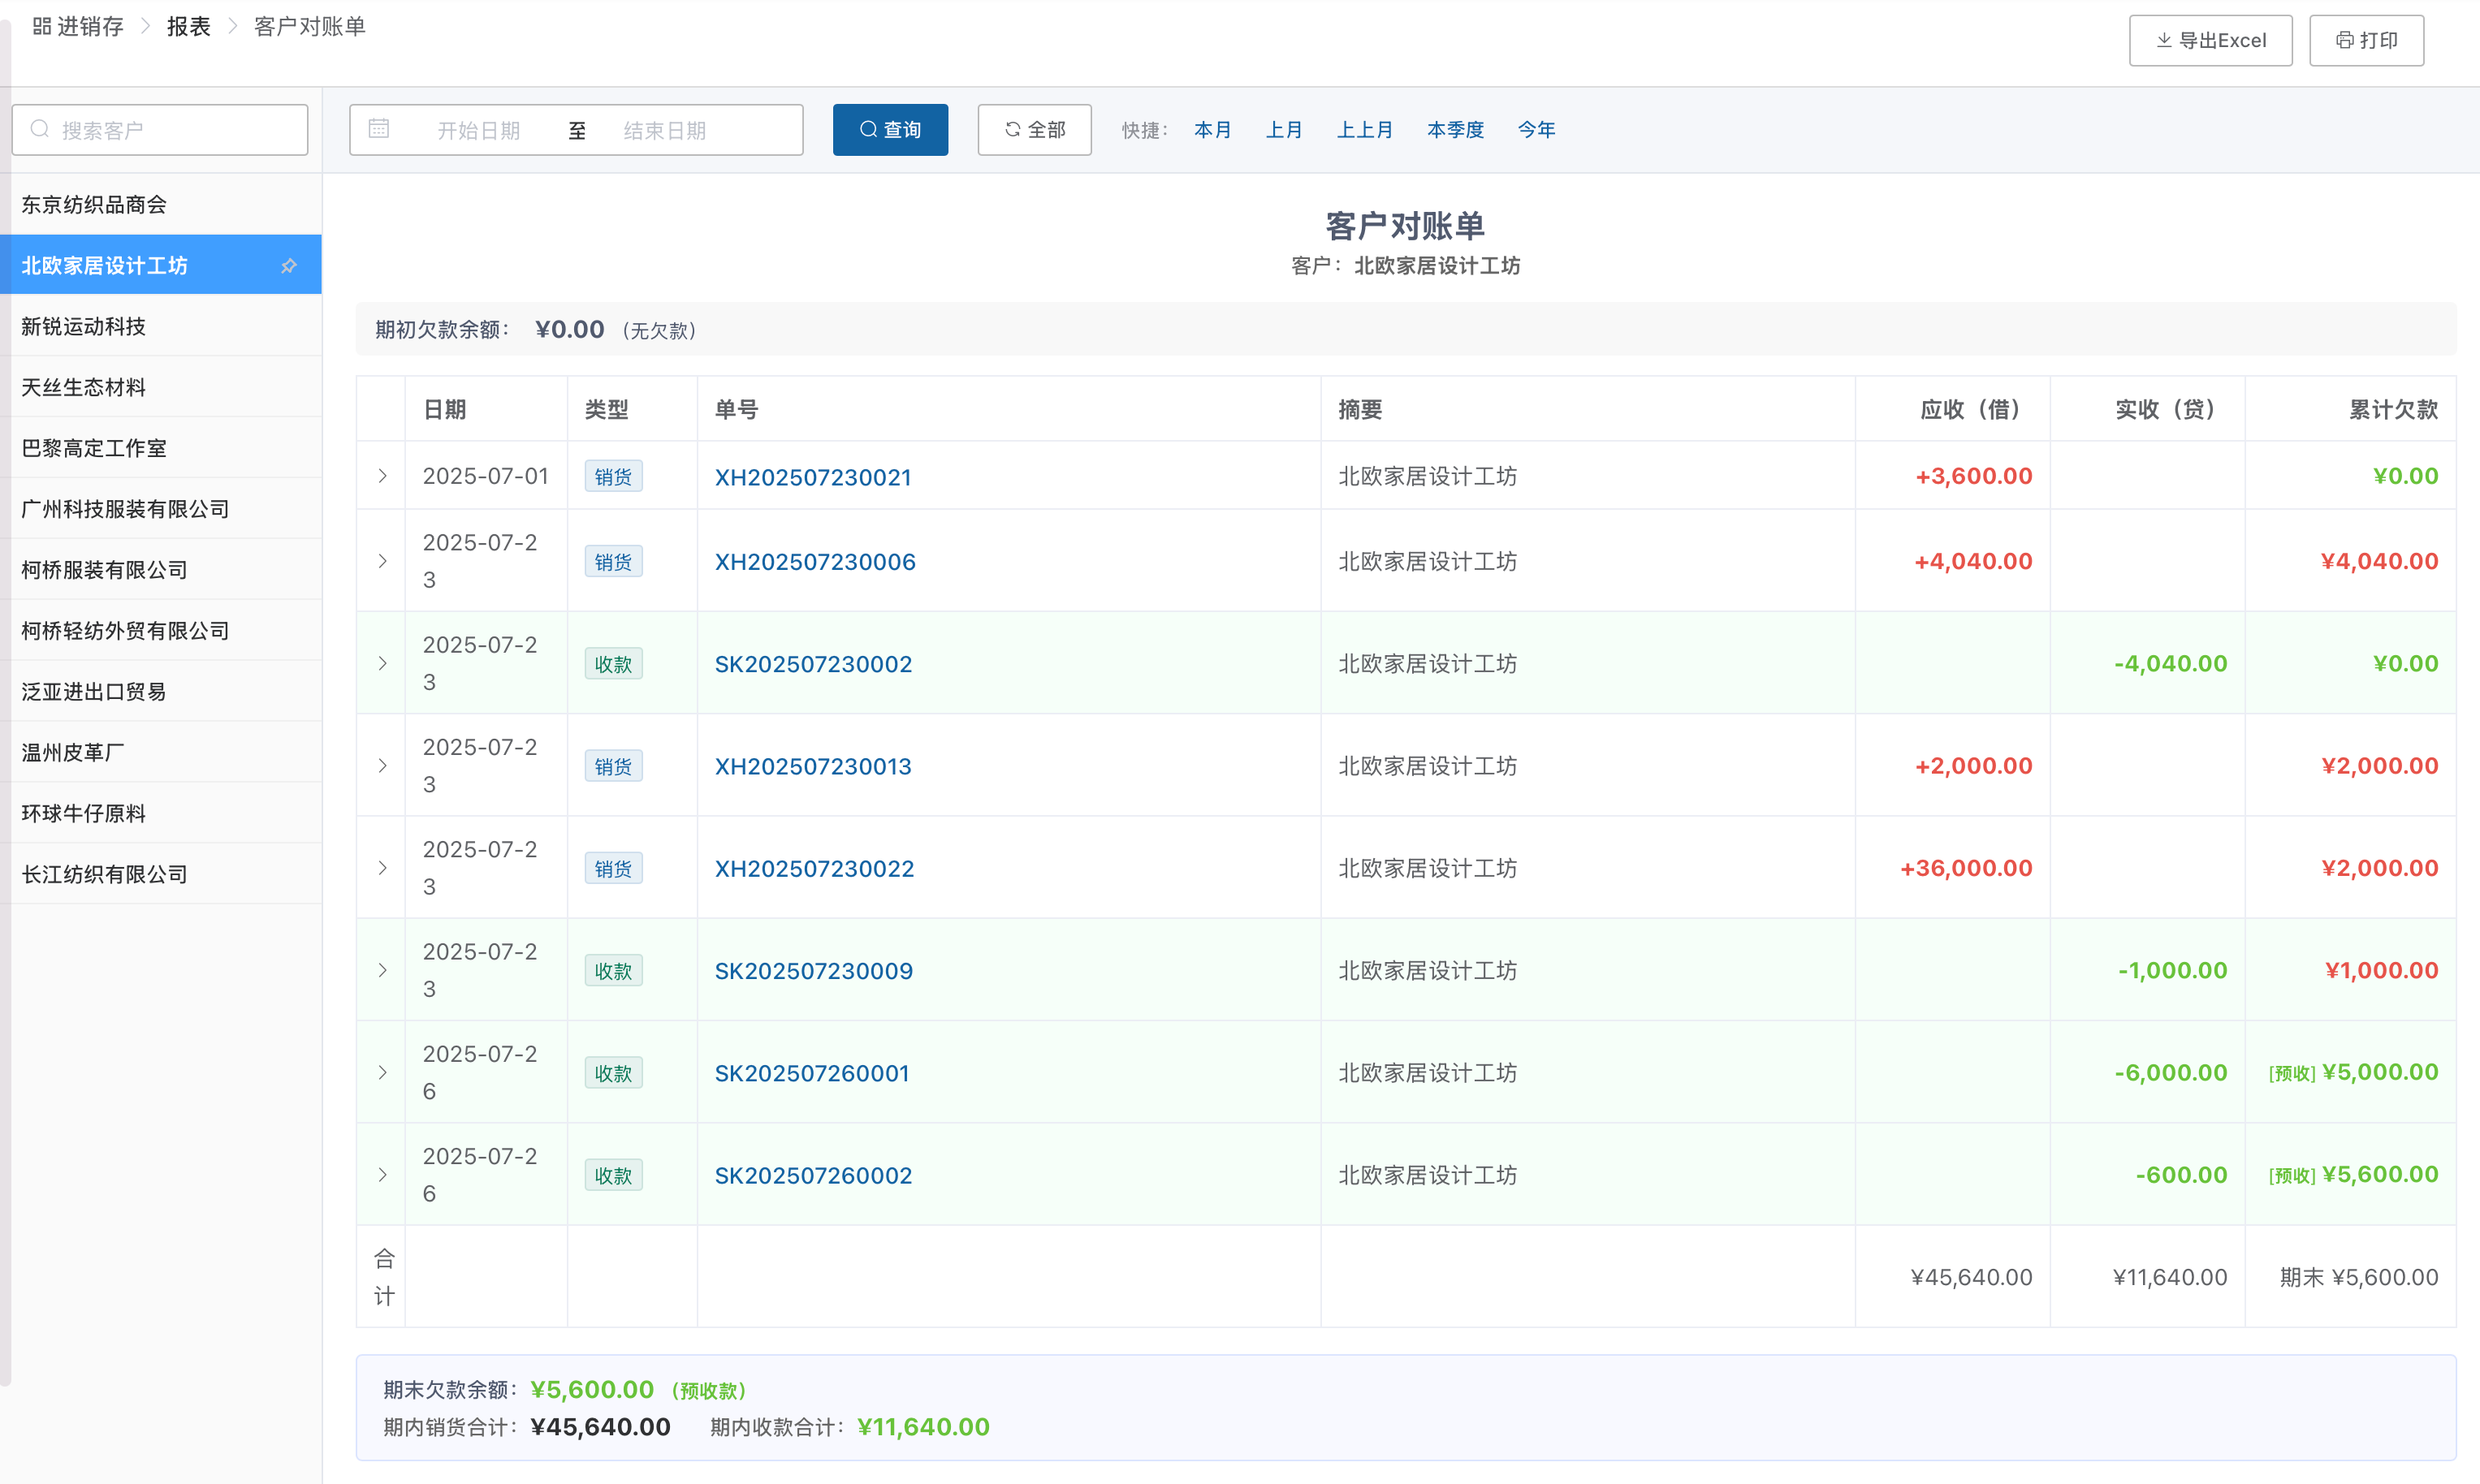
8.2 Customer Statement
Tracks the transaction dealings of each customer, including:
- Customer name
- Transaction date
- Contract amount
- Cumulative outstanding
Useful for reconciling accounts with customers. Supports pinning frequently used customers (hover over a customer name and click the 📌 icon); pinned customers always sort to the top of the list.
8.3 Supplier Statement
Tracks the purchase dealings of each supplier, including:
- Supplier name
- Transaction date
- Contract amount
- Cumulative outstanding
Useful for reconciling accounts payable with suppliers. Likewise supports pinning frequently used suppliers.
For a detailed introduction to the reporting features, see Reports in Detail.
Inventory & Sales Workflow Overview
Purchase flow: Create purchase order → Confirm receipt (stock increases) → Payment
Purchase return: Create purchase return → Confirm return (stock decreases)
           ↓
Stock-in flow: Create stock-in document → Enter piece-level measures → Save (stock increases)
           ↓
    ┌──────────────────────────────────────────┐
    │              Inventory pool                │
    │  Transfer: Warehouse A → B (total unchanged, location moves) │
    │  Stocktake: verify physical → auto-adjust overage/shortage   │
    │  Inventory ledger: every change is traceable                 │
    └──────────────────────────────────────────┘
           ↓
Sales flow: Create sales order → Report → Pick (enter piece-level measures) → Ship (stock decreases) → Receipt
Sales return: Create sales return → Confirm return (stock increases)
           ↓
Stock-out flow: Create stock-out document → Enter piece-level measures → Save (stock decreases)
           ↓
    ┌──────────────────────────────────────────┐
    │  Funds (fund ledger / receipts / payments / other income/expense) │
    │  Reports (performance/statements auto-summarized, pinning supported) │
    └──────────────────────────────────────────┘
Product settings
Inventory & Sales is built on the concept of spot stock. To make a fabric in the sample room usable in Inventory & Sales, set its attribute to "Product" on the sample editing page.