
Sample Management
Overview
The Sample Library centralizes all your fabric information. Its core design goals are fast data loading, clear browsing, fewer page jumps, and simpler data entry. It covers creating, editing, viewing, and deleting samples and color cards, plus tag cloud classification, batch printing, share collections, and more.
1. Create a New Sample
Click the "Create New Sample" button in the top-right corner. In some entries the button text may appear as "Create New" or "New Sample". The form opens as a drawer, usually split into Sample Data / Sample Images / Sample Colors / Sample Notes. Fill in the required data first, then add images, colors, and notes.
Key points:
- Required fields: Fields marked with a red asterisk are required. By default, only the code is required; administrators can set additional required fields under "Field Management".
- Code: Must stay unique within the company. The system checks for duplicates as soon as the cursor leaves the code input; if the code is already taken, a red warning appears below the field, so you do not have to wait until saving the whole form. If the warning points to a code in the recycle bin, follow the in-app prompt to handle that record first.
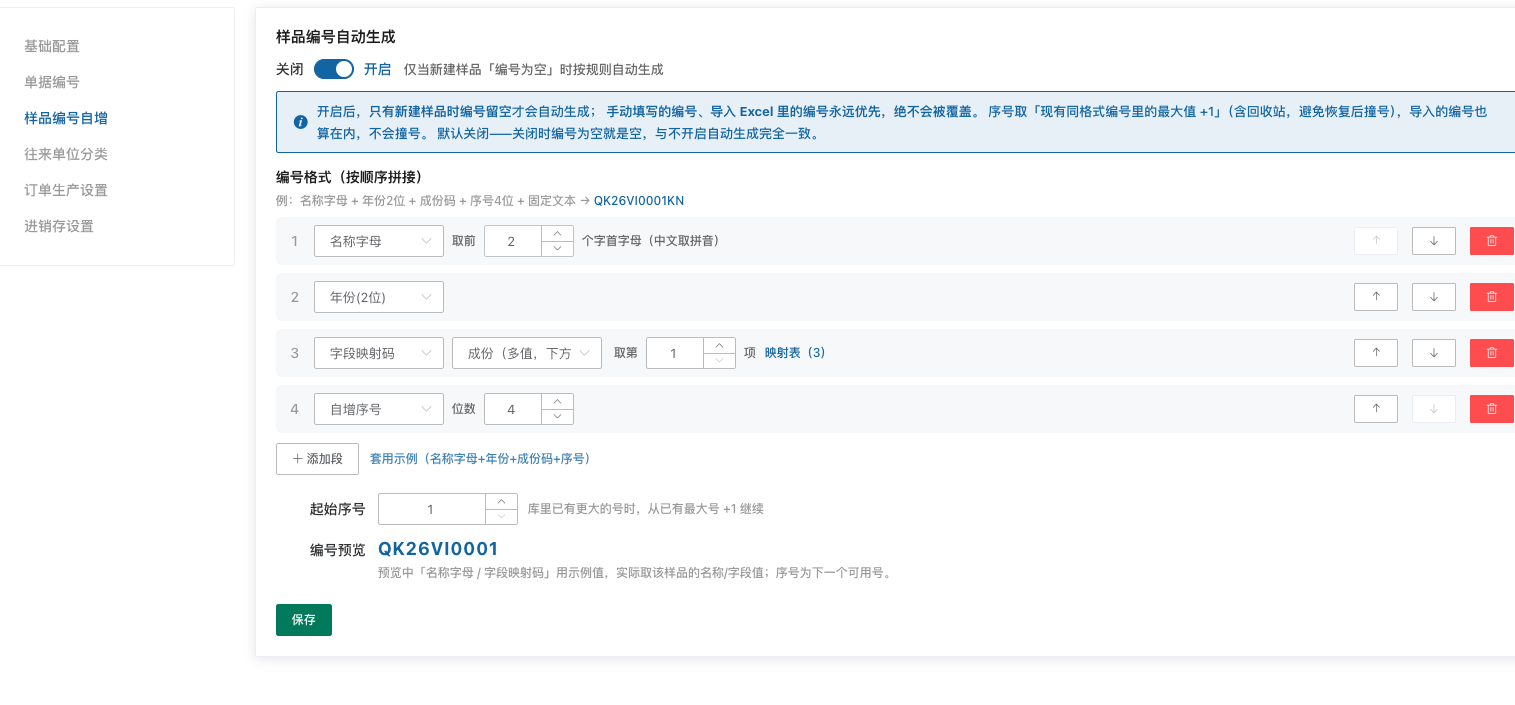
- Auto-generation is configured under "Personalization Settings → System Settings → Sample Code Auto-Increment / Auto-generate Sample Code". It is off by default; when off, a blank code stays blank.
- Once enabled, it only generates a code for a new sample whose code field is empty. Manually entered codes and codes already present in an Excel import always take priority and are never overwritten.
- The format can be built from ordered segments: fixed text, name initials, year, month, field mapping code, auto-increment serial, and more. Field mappings can read composition, classification, width, weight, spec, or custom fields, for rules such as
QK26VI0001KN. - When you open a new sample form, the system fetches a code once. If composition or classification changes and the code has not been edited manually, the code refreshes from the current fields. The "Generate" button beside the code input recalculates it from the current composition / classification and other fields.
- The serial continues from the largest existing code in the same format; recycle-bin codes and imported codes are included in the check. Previewing a code does not consume the serial. In commodity-library mode, the code is still entered manually.
Composition: Three input methods are supported
- Pick from the dropdown (can be preset in Field Management)
- Type directly and press Enter to confirm
- Enter the specific composition and percentage on the right
Width: Preset values can be configured in Field Management; custom input is supported
Weight (gsm): Type directly or select from the dropdown; you can set the unit "g/㎡" to be added automatically
Spec: Text input, with preset values supported
Multilingual data: sample name, composition, width, weight, and spec can be filled in across languages. The current supported set is 17 languages: Simplified Chinese / English / Russian / Korean / French / Vietnamese / Italian / Turkish / Japanese / German / Spanish / Portuguese / Arabic / Thai / Bengali / Indonesian / Traditional Chinese. Languages left blank are not forced into the record; external display follows the system's actual settings and fallback fields.
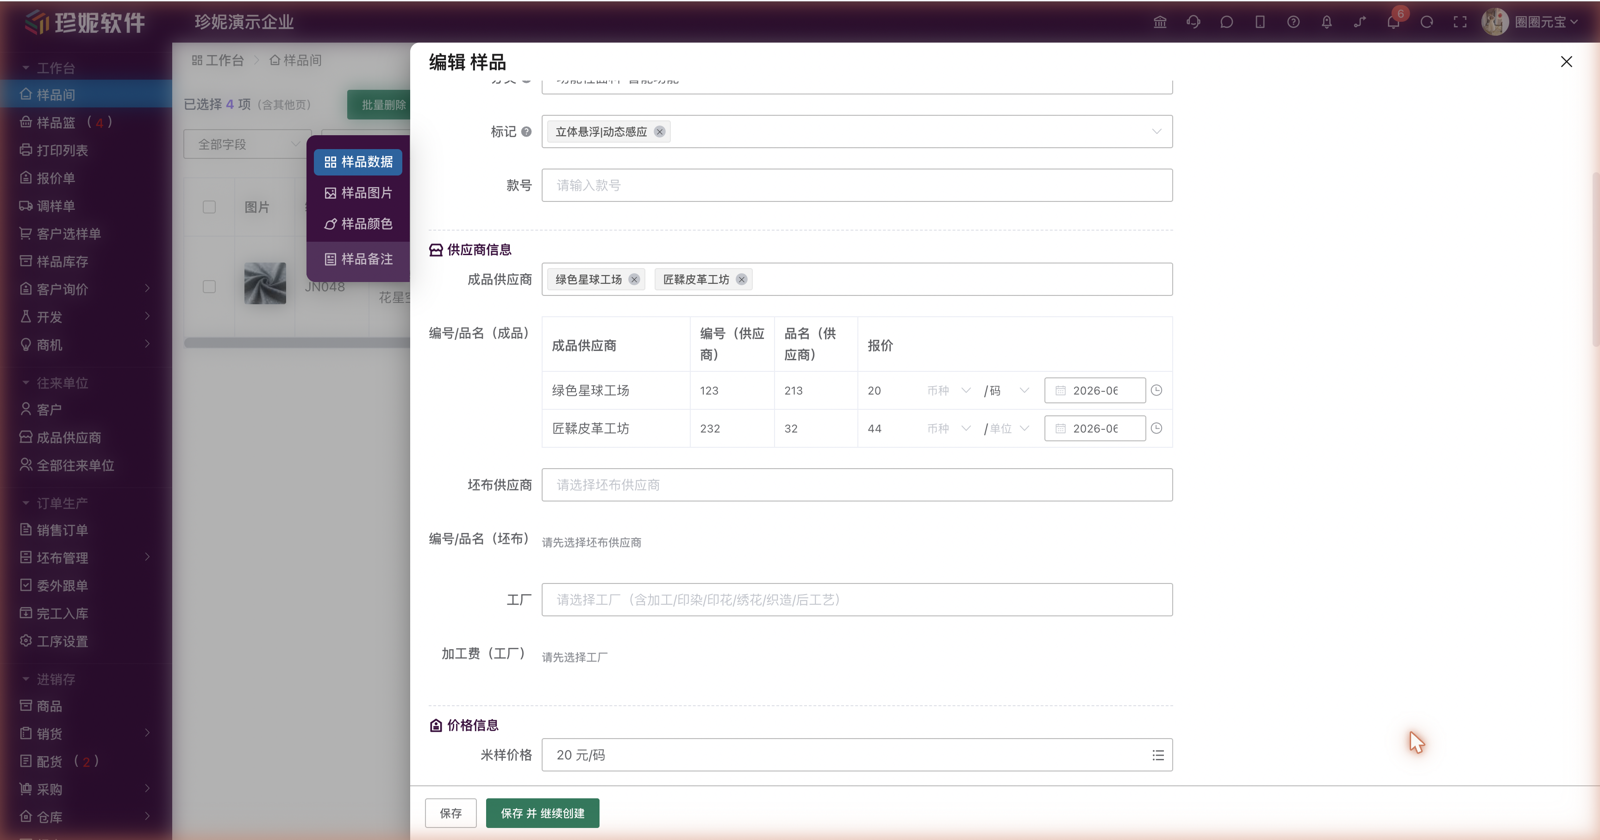
Supplier: Entry is split into three blocks—finished-product supplier / greige supplier / factory (all three become available once the "Supplier" field is enabled in Field Management). For each type you can pick from your contacts, or quick-add one in the popup on the right; the popup lets you fill in contact methods (multiple entries allowed), region, and detailed address:
- Finished-product supplier: name and owner are required
- Greige supplier: only the name is required (the owner defaults to yourself)—handy for quickly registering an ad-hoc greige mill
- Factory: name and factory type are required
- Classification: Up to three classification levels are supported
- Tags: Custom tags used to group and filter samples
- Galleries: There are three galleries, each holding up to 50 images (a single image over 10 MB is compressed automatically before upload—no manual processing needed)
- Public gallery: visible to everyone in the company and to the customer/buyer side; can be shared externally or to the showroom, and supports image search
- Internal gallery: shared among staff inside the company, but never shared externally or to the showroom; supports image search
- Private gallery: visible only to the uploader and to no one else; does not support image search
- After upload, thumbnails can be dragged between the public / internal / private galleries to adjust image ownership quickly
- Sample Colors: Used to manage the different color variants of the same sample (similar to SKUs, i.e., the smallest distinguishable unit of an item), building an "electronic color card"
- A color code or color name is required (either one)
- Each color can include images (up to 3) and an approximate color
- Bulk import color cards: In the color SKU area, you can drag in multiple color card images to generate multiple colors at once, making it faster to enter multi-color samples
- Electronic color card / AI recognition entry: if your company has this entry enabled, follow the in-app prompt to recognize a color card image or generate an electronic color card; if not, maintain color SKUs manually
When finished, click "Save" or "Save and Add Another" (to keep adding).
2. Edit a Sample
Click the edit button on a sample entry to modify it; the workflow is the same as creating a sample.
Notes feature:
- Public notes: Visible to everyone in the company, editable only by the creator
- Private notes: Visible only to the creator, with no limit on how many you can add
- Click the lock icon in front to quickly switch between types
Batch Editing
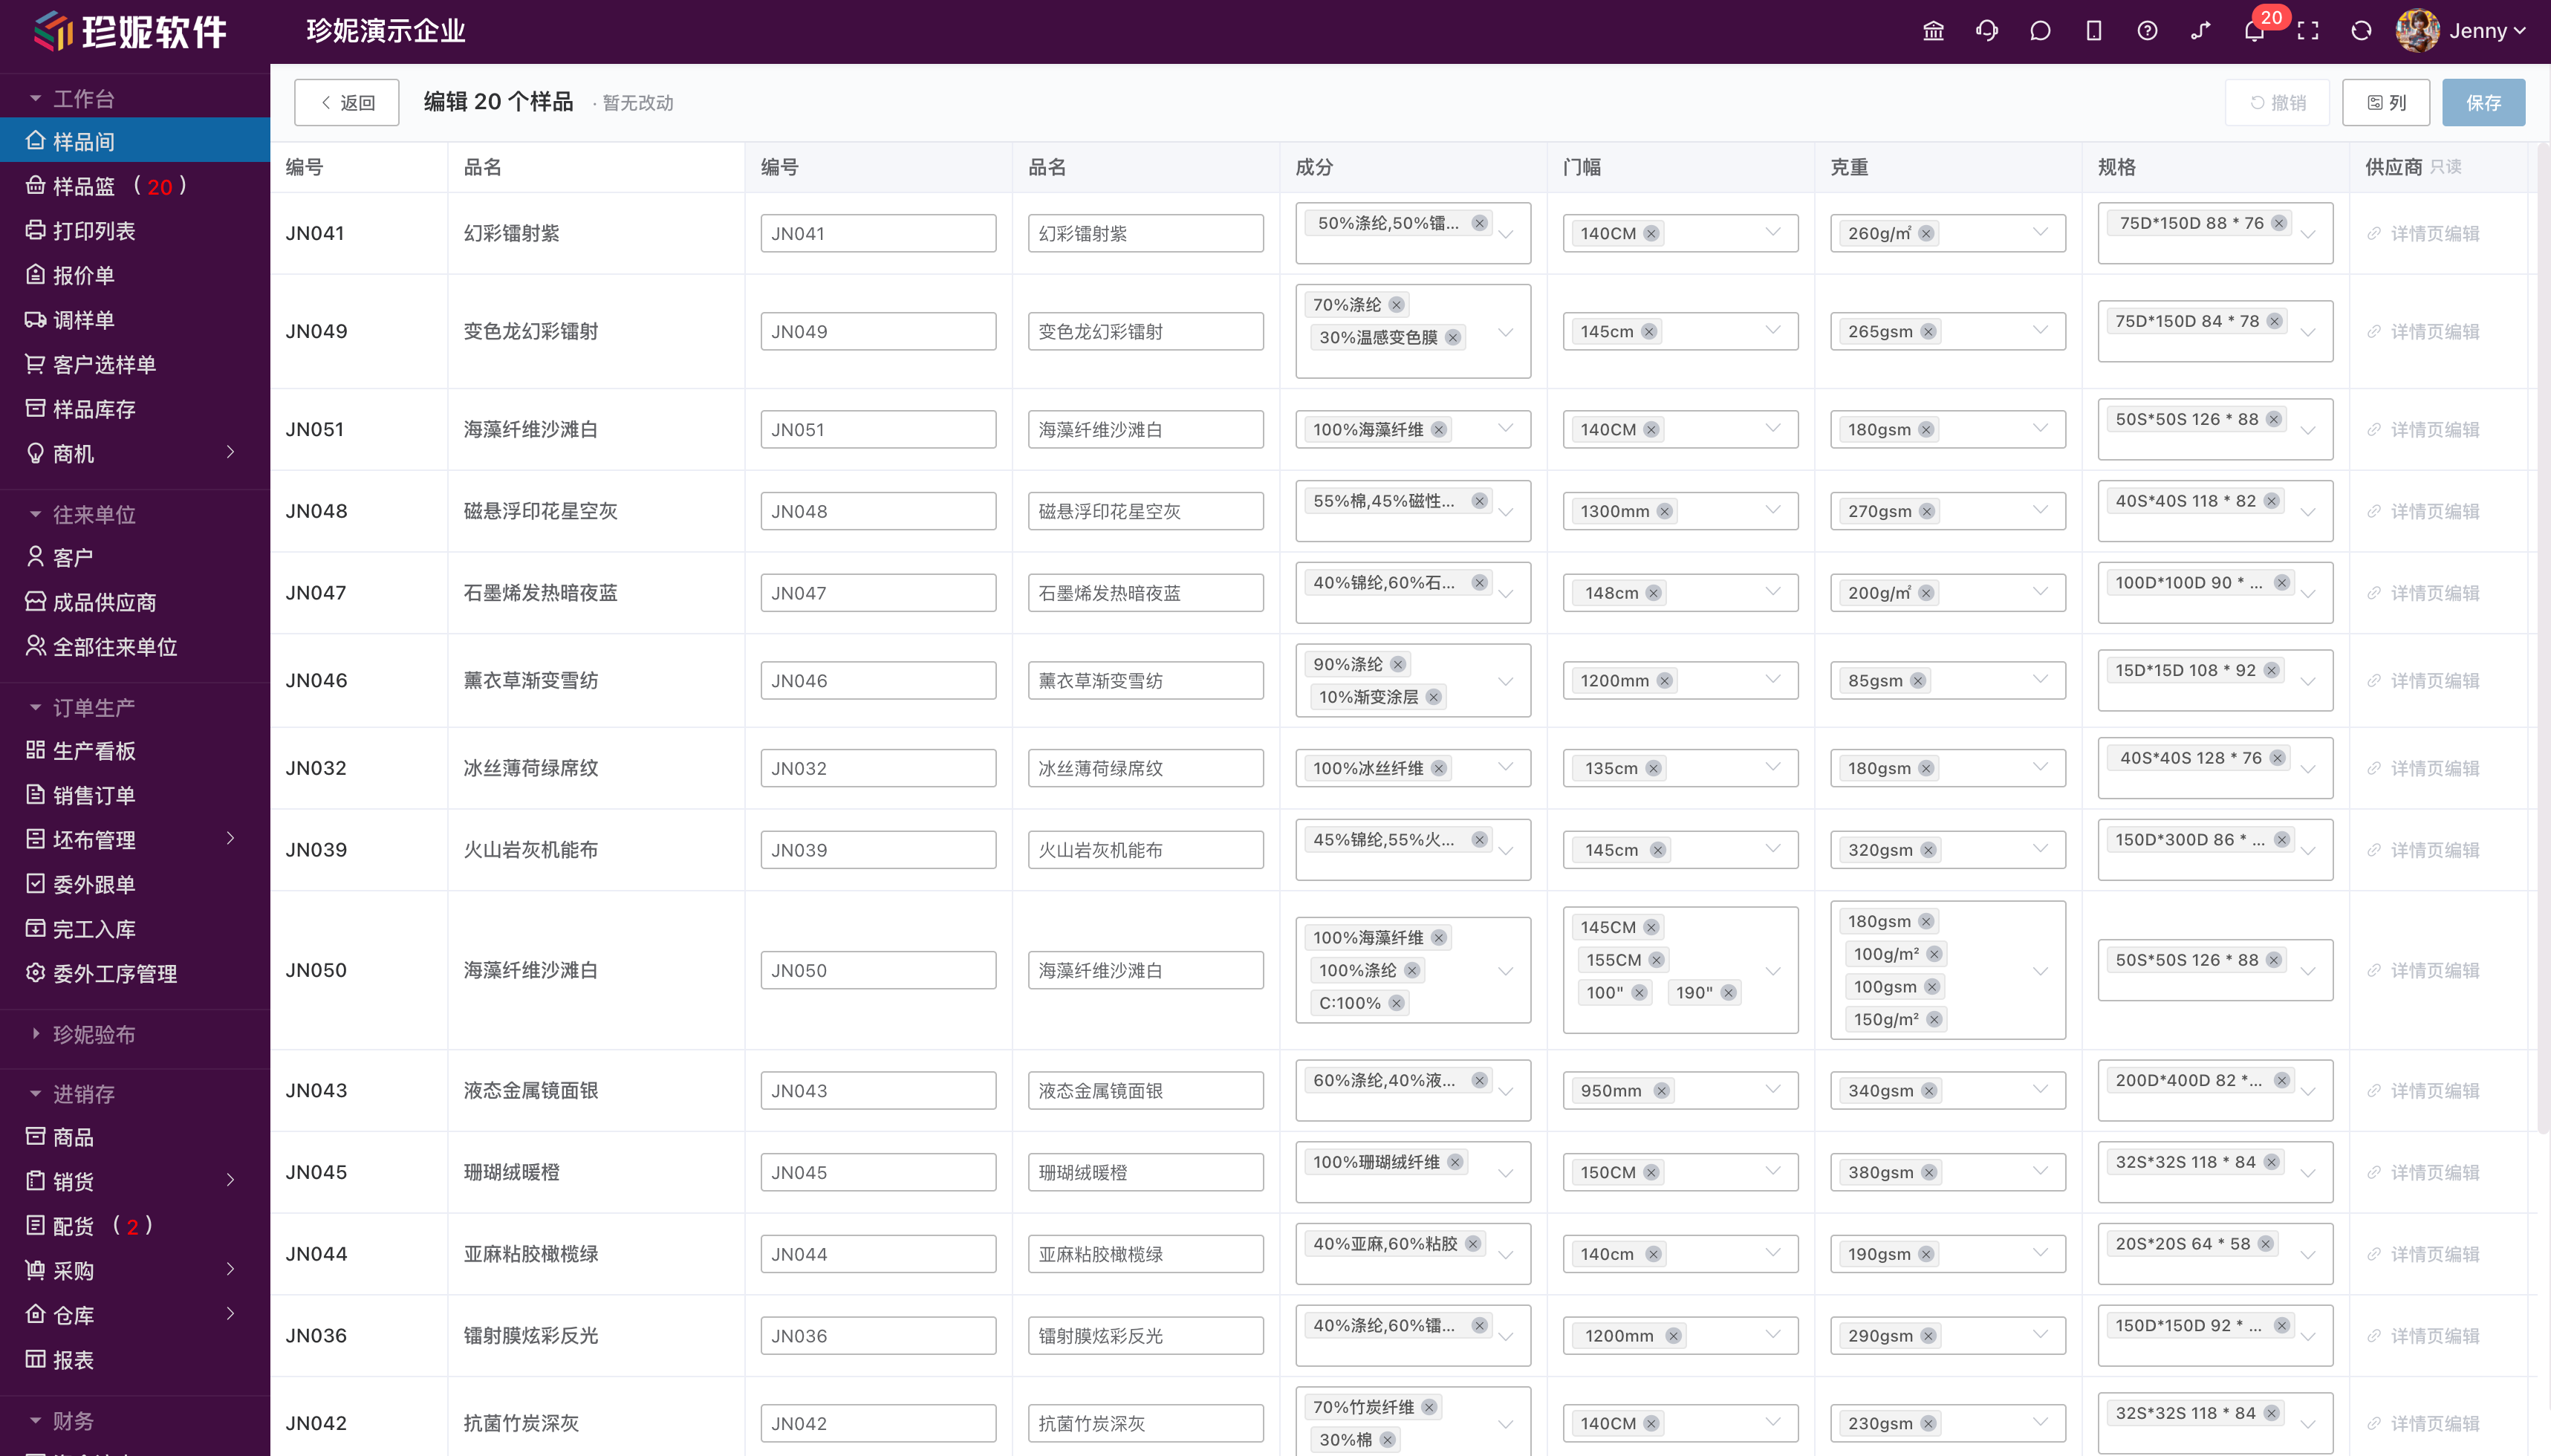
Add several samples to the Sample Basket → click "Batch Edit" in the Sample Basket → edit fields inline in a single table, without entering each detail page one at a time.
- You can simultaneously edit fields such as code / name / composition / width / weight / spec / tags across multiple samples
- Undo is supported (Ctrl+Z), and all changes are saved at once
- Complex fields such as classification (three levels), images, colors, and supplier cannot be edited here; you must go to the sample detail page to modify them
3. Viewing and Searching Samples
Sample Details
Click a sample entry to view its full information. The left-hand navigation bar lets you quickly jump to each section. Images support carousel, zoom in, zoom out, rotate, and download (right-click). The grouping and order of the fields on the detail page follow the group settings in "Field Management" (Basic Info / Supplier Info / Price Info / More Info)—move a field to another group in Field Management and both the detail page and the edit form reflect it consistently.
Sample List
- The displayed fields can be configured in "Field Management"
- Fields such as code and width support sorting
- Column widths can be adjusted by dragging
- Column settings: Lists such as sales orders and purchase orders let you hide columns you don't want to see, so each person can customize them to their own habits
- Check entries to add them to the Sample Basket
Mobile sample fields stay in sync with the desktop
On the mobile App, the field visibility / order / permissions / searchable fields for samples all follow the desktop's Field Settings: the field order on the detail page and in the create / edit form matches the desktop, fields you have no permission for are hidden automatically on the mobile App, and the fields you can search in advanced search also stay consistent with Field Settings. Adjust it once on the desktop and it takes effect on the mobile App right away.
Sample Search
Select a search field, enter a value, then press Enter or click the magnifying glass to search.
Multi-keyword search: Separate multiple keywords with spaces—for example, entering "supplier name supplier code" quickly locates a specific sample.
Tag Cloud
Shows all added tags along with their corresponding sample counts. You can select multiple tags at once ("OR" relationship filtering); the more tags a sample matches, the higher it ranks.
Combining the Tag Cloud with Search
The tag cloud and search can be used together with an "AND" relationship, further narrowing the filter range.
Batch Operations
- Batch delete: Items are first moved to the Recycle Bin; deleting them again in the Recycle Bin permanently removes them
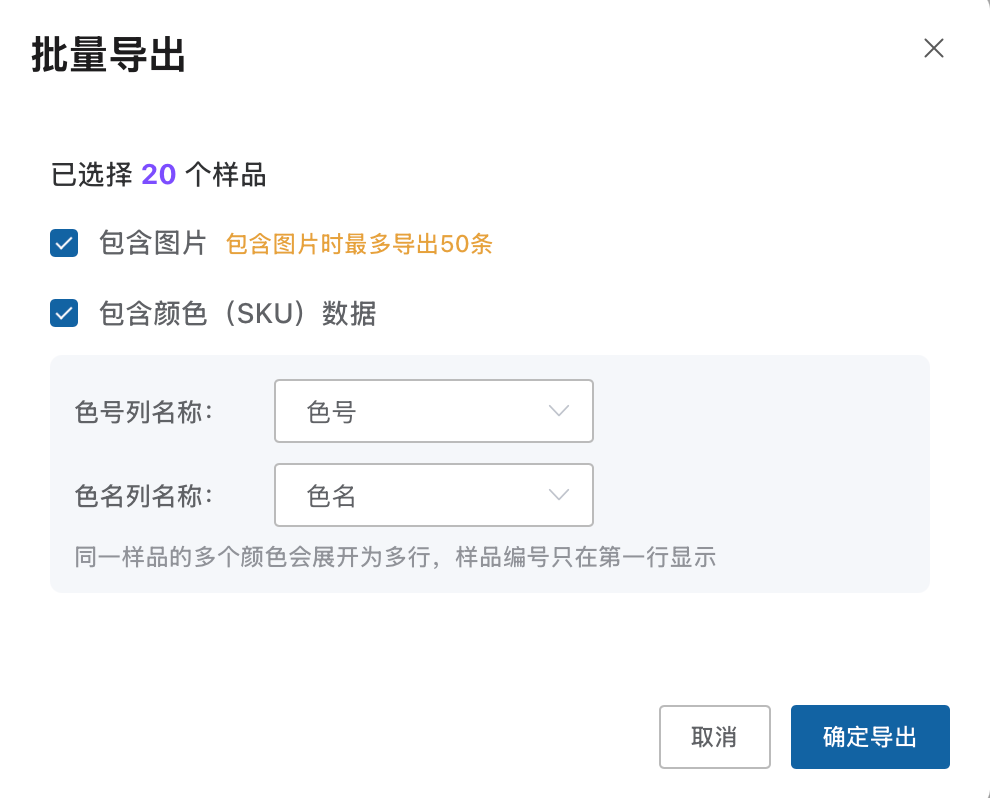
- Batch export: Export to Excel format, optionally including image and color (SKU) data, with customizable column headers for the color code / color name columns
- Batch import: before import, the system prechecks template headers and recognizes common field aliases. One sample can include multiple finished-product suppliers / greige suppliers, and sample stock plus warehouse location can be imported when the latest template includes those columns.
4. Prices and Costs
Price Fields
A sample's price-related fields (each can be enabled / disabled, renamed, and reordered in Field Management):
| Field (default name) | Meaning |
|---|---|
| 米样价格 (meter sample price) | The price for selling a meter sample |
| 成品销售价 (finished product selling price) | The external selling price of finished fabric (bulk price) |
| 成品进货价 (finished product purchase price) | The price you pay your finished-product supplier |
| 坯布价格 (greige price) | The greige fabric purchase price |
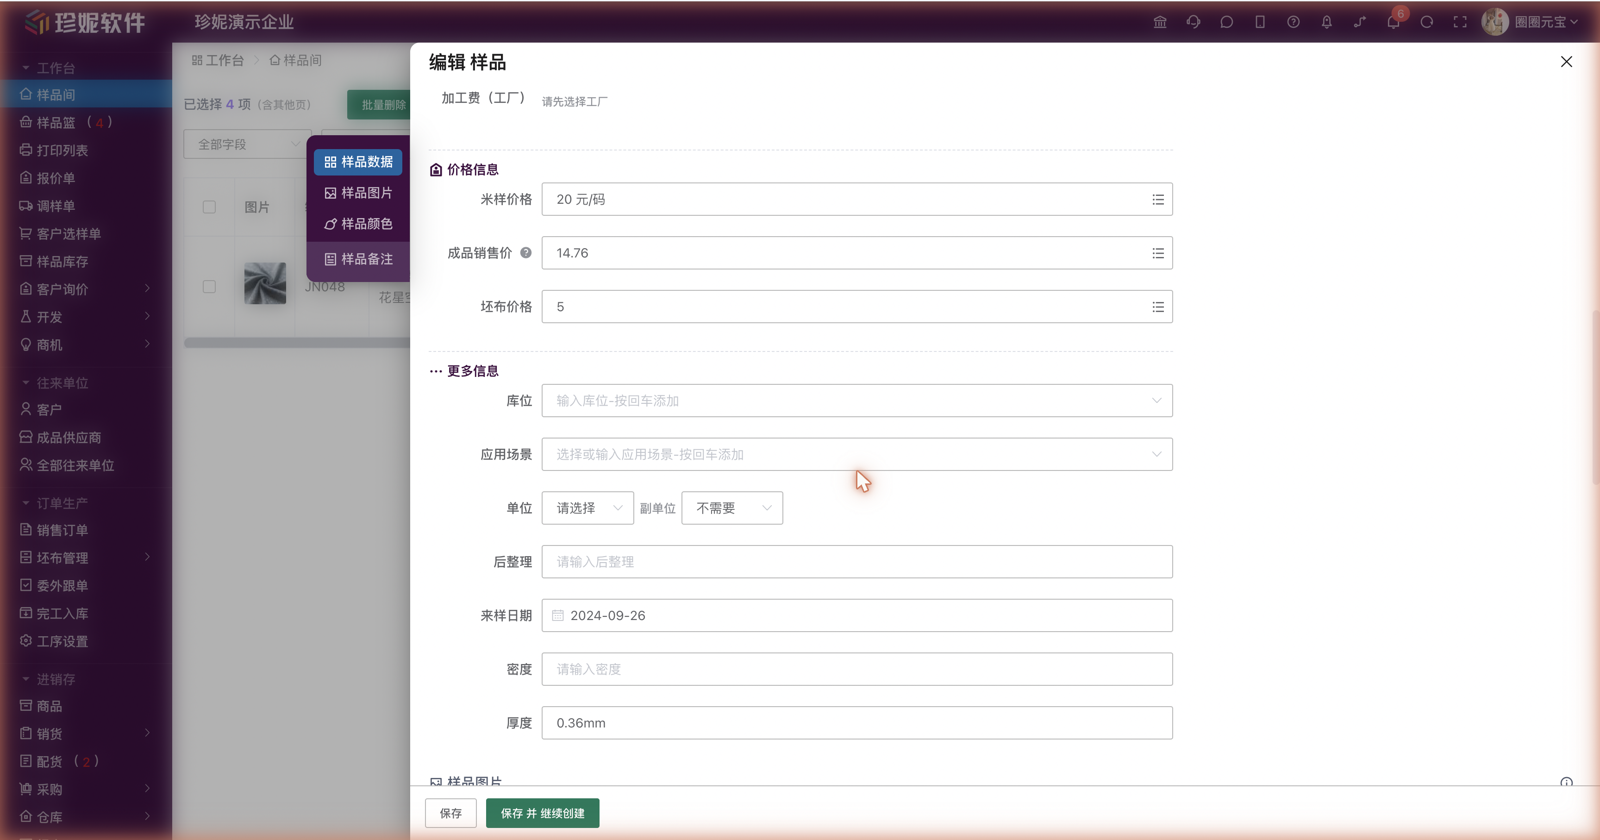
Clearer field names
Starting June 2026, the default field names were renamed for clarity: 进货价格 ("purchase price") became 成品进货价 (finished product purchase price), 成品价格 ("finished product price") became 成品销售价 (finished product selling price), and 样品价格 ("sample price") became 米样价格 (meter sample price). The meanings are unchanged. Fields your company had already renamed keep their custom names.
Each price field has a change-history entry to its right, where you can review every price change (amount / who changed it / when).
One-Click Fill from Supplier Quotes
Once supplier quotes have been entered, an 「采用」(Adopt) dropdown appears to the right of the finished product purchase price and greige price input boxes, listing each supplier's quote (suppliers with itemized cost calculation enabled show the converted itemized quote). Click an entry to fill it into the price field—no need to copy it over by hand.
Supplier Itemized Quotes (Cost Settings)
When editing a sample, each supplier in the finished-product supplier / greige supplier tables has a 「成本设置」(Cost Settings) button below its name (it reads "成本设置·已启用" / Cost Settings · Enabled once turned on). Click it to expand that supplier's itemized cost calculation:
- Finished-product supplier: tick "enable finished-product cost calculation", then fill in the conversion method (full meter / net weight), short-meter rate, tolerance, tax point, and target profit—the system converts these into an itemized quote automatically
- Greige supplier: tick "enable greige cost calculation", then fill in the loss rate, tax point, and target profit
Itemized calculation is entirely optional: leave it disabled or unfilled and everything works exactly as before; once enabled, a converted-quote tag appears next to the supplier's name.
Cost Calculator
The price section provides a Cost Calculator: enter the greige price, greige-to-finished shrinkage, estimated dyeing fee, other processing fees, management fee, rolling fee, and expected profit margin, and it computes the estimated cost and the customer quote. The formula:
Greige price / (1 − greige-to-finished shrinkage %) + dyeing fee + other processing fees + management fee + rolling fee = cost; cost × (1 + profit margin %) = customer quote
Once the customer quote is calculated, click 「添加到成品销售价」(Add to finished product selling price) to write it into the price field (the change is recorded in the price history).
Who Can See Costs
Cost-related information (the cost calculator, itemized quotes, the cost block, etc.) is visible only to the company owner by default. To authorize an employee, use either of these two paths:
- Finance settings whitelist: Personalization Settings → System Settings → Finance Settings (owner-only), and add the employee to the cost-calculation authorization list
- Role permission: Personalization Settings → Role Management, and tick the 「样品-看成本」(Samples – view costs) permission for the role (unticked by default)
Employees without cost permission don't see the cost calculator on the edit page, and the cost block on the detail page stays hidden.
Cost and Supplier Display on the Detail Page
- Cost fields on the detail page are gathered into a standalone 「成本计算」(Cost Calculation) block (gray background, with the formula shown as a caption), displayed only when you have cost permission and cost fields have been filled in
- Finished-product suppliers / greige suppliers / factories are listed row by row in the detail summary area—whatever has been filled in (code, product name, spec, quote, processing fee, notes) is shown directly, with no need to open the edit page