
Document Printing Setup Guide
🆘 Having a printer problem?
90% of common printer problems can be solved on your own. Please start with Printer Troubleshooting Quick Guide and find your answer by symptom. For hardware issues (won't power on / paper jam / driver), contact the printer manufacturer's support directly—they know best. We're always here to help with software-related issues.
Why this guide?
Document printing is a high-frequency task in the fabric trade—you might print dozens of sales orders and purchase orders a day. If the print settings are wrong, you'll run into:
- Content shifted off-center or running past the paper edges
- Faint text on the 2nd/3rd copy of multi-ply paper
- Having to manually choose the paper every time you print
- Paper jams or uneven feeding
Spend 10 minutes setting it up properly with this guide, and you'll be able to print with one click afterward—no more wrestling with paper and formatting over and over.
Which printer do you need?
Most fabric businesses actually don't need to buy a dedicated dot-matrix printer. Choose based on your real needs:
| Need | Recommended solution | Setup difficulty |
|---|---|---|
| Just need to print documents for customers | An ordinary laser/inkjet printer on A4 paper—print as many copies as you need | No setup, plug and play |
| Need carbon copies (multiple plies at once, with carbon on the bottom ply) | Dot-matrix printer + multi-ply paper | Paper setup required (see below) |
Recommendation
If you don't have a special carbon-copy requirement, printing on A4 paper with an ordinary printer is the simplest option—no special setup, ready to use. Need two copies? Print two: one for the customer to sign, one for your records. Jenny Software's Document Editor already provides preset templates in A4 format.
If you genuinely need a dot-matrix printer, read on for the setup guide.
Dot-matrix printer setup (for users who need carbon copies)
If you already have a dot-matrix printer
The following brands can be used:
| Brand | Common models | Notes |
|---|---|---|
| Epson | LQ-630KII, LQ-730KII | Best compatibility |
| Aisino | SK-820II | Good value for money |
| Jolimark | FP-630K+ | Durable |
Dot-matrix printer paper setup (the key step)
Common paper specifications
The fabric industry commonly uses the following paper specs for document printing:
| Paper type | Width | Height | Notes |
|---|---|---|---|
| Half-page (no perforation) | 9.50 in (241mm) | 5.50 in (140mm) | Most common, standard half page |
| Half-page (with perforation) | 8.50 in (216mm) | 5.50 in (140mm) | With tear-off perforated edges on left and right |
| Third-page | 9.50 in (241mm) | 3.67 in (93mm) | Small documents |
| Full page | 9.50 in (241mm) | 11.00 in (279mm) | Complete single page |
Important
Perforated and non-perforated paper have different widths! With paper that has left and right perforations, the actual printable width is 8.50 in (216mm), because there's about a half-inch perforated edge on each side that gets torn off. Getting this wrong causes content to print onto the perforated edge.
Setup steps (Windows 11)
1. Open printer settings
- Click the Windows Start menu → Settings
- Select Bluetooth & devices → Printers & scanners
- Find your dot-matrix printer (e.g., "EPSON LQ-630K") and click it
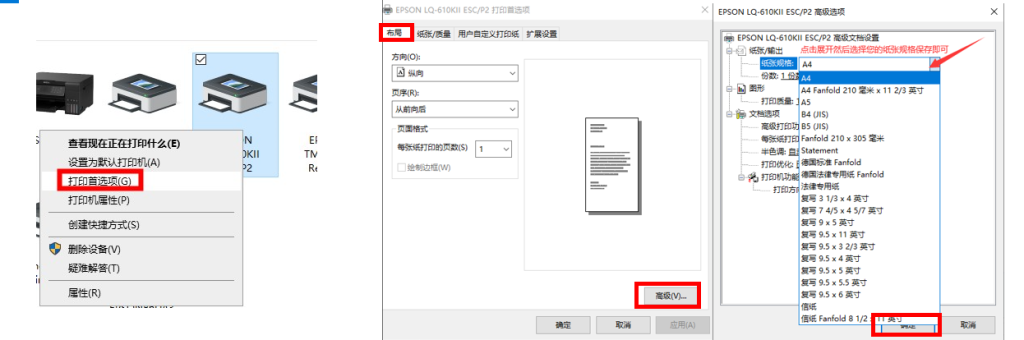
- Click Printing preferences
2. Set the paper size
In Printing Preferences:
- Find the Paper/Quality or Page Setup tab
- In the paper size dropdown, select "Half-page" (some drivers show it as "Half-page 241×140mm" or "Half Page 9.5×5.5in")
- This is the most common paper spec for printing sales orders in the fabric industry. Be sure to set it as the default in preferences, otherwise you'll have to select it manually every time you print
- If "Half-page" isn't in the dropdown, you'll need to create a custom paper size (see below)
3. If "Half-page" isn't in the list—create a custom paper size
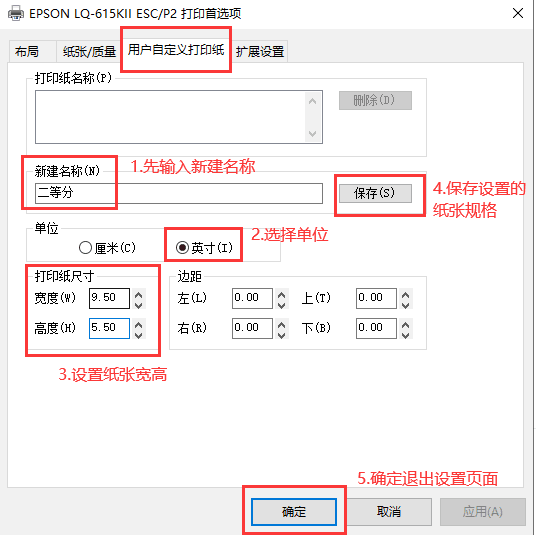
Some printer drivers don't have "Half-page" in the preset list, so you'll need to create it manually. Below uses the Epson LQ-630K (the most common dot-matrix printer in the fabric industry) as an example:
- In Printing Preferences, click the "User-Defined Paper" tab
- In the "New Name" box, enter:
Half-page - Set Unit to "centimeters"
- Set the paper dimensions:
- Width:
24.10(i.e., 241mm) - Height:
14.00(i.e., 140mm)
- Width:
- Margins: set left, right, top, and bottom all to
0.00 - Click the "Save" button
- The "Half-page" you just created will appear in the list; click "OK"
Other printer brands
Different brands have different driver interfaces, but the logic is the same—find the "Custom Paper" or "Paper Management" entry and create a 241mm × 140mm paper size. If you can't find a custom-paper entry in your printer driver, you may need to install the latest driver (see Printer Driver Downloads).
Note
- Before the printer driver is installed, the custom-paper options will be fewer or absent. Make sure you've downloaded and installed the complete driver for your model from the official website.
- A saved paper size can't be edited directly—this is a Windows limitation. To change it, select it, click "Delete," and recreate it.
4. Set the paper-feed method
A dot-matrix printer has two feed methods, and you must choose the right one, otherwise the paper won't feed properly:
| Method | When to use | How to tell |
|---|---|---|
| Rear feed (tractor) | Continuous / multi-ply paper | Paper feeds from the rear via chain sprockets; both sides of the paper have evenly spaced holes |
| Front feed (friction feed) | Single loose sheets | Paper is fed in manually one sheet at a time from the front |
The fabric industry typically uses the rear feed (tractor) method with continuous half-page multi-ply paper. In Printing Preferences, set "Paper Source" to "Rear Feeder" or "Tractor".
5. Set as default (very important)
You must save the settings in printer preferences, not just change them temporarily in the print dialog.
- In Printing Preferences, confirm: Paper Size = Half-page, Paper Source = Rear Feeder
- Click Apply → OK
- From then on, whether you print from Jenny Software or any other program, the half-page paper is used by default
- No need to select it manually every time you print
Common mistake
Many users change the paper size temporarily in the print dialog, think it's saved, but the next print job reverts to the default. You must enter Printing Preferences from "Printers & scanners" to change it—that's the permanent setting.
Special setup for perforated paper
If you use half-page paper with left and right perforations:
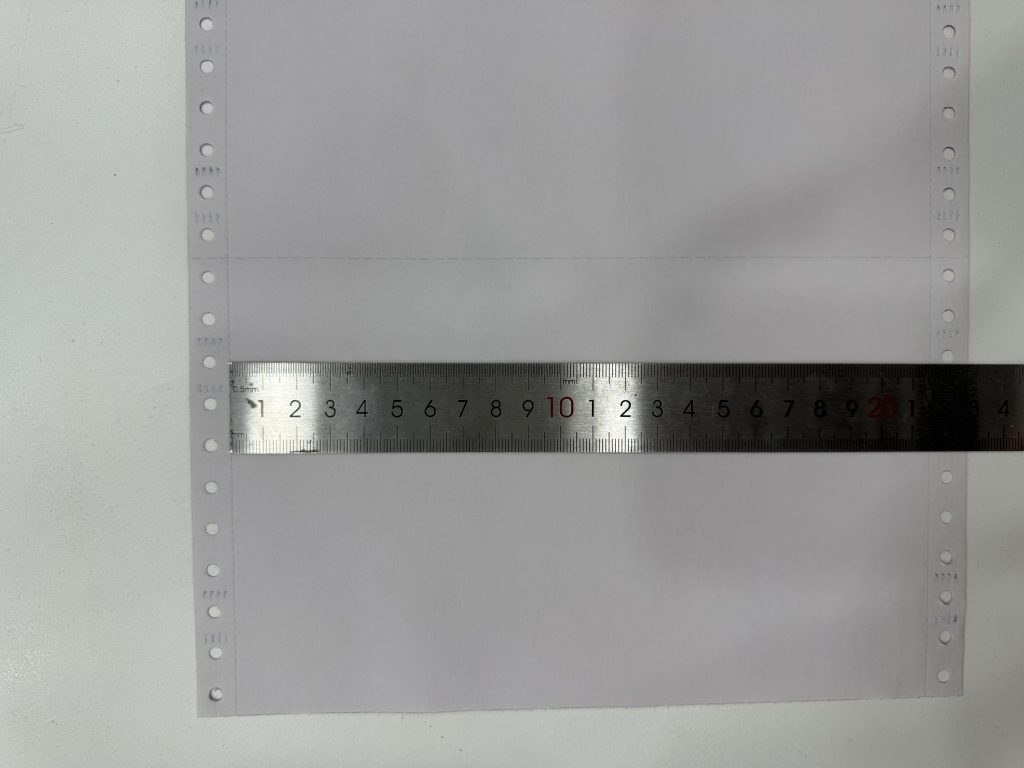
Set the width to 8.50 in (216mm) and keep the height at 5.50 in (140mm). This way the printed content automatically avoids the perforated areas on both sides.
Printing documents in Jenny Software
Print a sales order
- Open the sales order detail page
- Click the "Print" button
- The system renders the document using the default template set in the Document Editor
- Confirm the content and layout in the print preview
- Click print and select your dot-matrix printer
- Confirm the paper size matches the actual paper
- Click print
Print other documents
Purchase orders, stock-in orders, stock-out orders, receipt orders, and payment orders follow the exact same printing process, all managed through templates in the Document Editor.
Troubleshooting
Content shifted/not centered
Cause: The paper size setting doesn't match the actual paper.
Fix:
- Check that the paper size in printer preferences is correct
- Confirm 216mm width for perforated paper, 241mm width for non-perforated paper
- Check that the margins are set to 0
- Fine-tune the template margins in the Document Editor
Right side cut off (amounts truncated)
Symptom: Content prints fine partway, then the right side goes blank—amounts, totals, and other key data aren't fully shown.
Cause: The template content width exceeds the actual printable area of the dot-matrix printer. Different printers have slightly different physical print margins, and some models have a few millimeters of non-printable area on each side.
Solutions (from simple to complex—recommended order):
Option 1: Adjust the scaling at print time (simplest, try this first)
- Find the "Scale" option in the print preview dialog
- Change it from the default "100%" to "90%" or "95%"
- Preview again and check whether the right side is fully shown
- If still not, keep lowering it to 85%
- Once you find a good ratio, use it for all future printing
Tip
Adjusting the scaling is the fastest temporary fix. If you feel the text is a bit small after shrinking, then consider Option 2.
Option 2: Adjust the template margins in the Document Editor
- Open the Document Editor and edit your sales order template
- In the "Page Margins" area in the bottom-left:
- Increase the right margin (e.g., from 0mm to 5mm)
- If there's also a problem on the left, adjust the left margin too
- Save and reprint to test
- Fine-tune repeatedly until it's just right
Option 3: Switch to the perforated-paper setting
If you use non-perforated half-page paper (241mm wide) but your template is designed for full width, you can switch to the 216mm-wide paper setting in printer preferences to force a smaller print area.
Text on the 2nd ply is very faint
Cause: The printhead impact isn't strong enough.
Fix:
- Find "Print Density" or "Print Intensity" in printer preferences
- Increase the intensity (e.g., from "Normal" to "Dark")
- If it's a new printer, the impact will become more even after some use
Paper jam
Cause: The paper is loaded incorrectly or the feeder isn't aligned.
Fix:
- Check that the tractor (rear feed) sprockets are engaging the holes on both sides of the paper
- Make sure the paper is loaded centered
- Don't let excess paper pile up along the feed path
- Check whether the paper is warped from moisture
Print job shows "Printing" but the printer doesn't move
Cause: The continuous paper is loaded backward, so the tractor can't feed it properly.
Fix: Continuous paper has a direction. Rotate the paper 180 degrees and reload it so the holes on both sides align with the tractor sprockets. Once it's loaded the right way, the printer will feed normally.
Printout is a blank page
Cause: The feed method is set incorrectly.
Fix:
- Check "Paper Source" in Printing Preferences
- If feeding with the tractor, select "Rear feed"
- If feeding sheets one at a time, select "Front feed"
Having to manually choose the paper size every time
Cause: It wasn't set as the default.
Fix:
- Open printer preferences (not a temporary change in the print dialog)
- Set the paper size
- Click "OK" to save
- It will be used by default from then on
Printout has headers/footers like dates and URLs
The system already disables browser headers and footers automatically via CSS, so they shouldn't normally appear. If they still do, your browser may be an older version—you can handle it manually:
- Press
Ctrl + Pto open the print dialog - Find the "Headers and footers" option
- Uncheck it
- Click print again
Too much blank space on the left side of the printout
Cause: The physical paper-feed position of the dot-matrix printer pushes the content to the right overall, leaving too much blank space on the left.
Fix: Adjust the template's left margin in the Document Editor to compensate:
- Open the Document Editor and edit your template
- In the "Page Margins" area in the bottom-left, reduce the left margin (e.g., from 10mm to 5mm or even 0mm)
- Save and reprint to test
- Fine-tune repeatedly until the content is centered on the paper
Tip
Each printer's physical offset is different, so you'll need to adjust based on your actual print results. We recommend testing on plain paper first, then printing on multi-ply paper once it's dialed in.
Print preview looks fine but content is missing in the actual print
Cause: The content area in the template design exceeds the printable range of the actual paper.
Fix:
- Edit the template in the Document Editor
- Choose a paper size that matches the actual paper
- Shrink the font or adjust the layout to ensure nothing exceeds the boundaries
Paper purchasing advice
The multi-ply paper commonly used in the fabric industry can be bought from the following channels:
- Search "dot-matrix printer half-page paper" or "241 two-ply paper" on 1688/Taobao
- Common specs: 241mm × 140mm (half-page), two-ply/three-ply
- We recommend buying color-coded multi-ply paper (e.g., white + red ply) to easily distinguish the customer copy from the file copy
Related articles
- Document Editor — customize print templates for sales orders, purchase orders, etc.
- Printer Driver Downloads — driver download links by brand
- Thermal Label Printer Setup — installing and configuring a label paper printer
- Printer LAN Sharing — share one printer across multiple computers
- Label Printing Setup — fabric roll label template design