
Designing the Sales Tally Receipt Template & Configuring Payment Info
Who this is for
Owners / finance staff / salespeople setting up a sales tally receipt for their company for the first time. Read it through and follow along, and you'll have your own professional receipt in 30 minutes—complete with logo, bank account, and WeChat/Alipay payment codes, so customers can scan and pay at a glance.
If you just want an overview of the Document Editor's overall features, see the Document Editor. This article focuses more on "how to make a sales tally receipt that's ready to use right away."
The Big Picture
Designing a sales tally receipt takes 5 steps; do them in order and you won't go wrong:
1. Enter company payment info (bank account + payment QR code)
       ↓
2. Open document template management (find the entry point)
       ↓
3. Copy a preset template (don't touch the original; edit a copy)
       ↓
4. Adjust the template layout (fields / font size / logo / payment area)
       ↓
5. Set as default + print test (check the real result before sending to customers)
Prep Work: Gather These 4 Things Before You Start
Before you start designing, prepare the following materials so the process isn't interrupted:
| Material | Source | Purpose |
|---|---|---|
| Company logo (transparent PNG) | Designer / your previous business card print file | Brand identity at the top of the document |
| Bank account info | Company finance (bank, account name, account number) | For customers' corporate transfers |
| WeChat payment QR code image | WeChat → Me → Services → Pay/Collect → Collect via QR → Save image | For customers to scan and pay |
| Alipay payment QR code image (optional) | Alipay → Me → Collect → Save to album | For customers to scan and pay |
| Corporate payment QR code (optional) | Acquiring bank or WeBank | QR code for corporate transfers |
QR code image requirements
- White background, single image, with ample margins (higher scan recognition rate)
- PNG / JPG format, under 2MB each
- Recommended size: 400 × 400 to 800 × 800 pixels
- No text watermarks / logo decorations—a plain code is best (a text label is added automatically when printed)
Step 1: Enter Company Payment Info
Path: Left-hand menu → Enterprise Operations → Enterprise Center → Basic Info
The page is divided into 3 sections: Basic Info / Company Contacts / Payment Info.
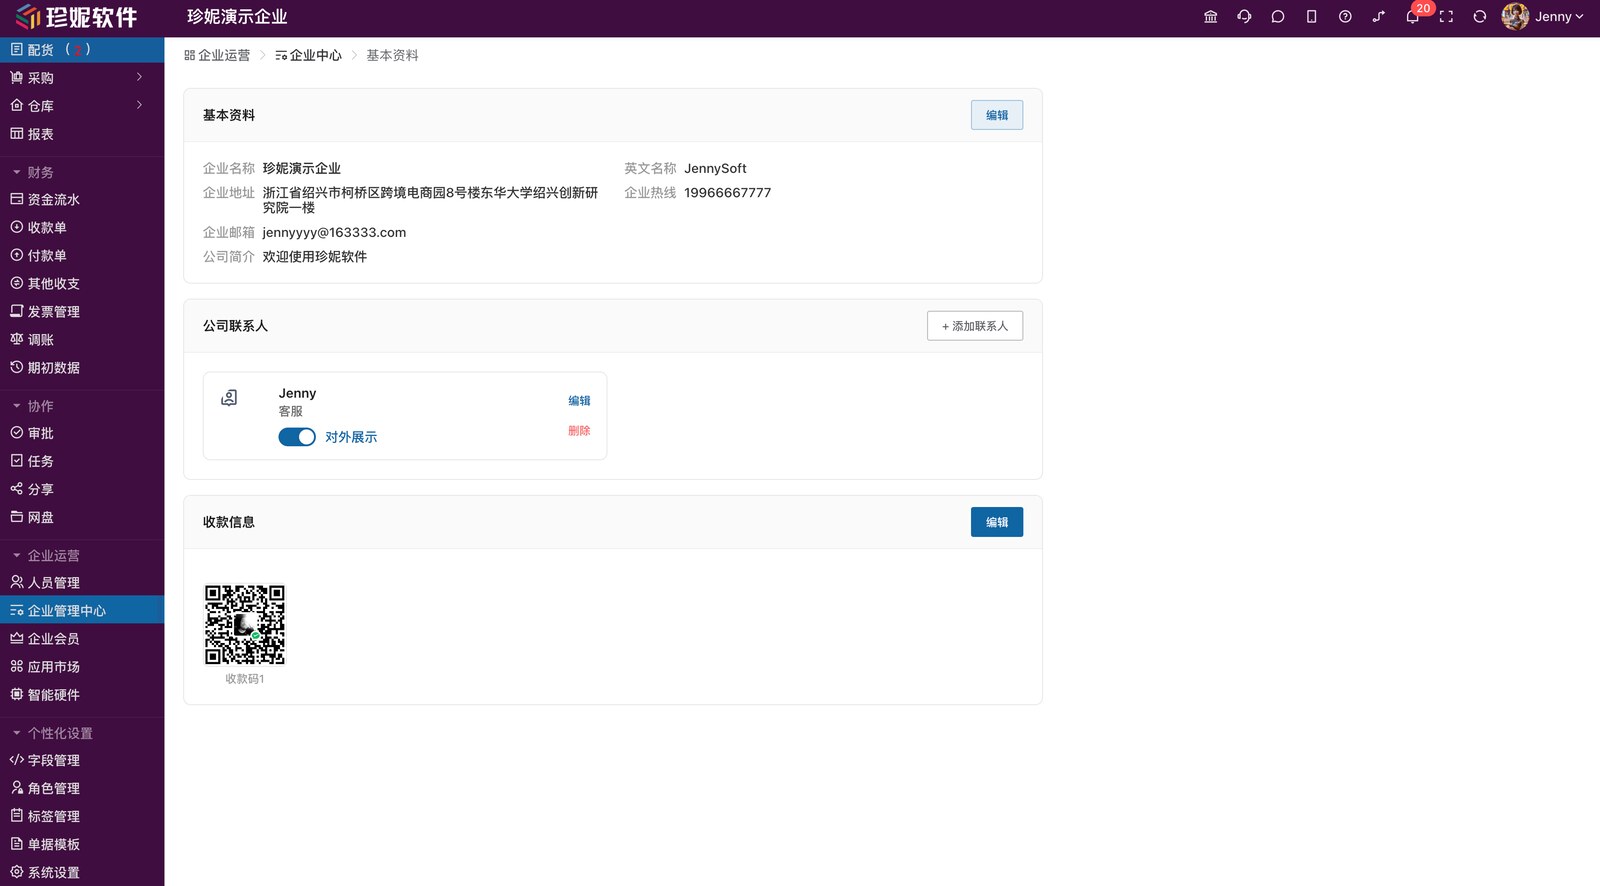
Scroll down to find the "Payment Info" section and click the "Edit" button in the top-right to start configuring.
Configure Bank Accounts (up to 5)
Click the "Add Bank Account" button and fill in the following for each account:
| Field | Description | Example |
|---|---|---|
| Bank | Full bank name (including branch) | ICBC Hangzhou Keqiao Branch |
| Account name | The account holder (company or individual) | Shaoxing XX Textile Co., Ltd. |
| Bank account number | The full account number | 6217 0012 3456 7890 1234 |
How to use multiple accounts
- Use different accounts for different customers (e.g., a USD account for export customers)
- Keep the owner's personal account and the company's corporate account separate, using different accounts by business type
- By default, all added accounts appear on the sales tally receipt; you can manually hide some of them in the template
Upload Payment QR Codes (up to 3)
Click the upload box for payment code 1/2/3 to select and upload a QR code image. The most common set of 3:
| Position | What to put | How the customer uses it |
|---|---|---|
| Payment code 1 | WeChat payment code | Pay by scanning with WeChat |
| Payment code 2 | Alipay payment code | Pay by scanning with Alipay |
| Payment code 3 | Corporate payment code / backup | Large corporate transfers |
Order matters
The QR codes on the document are arranged in the order of payment code 1 → 2 → 3. Put the most commonly used one (usually WeChat) in payment code 1.
Save
After filling everything in, click "Save." Once "Saved successfully" appears, all of your company's sales tally receipt templates will automatically use this payment info—no need to re-enter it on every document.
Step 2: Open Document Template Management
Path: Left-hand menu → Personalization Settings → Document Templates
The left side of the page is a category list (sales order / purchase order / stock-in / stock-out / receipt / payment), and the middle shows the template cards for that category: each card shows the template name + a type label (Default / Preset / Custom) + paper size + orientation.
Click the "Sales Order" category to see several system-preset templates: there are A4 landscape versions (good for laser printing / PDF), dot-matrix printer versions (dot-matrix paper, 2-ply/3-ply), and large-font dot-matrix versions to choose from.
Each card has "Preview" and "Set as Default" buttons. To copy, edit, or create a new template, click "Go to Online Editor" in the top-right of the page to enter the full editor (see Steps 3 and 4 below).
Template Type Labels
| Label | Meaning |
|---|---|
| Preset | A factory template that ships with the system; not directly editable |
| Custom | One you created or copied and then modified; freely editable |
| Default | The print template currently in use (used automatically when printing a sales order) |
Step 3: Copy a Preset Template (highly recommended)
Don't edit a preset directly
Preset templates are factory references. Editing one directly may break a version others are also using. The right approach is to make a copy and edit the copy freely.
How to Do It
- On the template list page, click "Go to Online Editor" in the top-right to enter the full editor.
- Choose a suitable preset template (the A4 version or a dot-matrix printer version).
- Click the "Copy Template" button on that template.
- The system adds a copy to the custom template list.
- Rename the copy to something meaningful (e.g., "Shaoxing XX Textile - Sales Tally Receipt," "Export Customers Only").
Which Preset Should You Base It On?
| Your situation | Recommended preset |
|---|---|
| Printing PDFs / email with A4 paper / a laser printer | Choose the A4 landscape version |
| Printing 2-ply / 3-ply with 9.5×5.5 inch dot-matrix paper / a dot-matrix printer | Choose a dot-matrix printer version |
| The printout is too small to read clearly | Choose the large-font dot-matrix version |
A preset template roughly looks like this (using the A4 landscape version as an example):
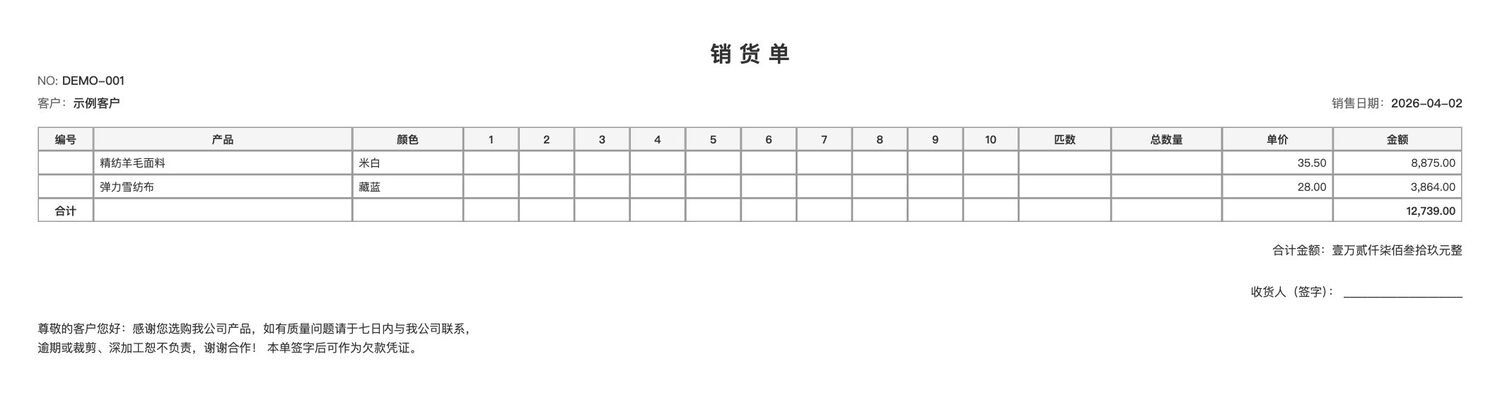
Click the "Preview" button on any template card to pop up a preview like this. Preview first and understand the structure clearly before deciding which one to copy.
Step 4: Adjust the Template in the Editor
From the template list page, click "Go to Online Editor" in the top-right to enter the online editor, then open your copy there for visual editing.
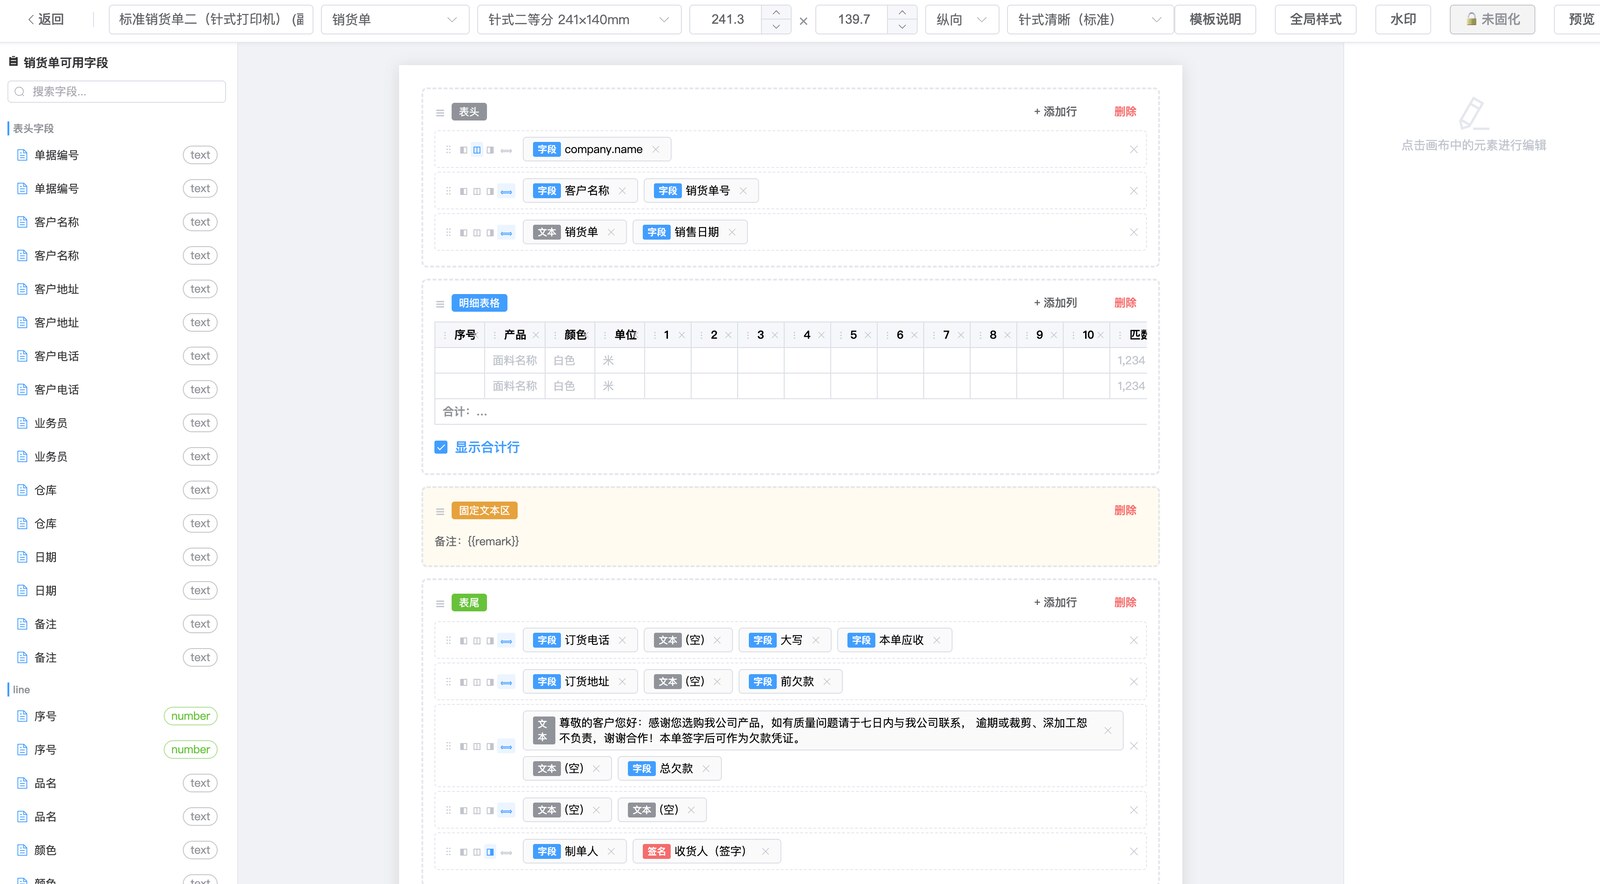
The editor has 4 areas:
┌─────────────────────────────────────────┐
│  [Left field panel]  [Center canvas]  [Right properties] │
│  - Header fields      (WYSIWYG          - Font size │
│  - Line-item fields    editing area)    - Color    │
│  - Summary fields                       - Alignment │
│                                           │
│  [Bottom: Add element + Page settings]   │
└─────────────────────────────────────────┘
4.1 Adjust Page / Paper
Click "Page Settings" at the bottom:
| Setting | Recommended value |
|---|---|
| Paper size | A4 (210×297mm) or custom (3-ply 241×140) |
| Orientation | A4 → landscape (fits more piece-level measure columns); 3-ply → portrait |
| Margins | Top/bottom 10mm, left/right 10mm (narrower for dot-matrix printers, 5mm) |
4.2 Header (company info + document info)
Drag the following fields from the left to the top of the canvas:
| Field | Data source | How it displays |
|---|---|---|
| Company name | company.name | Main title position |
| Company phone | company.phone | Top-right of header |
| Company address | company.address | Below the company name |
| Sales order number | auto | Top-right of header |
| Sale date | header.date | Top-right of header |
| Customer | header.clientName | Center of header |
4.3 Upload the Logo
- Click "Add Element" at the bottom → choose "Image."
- Drag it to the top-left of the canvas header.
- Click the image → "Upload Image" in the right properties panel → choose your logo PNG.
- Drag a corner to resize; we recommend a height of 30-50mm, not exceeding the header height.
4.4 Line-Item Table (products + piece-level measures)
The center canvas has an auto-looping table that displays each product row. Click the table header to see the available columns:
| Column | Recommended to keep? | Description |
|---|---|---|
| Sequence | ✅ Must keep | 1 / 2 / 3 ... row number |
| Product | ✅ Must keep | Fabric product name |
| Color | ✅ Must keep | What multi-color sample customers care about most |
| Unit | ✅ Must keep | Meters / kilograms / pieces |
| Piece-level measures 1-10 | ✅ Recommended | Independent meters per bolt, 10 columns total |
| Pieces | ✅ Must keep | Total pieces for that row |
| Total quantity | ✅ Must keep | Total meters for that row |
| Unit price | ✅ Must keep | CNY/meter |
| Amount | ✅ Must keep | Unit price × quantity |
Delete unwanted columns by clicking ✕; to add a column, click "+ Add Column" and pick from the field panel.
How to decide the number of piece-level measure columns
- The line-item table provides 10 piece-level measure columns (1–10), which is enough for most customers (it's rare to have more than 10 bolts in one color).
- You can delete any piece-level measure columns you don't need to make the table more compact.
4.5 Footer (signature + notes)
Drag the following elements to the bottom of the canvas:
- Total amount (figures + words)
- Order phone (
header.clientPhone) / Order address (header.clientAddress) - Creator / Salesperson
- Signature line: click "Add Element" at the bottom → "Signature line," labeled "Recipient (signature)."
4.6 Payment Info Area (the core of this article!)
Find the "Payment Info" block at the bottom of the canvas. If the template doesn't have one, add it yourself:
Add Bank Account Text
- "Add Element" at the bottom → "Text."
- In the right properties panel, set the data source to
company.paymentInfo. - The data source is automatically bound to the bank account you entered in Step 1.
It will display automatically as:
Bank: ICBC Hangzhou Keqiao Branch
Account name: Shaoxing XX Textile Co., Ltd.
Account number: 6217 0012 3456 7890 1234
If there are multiple accounts, it automatically lists them all in order.
Add Payment QR Codes
- "Add Element" at the bottom → "Image."
- Drag it to the payment area at the bottom of the canvas.
- In the right properties panel, set the "data source" to
company.paymentQrcode1(corresponds to payment code 1 you uploaded in Step 1). - Resize it; we recommend around 40 × 40mm (easy to scan when printed).
- Add another, with the data source set to
company.paymentQrcode2(payment code 2). - Add another, with the data source set to
company.paymentQrcode3(payment code 3).
Label Each QR Code
Add a text element below each QR code reading "Scan with WeChat," "Scan with Alipay," and "Corporate Payment."
Recommended Layout
For landscape A4 paper:
[Bank account text]    [WeChat code]  [Alipay code]  [Corporate code]
Bank: ...               |scan|         |scan|         |scan|
Name: ...              WeChat         Alipay        Corporate
Account: ...
Step 5: Set as Default + Print Test
Set as Default
- Close the editor (saves automatically).
- Return to the document template management page.
- Click "Set as Default" on your copy's card.
- A green "Default" label appears in the card's top-right = set successfully.
Print Test
- Enter the detail page of any existing sales order.
- Click the "Print" button.
- The browser opens a print preview; check 4 things:
- ✅ Logo size and position look right
- ✅ Payment QR codes are clear and recognizable (view at 100% browser zoom)
- ✅ Bank account info is correct
- ✅ There are enough piece-level measure columns in the line-item table, and the total amount adds up
- Print it on a real printer and scan the QR codes with your phone to confirm they're recognized (printed codes have a lower recognition rate than on-screen ones).
Must do: actually scan once with your phone
Due to the limited resolution of thermal / dot-matrix printers, the scan rate of printed QR codes is not 100%. The first time you print, be sure to scan once with your phone to confirm. If it won't scan:
- Enlarge the QR code block (start at 48mm)
- Keep it away from fold lines / binding lines
- Use a higher DPI mode on the printer (see Thermal Label Printers)
Advanced: Switch Templates by Scenario
Different customers / scenarios can use different templates. A few common sets:
| Template purpose | What to name your copy |
|---|---|
| Domestic retail/wholesale | "Standard Sales Tally Receipt" (set as default) |
| Large export customers | "Export Sales Order (English version)" |
| Long-term key customers | "VIP Customer Sales Order" (no logo placeholder, large font) |
| Dyehouse processing business | "Processing Tally Receipt" (emphasizing process, shrinkage) |
| A simplified version without prices | "Simple Tally Receipt (no prices)" (an internal delivery note for salespeople) |
How to switch: on the template management page, "Set as Default" the template you want to use, and printing will use the default template.
Automatically apply different templates to different customers?
Currently you need to switch the default template on the template management page; the system won't automatically apply different templates by customer name. In the future we may consider applying the approach of Contract Field Templates to add customer-level templates for sales orders too—pending product planning.
FAQ
Q: If I change the "Payment Info" block in a template once, does it apply to all sales orders?
A: Yes. Template changes apply globally; once you save, all sales order prints using that template will use the new version. Already-printed documents won't change (those are snapshots from the moment of printing).
Q: After uploading a QR code image, it doesn't show in the template—what should I do?
A: 3 things to check:
- Did you set the image element's "data source" correctly in the template (
company.paymentQrcode1/company.paymentQrcode2/company.paymentQrcode3)? - Did you save when uploading the QR code in Step 1? (Go back to "Enterprise Center → Basic Info" to see if it's still there.)
- Is the image element's size 0? (Check the width/height in the right properties; change it to 40-60mm.)
Q: Can the payment info show different QR codes / accounts for different customers?
A: Not currently. The system's payment info is unique at the enterprise level. If you want to show a USD account for export customers and an RMB account for domestic customers, you can make two sales order templates (export version with USD account text, domestic version with CNY account) and switch the default template on the template management page before printing.
Q: The printout text is too small to read—how do I adjust it?
A:
- Select a field element → enlarge the "font size" in the right properties panel (12-16px is common).
- Do not change the browser zoom.
- Field font sizes inside the table must be set separately (select the header column and adjust).
Q: A field on the printout is blank with no data?
A: 3 possibilities:
- The data source isn't bound correctly (check the right properties).
- This field wasn't filled in on the sales order (e.g., if the customer has no phone set, the template is blank).
- The field name is misspelled (fields dragged in from the field panel won't be wrong; manually typed field names are easy to get wrong).
Q: Can I add a QR code to the receipt that scans to this order's details?
A: Yes. "Add Element" at the bottom → "QR Code" → set the data source to header.shareUrl. After scanning, the customer can view the complete document in the WeChat mini program.
Q: If I want to change the template after printing, do I need to reprint?
A: No. After the template is changed, documents printed in the future use the new version. Documents already printed or exported to PDF don't change.
Q: I have a hand-drawn design—can I just hand it to Jenny to make the template?
A: Yes. Send your design (Word / PPT / a photo of a hand drawing all work) to support, describe clearly where each field goes, and we'll design it for you—usually done in 1-2 business days.
Q: There are lots of fields in the template; when I change one, it affects others—what do I do?
A: This happens because two elements in the template use the same data source. We suggest clicking an element first to see its data source on the right, finding all the duplicate-named elements, and adjusting each one's style separately.
Q: Can a print template be shared across companies / sold to others?
A: Not currently (each company is independent). A cross-company template marketplace is in planning.
Q: When a dot-matrix printer prints multi-ply paper, the text on the 2nd and 3rd ply is unclear?
A: The ribbon is too old / the pressure bar isn't tight enough—replace the ribbon and adjust the pressure bar. See the Document Printing Setup Guide. The template itself is fine.
Can't Design It Yourself? Here's the Fastest Way
Don't struggle—just contact support
If you've read the docs and still find it complex, the fastest way is:
- Contact support—describe what you want (or provide a reference image), and support will make a template for you, usually done by the end of the day.
- Keep the preset template—the preset "Standard Sales Order" is enough for most small and medium customers; just "Set as Default," you don't necessarily need to customize.
- Look at competitors' / peers' sales orders—modifying someone else's sales order as a reference is much faster than designing from scratch.
Related Articles
- Document Editor — The general document template editing tool
- Quickly Issue a Sales Tally Receipt — How to issue a sales order (the order-issuing flow; this article is about designing the template)
- Field Management — Sales order custom fields
- Document Field Customization & Export — The complete rules for field configuration
- Document Printing Setup Guide — Windows dot-matrix printer configuration
- Thermal Label Printer Setup — Label printers (different from sales tally receipts)
- Quick Printer Self-Help — Troubleshooting print issues
- FAQ