
Staff and Role Management
Who is this for
The company owner or an administrator. If you need to open accounts for staff, assign them to departments, and configure role permissions, read this.
Jenny Fabric Software supports an unlimited number of staff (billed per seat) and manages team collaboration through a three-layer model of department + role + permission.
Where to find it
- PC: left menu → Operations → Staff Management / Role Management
- App: bottom tab "Company" → "Staff" → Create Employee / Invite Employee
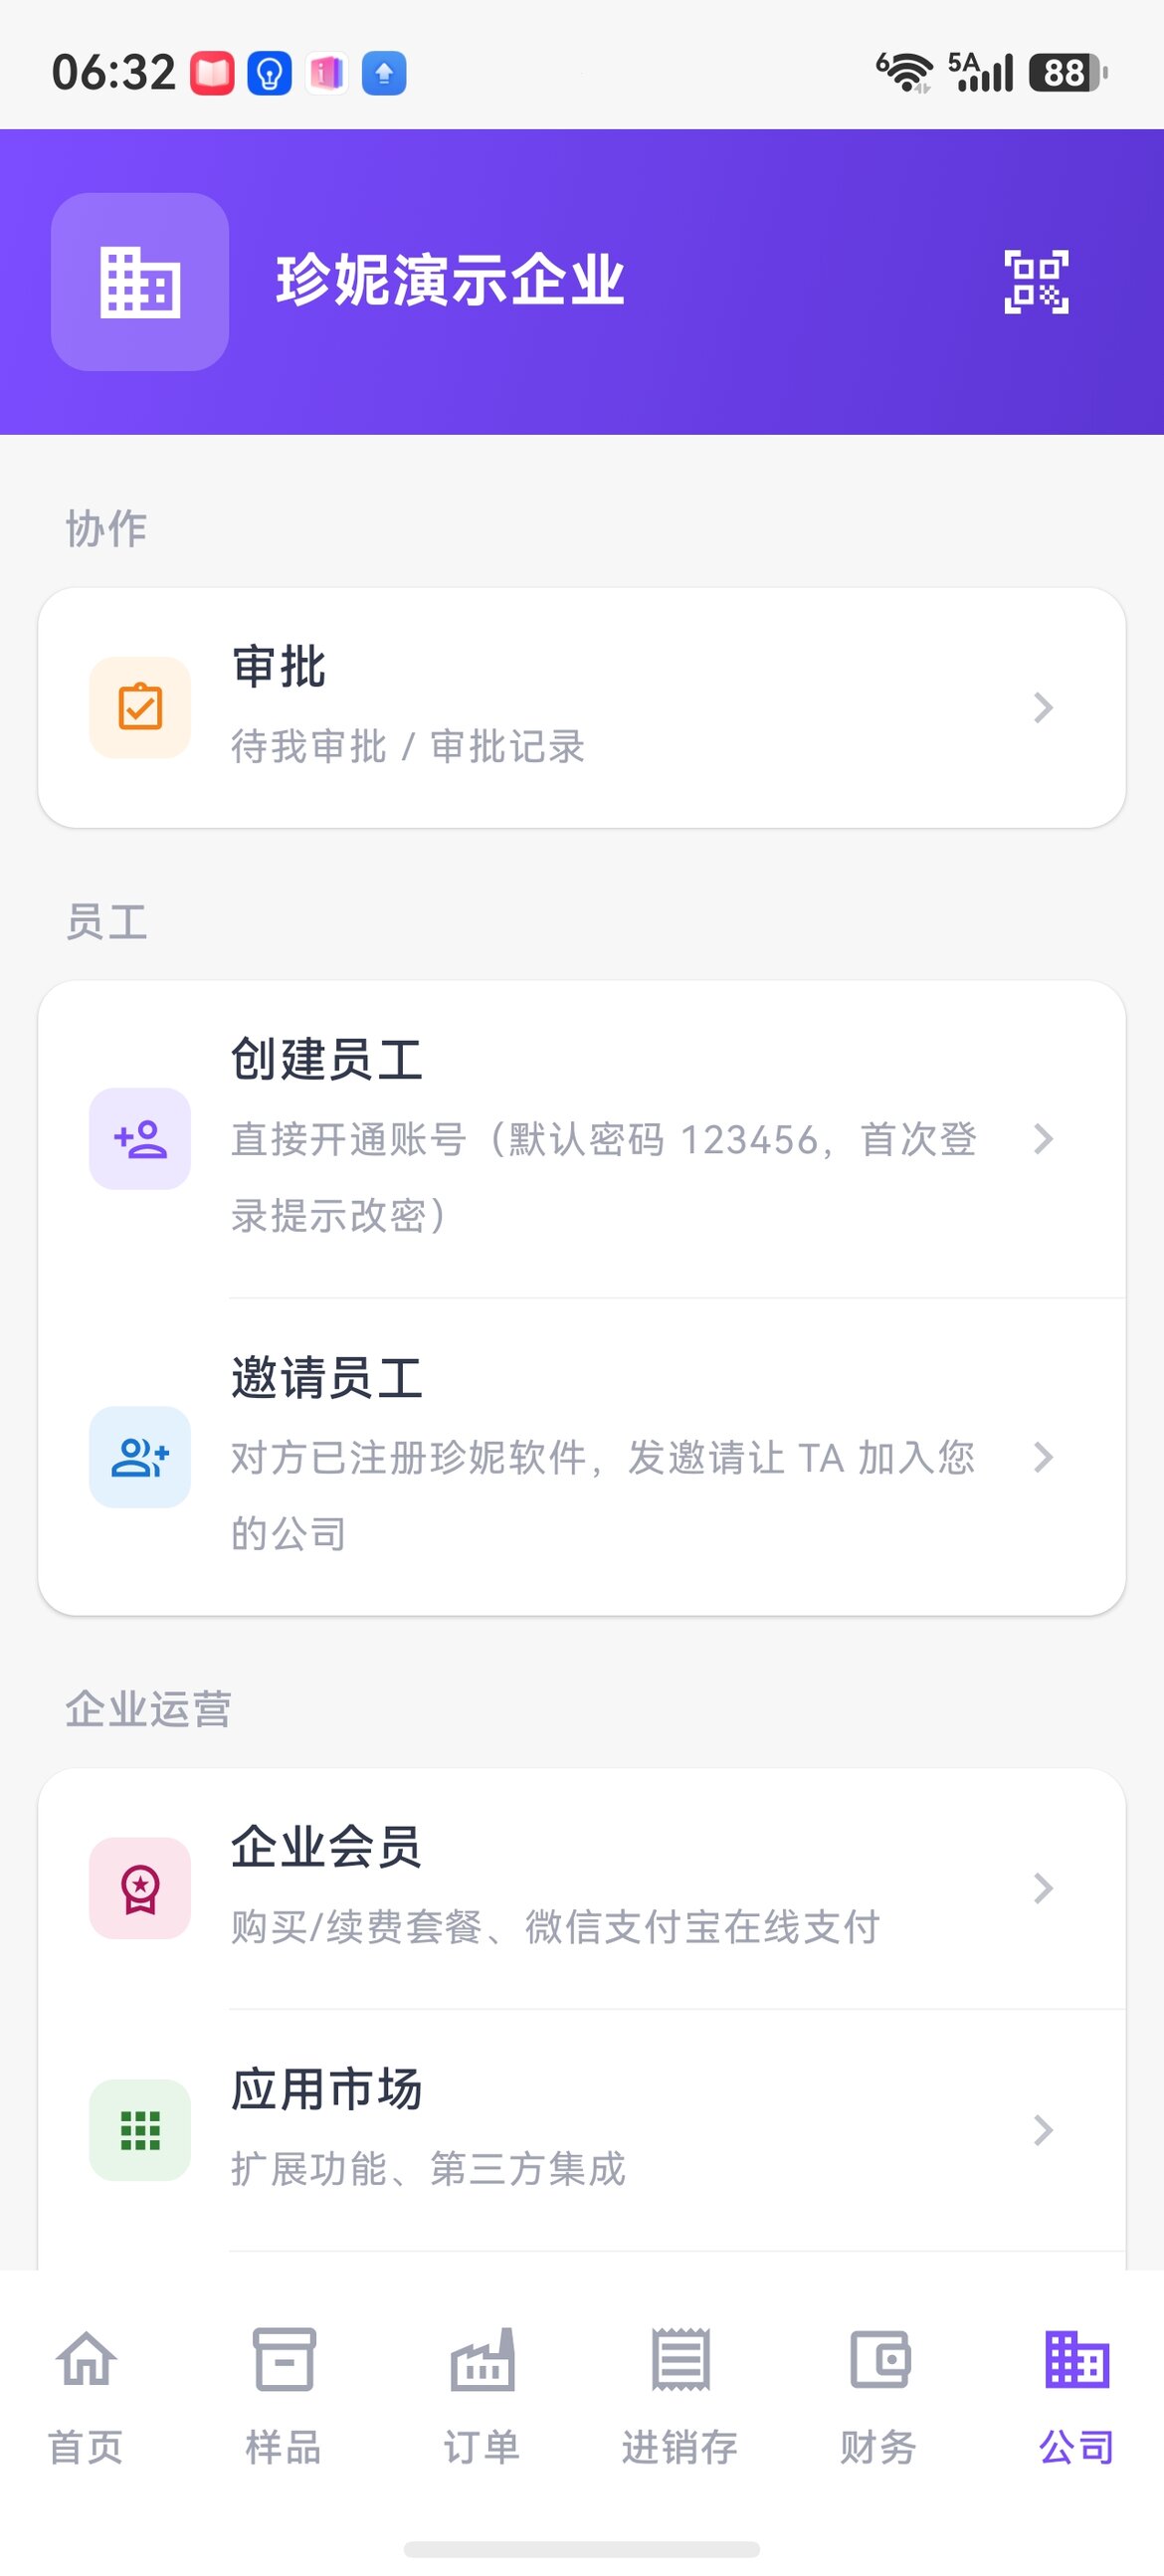
Two ways to add staff
There are two routes for opening accounts for your team members, chosen by whether the person already has a Jenny account:
| Aspect | Invite Employee | Create Employee |
|---|---|---|
| Best for | The person has already registered with Jenny Software | The person hasn't registered, or you want to open the account for them directly |
| Who sets the password | The person keeps their existing password | You set the default password 123456 |
| Process | Enter their phone number → they receive an invitation SMS → they tap "Accept" under "My Invitations" | You fill in the employee's name + phone number → the system creates the account directly → on first login the employee is reminded to change the password |
| Timing | Depends on when they accept; could take a few days | Effective immediately |
| Typical scenarios | A peer joining with an existing account, a temporary partner | A new hire, or batch-creating accounts for warehouse / finance staff |
Which to choose?
- Not sure whether the person has an account → choose Invite first; if they haven't registered, have them register, or switch to Create
- Want the employee to be able to use it right away → use Create
Method A: Invite Employee (the person already has an account)
On PC
- Left menu → Operations → Staff Management
- Click the "Invite Employee" button
- Enter the person's phone number (it must match the phone number bound to their Jenny Software account)
- Select a department and role (can be adjusted later)
- Click "Confirm Invitation" → the system sends them an invitation SMS
On the App
Bottom tab "Company" → "Invite Employee" → enter the phone number → select department / role → send
After they receive it
- They receive the invitation SMS ("Company XX invites you to join...")
- They open Jenny Software, log in, and go to the company list or "My Invitations" in the top bar
- They tap "Accept" → they join the company
- On your end, the employee immediately appears in the "Staff Management" list
Invitation failed / they didn't receive it?
- Check that the phone number is correct (even one wrong digit won't work)
- SMS-platform interception: have them log in to Jenny Software directly → they'll see it under "My Invitations"
- They haven't registered yet: have them register with the same phone number, and the invitation will appear automatically
Method B: Create Employee (open the account directly)
For when you want to open an account for an employee directly, without waiting for them to register.
On PC
- Left menu → Operations → Staff Management
- Click the "Create Employee" button
- Fill in the employee's name + phone number (the phone number becomes their login account)
- Select a department and role
- Click "Confirm Creation" → the system automatically activates the account with the default password
123456
On the App
Bottom tab "Company" → "Create Employee" → likewise fill in name + phone number + select department / role → confirm.
The employee's first login
After you give the employee their account info (phone number + default password 123456):
- The employee opens Jenny Software → enters the phone number +
123456on the login page - The system pops up a "We recommend changing your password now" reminder (not mandatory — there's a "Remind me later" button, and the employee can enter the system without changing it; the reminder reappears at the next login until they do)
- The employee sets a new password → done
The default password 123456 is known to everyone
The default password is a publicly known weak password. The employee is reminded to change it on first login, but it's not mandatory — they can tap "Remind me later" and enter the system directly. Until the password is changed, the account is effectively "wide open," so notify the employee to log in and change the password as soon as you create the account to prevent misuse.
What's already in place after creation
- The employee can log in immediately and see all company data (filtered by their role permissions)
- The employee's phone number is registered in the system, so they can be selected when assigning a customer's owner
- The employee can independently create / edit documents under their own name (performance reports aggregate by owner)
If the phone number is already registered by someone else
- The system will prompt "This phone number is already registered"
- Switch to the Invite Employee method (the person with that number is the employee you want to add — have them log in and accept the invitation)
Removing / deleting staff
When an employee leaves or transfers, you need to remove them from the company:
- Left menu → Operations → Staff Management
- Find the employee → click "Remove" (or "Delete")
- Confirm → effective immediately
Deleting an employee ≠ deactivating their account
- The employee is removed from your company and can no longer see your company's data
- Their own Jenny Software account remains (phone number / password / registration info are kept)
- The documents they created / samples they entered still belong to your company and won't be lost
- They can join another company and keep using it
- To restore: just invite / create again
Department management
Why use departments
- Data access control: Sales Team 1 only sees Team 1's customers, Team 2 only sees Team 2's (avoiding order grabbing)
- Sales attribution: sales performance is aggregated by department
- Distinguishing sample sources: each department can set its own department code, printing different prefixes on hanging cards / labels
- Approval-flow routing: documents from different departments can follow different approval paths
Steps
PC left menu → Operations → Department Management → "New Department"
Fields:
- Department name (e.g. "Sales Team 1," "Warehouse," "Export Department")
- Department head (assign one employee)
- Department code (optional; once enabled, used as a sample / label prefix to distinguish departments)
- Add members (assign employees to the department; multiple selection allowed)
Role-permission system
The three-layer permission model
Permissions are configured at three levels of granularity: functional module → submodule → action:
| Level | Content | Example |
|---|---|---|
| L1 Major module | Workbench / Inventory / AI / Collaboration / Marketing / Operations / Finance | Whole-group toggle |
| L2 Submodule | Sample room, sales order, purchase order, picking order, quotation, task, cloud drive | Module-level toggle |
| L3 Specific action | Create / Edit / Delete / Print / Share / Import / Export / View | Per-action toggle |
For example: "Sales rep A can only create sales orders for their own customers and cannot edit others' orders" = sales order Create ✅, Edit (own creations only) ✅, Edit (others' creations) ❌, Delete ❌
Role management interface
The 3 default system roles
| Role | Characteristic | Default permissions |
|---|---|---|
| Owner | Unique, undeletable | All permissions + can transfer the company + can delete the company |
| Administrator | Standard role | Most operation permissions (no deleting / transferring the company) |
| Sales Rep | Standard role | Samples / sales / quotations etc. for their own customers |
Who is the owner?
The person who creates the company automatically becomes the owner. The owner is unique; to hand it over to someone else you go through the "Transfer Company" process: the owner initiates it, the new owner accepts, and the original owner is demoted to administrator.
Custom roles
The 3 preset roles aren't enough? Add your own:
- Left menu → Operations → Role Management → "New Role"
- Enter a role name (e.g. "Warehouse Supervisor," "Production Supervisor," "Export Specialist")
- Tick permissions: configure item by item across the L1 → L2 → L3 levels of granularity
- Save
The role name is just a label
The role name doesn't affect permissions — permissions are determined entirely by what you tick. The name "Warehouse Supervisor" won't automatically grant warehouse-related permissions; you still have to tick them. Naming is just for easy recall.
Assigning a role to an employee
Staff Management → find the employee → click "Edit" → change the "Role" field → save. Effective immediately, no need for the employee to log in again.
An employee can have only one role at a time (stacking multiple roles is not yet supported).
The three-level permission rule (important)
The permissions that actually take effect in Jenny Software follow a three-level model, not just the role:
| Level | Meaning | Example |
|---|---|---|
| L1 Enterprise permission | Whether the company has activated this module | Haven't bought the "Order Production" module → no one can see it |
| L2 User permission | Whether the current role has this feature | The sales-rep role doesn't tick "Role Management" → the entry is hidden |
| L3 Data permission | Which data they can see within their permission scope | A sales rep can only see the customers they own |
Every assignment / visibility scenario is filtered through these three levels: first L1 checks whether the company has it, then L2 checks whether the role can use it, and finally L3 checks which specific data they can see.
How the visible data scope is determined
Jenny Software's data scope isn't set via a standalone "data permission" dropdown on each employee. Instead it's determined jointly by the owner of the contact + the "participate in all / view all" permission points within the role:
| Data type | Scope rule |
|---|---|
| Contacts (customers / suppliers) | Ticked permissions like "View all customers" in the role → see all; otherwise only the ones where you are the owner |
| Sales orders / production task orders | Ticked "View all" → see all; otherwise only those you own, those you created, or those linked to your customers |
| Other documents (sales orders / purchase orders / inbound orders / outbound orders / samples, etc.) | Visible company-wide, no extra setting needed |
The company owner can view all data by default and is not subject to the limits above.
Sales reps can't see each other's data
By default, the sales-rep role does not tick "View all customers," so a sales rep can only see the customers they own — they can't see each other, which prevents order grabbing. To let certain people see everything, just tick "participate in all / view all" in their role.
The 5-step rollout
If you're just starting out and haven't built your team yet, this order works best:
- Create departments (e.g. Sales, Warehouse, Finance)
- Create custom roles (if needed — for most companies the preset roles are enough)
- Configure each role's permissions (tick across the L1 / L2 / L3 levels; to let a role see all customers, remember to tick "participate in all / view all")
- Invite / create staff and assign departments + roles
- Set contact owners so the corresponding sales reps can see their own customer data
Best practices
Define permissions by function
- Sales rep: Samples (view / edit) + sales orders + quotations + sample dispatch orders + customer management + reports (their own performance)
- Warehouse keeper: Inventory (inbound / outbound / picking / stock) + label printing, no sales / finance permissions
- Finance: Receipts & payments + statements + financial reports + invoice management, no sample / sales-order editing permissions
- Designer: Samples (create / edit) + AI design + cloud drive, no business / finance permissions
- Boss / GM: Administrator or owner role, full permissions
Choosing the visible data scope
- Small team (1–10 people): usually tick "View all customers" for every role to make collaboration easy
- Mid-size team (10–50 people): don't tick "View all" for sales reps — rely on owners managing their own customers to prevent order grabbing; tick "View all" for warehouse / finance
- Multiple sales departments: use contact owners to finely assign which sales rep follows up which customer
FAQ
Q: What's the difference between inviting and creating an employee?
A: Invite = the person already has a Jenny account; you send an invitation asking them to join, and it takes effect only after they accept. Create = you open the account directly, set the default password 123456, and the employee is reminded to change it on first login. See the comparison table above.
Q: Is the default password 123456 safe?
A: A change-password reminder pops up on first login, but it's not mandatory (the employee can tap "Remind me later" and enter the system directly; the reminder reappears at the next login). So notify the employee to log in and change the password as soon as possible after creation, and don't leave the account on the default password.
Q: What if an employee forgets their password?
A: Have the employee click "Forgot password" on the login page → reset it after SMS verification. You can't change a password for an employee (for security), but you can remove the employee and create them again to reset the default password.
Q: An employee left — what happens to their sales orders?
A: Removing an employee only takes them out of the company; all the documents they created / samples they entered still belong to the company. You can then reassign the corresponding customers to active staff.
Q: Can I configure an employee to "only view sales orders, not edit them"?
A: Yes. Role Management → edit the role → sales order module → "View" ✅, "Create / Edit / Delete" ❌.
Q: How is the seat count calculated? Do former employees occupy seats?
A: Seats = the number of active employees currently in the company. Resigned / removed employees don't occupy seats. The Enterprise edition includes 5 seats; beyond that, expand at ¥360 / seat / year. See Pricing.
Q: Can the owner be transferred?
A: Yes. The owner initiates "Transfer Company" → the new owner accepts → the original owner is demoted to administrator.
Q: Can multiple people log in to the same account at once?
A: Technically yes (it doesn't force a logout), but it's not recommended — all operation logs get mixed together and you can't tell who did what. One account per person is clearest.
Q: How is data isolated between sales reps?
A: By default the sales-rep role does not tick "View all customers," so they can only see the customers they own and can't see each other's customers or documents. To make everything visible to everyone, tick "participate in all / view all" in the role. See Data Access Permissions and Contacts and Data Permissions.
Q: Can administrators see the boss's data?
A: It depends on the permission configuration. If the administrator role ticks "View all customers," they can see the boss's customers and documents. Owner data has no special protection — it relies on role permissions + contact owners just like any other employee's.
Related articles
- 5-Minute Quick Start for New Users — registration + company creation in one go
- Pricing — seat-based billing rules
- Data Access Permissions — detailed data-permission configuration
- Contacts and Data Permissions — customer / supplier permissions
- Field Management — custom fields and permissions
- Multi-User Task Collaboration — task assignment and collaboration