
Thermal Label Printer Setup (Windows)
⚠️ Read this before buying a printer
A printer for fabric hang tags must be 300 DPI or higher—don't buy a cheap 200 DPI model in the ¥200 range.
The Chinese composition text / color numbers / QR codes on fabric hang tags are all printed at small sizes. At 200 DPI they will inevitably come out blurry and the QR codes won't scan, and a customer who can't read the tag means you printed it for nothing. 300 DPI is the minimum clarity threshold for the fabric industry.
Every model in the recommendation table below is a qualified 300 DPI or higher unit—just pick one based on your scale.
This article uses Windows as the example to walk through the complete setup process for a thermal label printer. Mac users, please see Mac Printing Setup.
🆘 Having a printer problem?
90% of common printer problems can be solved on your own. Please start with Printer Troubleshooting Quick Guide and find your answer by symptom. For hardware issues (won't power on / paper jam / driver), contact the printer manufacturer's support directly—they know best. We're always here to help with software-related issues.
Buying advice (important: choose 300 DPI, not 200 DPI)
The "clarity threshold" for fabric hang tags
Fabric hang tags carry several types of content—item number / Chinese composition / weight (GSM) / QR code—so you must choose a printer of 300 DPI or higher.
Cheap 200 DPI models (commonly in the ¥200 range) blur size-6 small text and have low QR scan rates. When a customer receives a tag they can't scan or read, you printed it for nothing. The hang tag is the customer's first impression—don't skimp on clarity.
🏆 Foolproof recommendations (by scale)
First tell these apart: computer printing vs phone-app / PDA printing
The recommendations on this page are thermal label printers connected to a computer (USB / network / driver); the models below are chosen for computer-side printing. If what you want is printing directly from the phone app or Jenny PDA, currently use the Dascom TL-332 / TL-333—the iOS app supports network printing (TCP:9100), while the Android app's Bluetooth print entry is not yet open (still being debugged). See Bluetooth / Mobile Label Printing.
| Your scenario | Recommended model | Price | Why |
|---|---|---|---|
| Micro / stall (< 200 prints/day, via computer) | HPRT N31BT | ¥499-699 | 300 DPI + USB, sharp and clear, top-selling domestic model, great value for computer printing |
| Phone-app / PDA mobile printing | Dascom TL-332 / TL-333 | per smart-hardware quote | The supported model for mobile. iOS supports network / Bluetooth printing; the Android app's Bluetooth entry is not yet open (being debugged) — see Bluetooth / Mobile Label Printing |
| Mid-size trader / showroom (200-2000 prints/day) | HPRT HT300 or Gainscha GP-1324D Plus | ¥899-1299 | 300 DPI wide format 108mm, compatible with large hang tags (100×60), dual connectivity, widely used in apparel & fabric factories |
| Industrial / export factory audit (> 2000 prints/day) | Zebra ZD421d-300 | ¥2800-3800 | 300 DPI + 10-year printhead life, a plus for factory audits by European/American customers |
Full model comparison
| Brand | Model | DPI | Print width | Connectivity | Price | Scenario |
|---|---|---|---|---|---|---|
| HPRT | N31BT ⭐ | 300 | 80mm | USB + Bluetooth | ¥499-699 | Desktop / portable |
| HPRT | T260L | 300 | 80mm | USB + Bluetooth + WiFi | ¥899-1199 | Common in apparel hang tag factories |
| HPRT | HT300 ⭐ | 300 | 108mm | USB + Bluetooth | ¥699-899 | Top pick for large hang tags |
| Gainscha | GP-3120TUC | 203 ⚠️ | 80mm | USB + Bluetooth | ¥399-599 | Entry-level, fuzzy on small Chinese text |
| Gainscha | GP-1324D Plus ⭐ | 300 | 108mm | USB + Bluetooth + Ethernet | ¥899-1299 | Widely used in apparel / fabric factories |
| Deli | DL-770DW | 300 | 80mm | USB + Bluetooth + WiFi | ¥699-999 | Many service centers, fine office-grade build |
| Deli | DL-888T | 300 | 108mm | USB + Bluetooth | ¥899-1199 | Wide format |
| Zebra | ZD421d-300 ⭐ | 300 | 104mm | USB + Bluetooth + Ethernet | ¥2800-3800 | Top industrial pick, large factories / export |
| Zebra | ZD230 | 203 ⚠️ | 104mm | USB + Ethernet | ¥1500-2000 | Entry-level, not recommended for fabric |
| TSC | TE344 | 300 | 108mm | USB + Bluetooth + serial | ¥1500-2200 | Common on apparel hang tag lines, reliable |
| TSC | TTP-244 Pro | 203 ⚠️ | 108mm | USB + serial | ¥1100-1500 | Older model, avoid |
⭐ = Strongly recommended ⚠️ = 200 DPI, not recommended for the fabric industry
What to avoid
Don't buy any of these
- Any cheap 200/203 DPI model — blurry small Chinese text / QR codes won't scan, not suitable for fabric hang tags
- Buying a model from this table for "phone-app Bluetooth printing" — this table is for computer (USB / network) printers; for phone-app / Jenny PDA Bluetooth printing, use the Dascom TL-332 / TL-333 (see Bluetooth / Mobile Label Printing)
- ¥199 knockoffs of "Xprinter / Qirui" on Taobao — closed-source drivers / incomplete command sets / poor app compatibility
Matching consumables
The printer and label paper must be matched:
- Recommended for fabric hang tags: 250-300g coated thermal tag stock with pre-punched holes (for threading string to hang)
- Common sizes: 70×40mm / 80×50mm / 100×60mm (choose based on how much information you need)
- Buy matching consumables from the printer manufacturer's official store to avoid low-quality paper that jams or fades quickly
Installation steps
Step 1: Install the driver
- Download the driver from the printer brand's official website (download links: see Printer Driver Downloads)
- Double-click the installer and follow the prompts
- Connect the printer to your computer with a USB cable
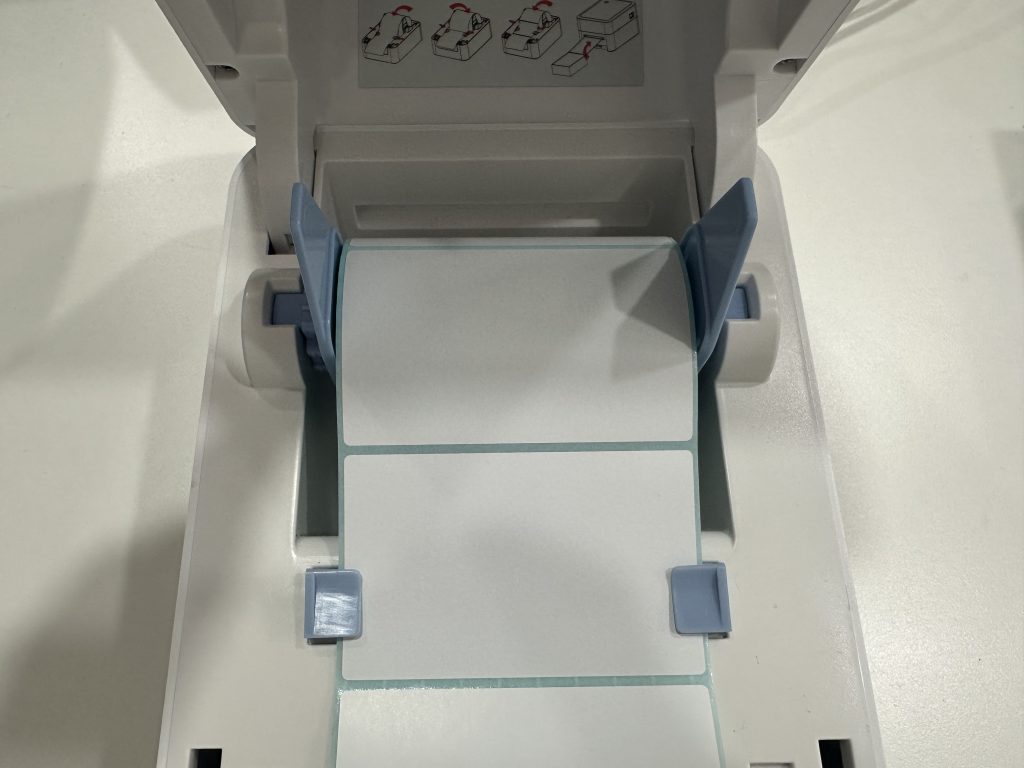
Step 2: Load the label paper
Using 70mm × 40mm label paper as an example:
- Open the printer cover
- Place the label roll into the paper compartment, centered
- Feed the leading edge of the labels under the printhead
- Fix the paper guide rails (on the bottom or side of the printer) so they grip both sides of the label paper
Important
The paper guide rails on the bottom must be adjusted to match the width of the label paper and locked firmly in place, otherwise you'll get severe paper jams. This is the most common problem.
Step 3: Create a new paper size
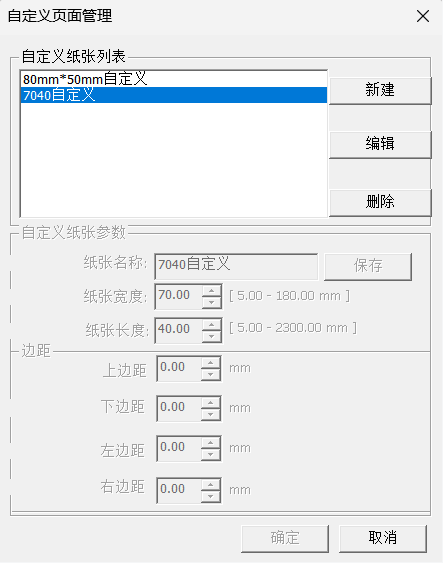
If the label paper size you use isn't in the printer driver, you'll need to create it manually:
Windows 11 steps:
- Open Settings → Bluetooth & devices → Printers & scanners
- Find your thermal printer and click it
- Click Printing preferences
- Find the "Paper Management" button on the Page tab
- Click "New" and create a common size:
- Name:
70x40mm - Width:
70 mm - Height:
40 mm - Margins: all set to 0
- Name:
- Click Save
Common label paper sizes:
| Size | Width × Height | Purpose |
|---|---|---|
| 70 × 40mm | Most common | Standard fabric hang tag |
| 80 × 50mm | Medium | Hang tags with more information |
| 100 × 60mm | Large | Large labels for trade shows |
| 40 × 30mm | Small | Minimal labels |
Step 4: Set as default paper
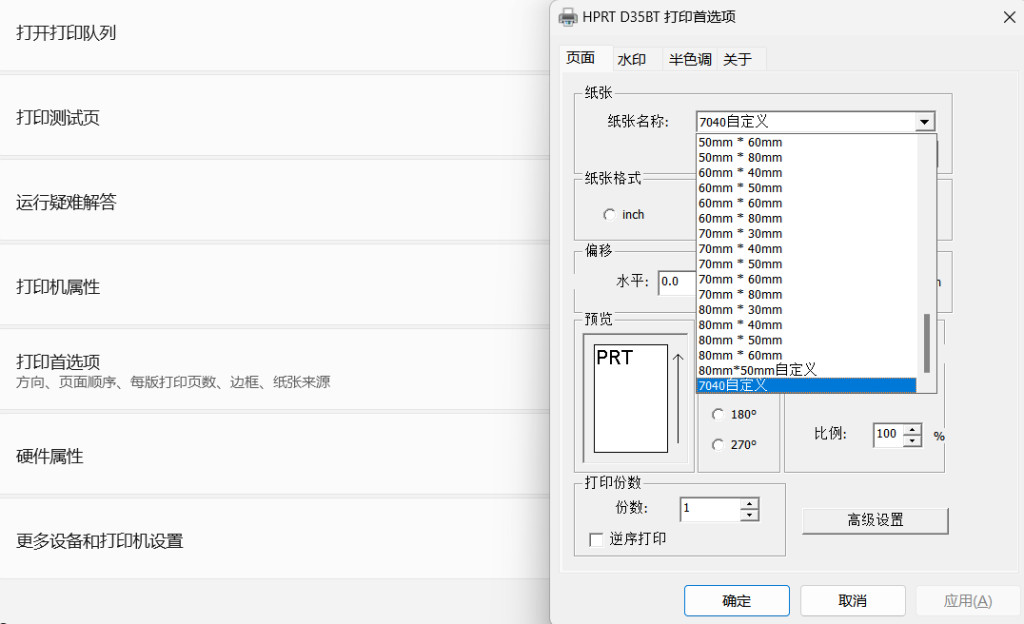
- In Printing Preferences, set "Paper Size" to the
70x40mmyou just created - Click OK to save
- From now on every print job uses this size by default—no need to select it manually each time
Printing in Jenny Software
- In the sample room, check the samples → open the sample basket → click "Print Labels"
- Choose the matching label template (such as 70×40mm)
- If you mainly use this size, click "Set as Default"
- Click the "Generate Labels" button; the print page opens in a new browser tab
- Click "Print Directly"; if the printout isn't sharp, click "Generate PDF" to have the server render a high-definition PDF and print that
- Confirm the paper size is set to 70×40mm
- Click print
For detailed label design and template management, see Label Printing Setup.
FAQ
Printout shifted/not centered?
- Check that the label paper is loaded centered
- Check that the paper guide rails are locked in place
- Confirm that the paper size in Printing Preferences matches the actual label paper
- Fine-tune the element positions in the label designer
Printing blank?
- Check that the label paper is face up (the coated side of thermal paper faces up)
- Try scratching the label paper with your fingernail—the side that leaves a black mark is the front
- Check whether the printhead needs cleaning
Constant paper jams?
- Most common cause: the paper guide rails aren't locked in place
- Check that the label paper is loaded centered
- Check for scraps of paper left in the compartment
- Try a different brand of label paper (some low-quality paper jams easily)
Having to choose the paper size every time?
You probably changed the paper size temporarily in the print dialog rather than setting it permanently in printer preferences. Follow "Step 4" above to set it as the default in Printing Preferences.
Related articles
- Label Printing Setup — label design, data variables, the three label types
- Mac Printing Setup — printing configuration on Mac
- Printer Driver Downloads — driver download links by brand
- Printer LAN Sharing — share one printer across multiple computers